Using Named Queries - Example
A Named Query Example
Here we will go over the steps necessary to put together a basic named query. This example will create a Named Query that uses a single parameter to run a select query, and then add a Table to a window and create a binding that uses our new Named Query.
We are going to be querying a table in the database that holds information about products stored in storage bays. The database table is named "containers" and has the following structure.
| id | StorageBay | ContainerType | ItemName | Weight | Time |
|---|---|---|---|---|---|
| 1 | 1 | Jug | Vanilla | 25.2 | 2017-06-25 15:58:47 |
| 6 | 1 | Mason Jar | Chocolate | 12.3 | 2017-06-26 16:05:27 |
| 18 | 2 | Tray | Swiss Cheese | 88.8 | 2017-06-25 01:21:31 |
| 22 | 3 | Tray | Cheddar Cheese | 54.7 | 2017-06-25 03:52:16 |
| 23 | 3 | Basket | Strawberry | 36.8 | 2017-06-25 15:56:03 |
| 31 | 3 | Jug | Whole Milk | 80.1 | 2017-06-27 09:51:31 |
| 32 | 3 | Jug | Fat Free Milk | 76.9 | 2017-06-27 09:52:52 |
If you want to follow along with the example, feel free to make a database table that looks similar to this one and add as many rows of data as you would like, otherwise, you can use your own and substitute in the proper column names from your database.
Creating a Named Query and Adding Security
-
Start by opening up the Designer and loading a project.
-
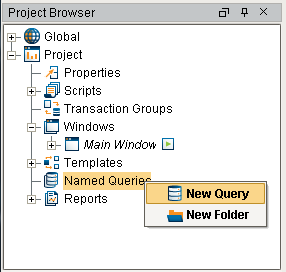
Locate the Named Query section of the project browser, right click on it, and select the New Query option.
-
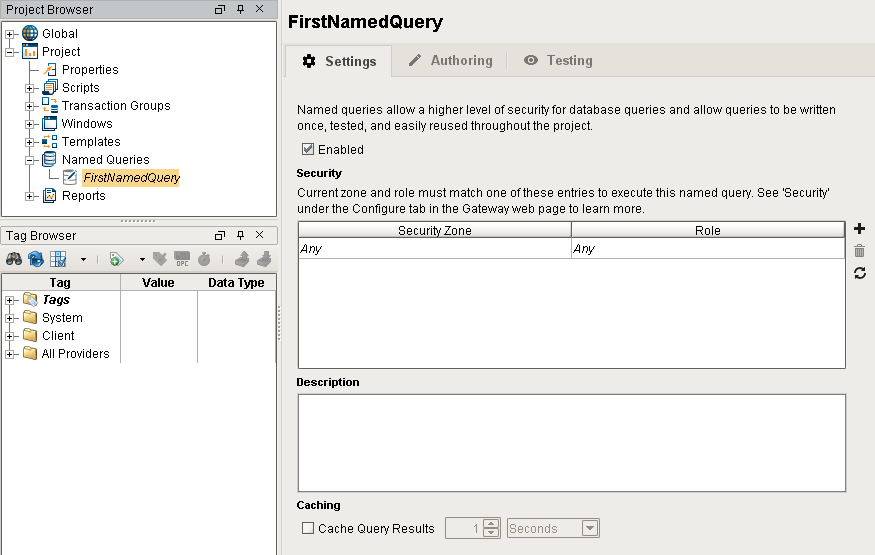
You should now have a fresh Named Query that you can rename whatever you want. It is named FirstNamedQuery for this example.
-
To setup security on the Named Query, set required Security Zone and Role combinations in the Security table of the Settings tab. You can leave this blank if you don't have roles or zones set up yet.
-
If multiple security combinations are required, use the plus (
 ) button to add additional rows.
Building the Query
-
Click on the Authoring tab. Here is where we do most of the work.
-
Under Database Connection, we need to select a database connection that this named query will use. I selected
<Default>. -
For the Query Type, we can decide what type of query this will be. For this example, I am running a select query that will return a dataset, so I selected Query.
-
In the Parameters section, we can decide on a list of parameters that will be used in this query. My query is fairly simple, and will only use a single parameter. Click the plus (
) button to add a new parameter and set the following values:- Type: Parameter
- Name: BayNum
- Data Type: Integer
-
In the Query section below, we will construct our query using the Table Browser.
- Right click on the containers table in the Table Browser on the right, and click on Create SELECT Statement. This will populate our query field with a basic select all statement.
- Type into the Query field and add the following WHERE clause: "WHERE StorageBay = "
- Now drag the BayNum parameter from the Parameters table to the end of the query you just typed. Notice ":BayNum" will be added at the end of the query.

Using the Query
- In the Project Browser, create or open a Main Window.
- Drag a Dropdown List component onto the window.
- The Dropdown List is where we will be able to select a Bay Number to use as our Named Query's BayNum Parameter. Use the Dataset Viewer to set the Data property of the Dropdown to look like this:
| Value | Label |
|---|---|
| 1 | Bay 1 |
| 2 | Bay 2 |
| 3 | Bay 3 |
-
Now drag a Table component onto the window. We can setup a Named Query binding on the Data property.
-
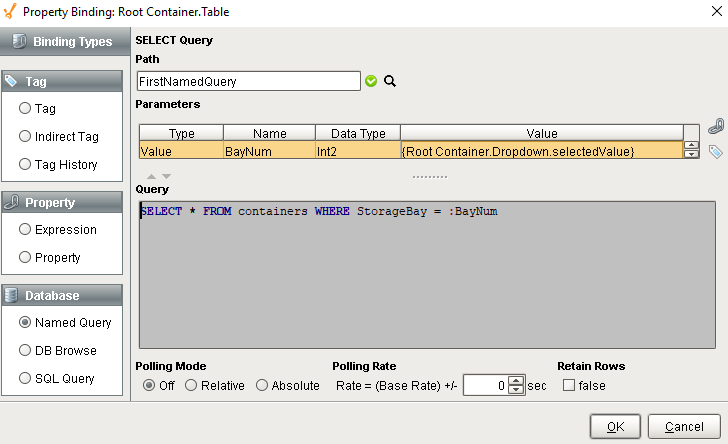
Click on the binding icon for the data property and select the Named Query binding type.
-
Set the Path property by clicking on the magnifying glass (
 ) button and selecting your new Named Query from the list. In my case it is FirstNamedQuery. Alternately, we can type the name in.
 -
Highlight your BayNum Parameter (in the Parameters table) and click on the property binding (
 ) icon. We want to select the Selected Value property of our Dropdown List.
 -
Finally, we want to ensure the Polling Mode is set to Off. This means the query will not run continuously, but will only run when it changes such as when a new bay is selected from the dropdown.
-
Click the OK button to save your binding, and put your Designer into Preview Mode to test it. We can then make a selection (i.e., Bay 3) with our dropdown, and see our table populate with data.
