Query Builder
Crafting Queries with the Query Builder
Many places in Ignition that allow for SQL queries have a link to the SQL Query Builder tool. The Query Builder is a powerful Drag-and-Drop query building GUI that allows you to make complex queries from your connected databases. While a basic understanding of SQL helps make the most of the Query Builder tool, most people will have no problem creating effective queries after a brief tutorial. Additionally, the Query Builder does go over many advanced features of SQL that may be unfamiliar. We suggest looking up how these work in your favorite SQL resource guide as this covers how to use them, not what they do.
Builder Anatomy
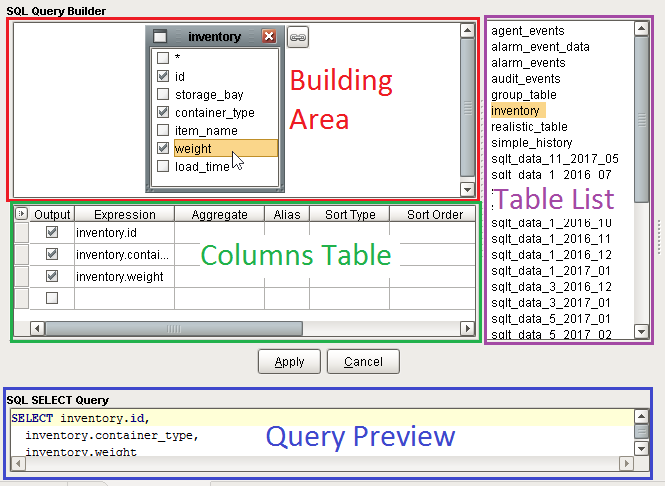
Once opened, the Query Builder has the following items:
- Building Area: Visualizes the table relationships of all tables included in the query. Tables are typically dragged in from the Table List.
- Columns Table: Shows which columns from all tables are referenced in the query.
- Table List: Shows all database tables in the selected Database Connection.
- Query Preview: Shows a preview of the query that will be created once the Apply button has been pressed.
Opening the Query Builder
The Builder can be accessed from several different resources in Ignition, notably when using Named Queries and setting up Report Data. To use the Builder, click the Show Builder button.
![]()
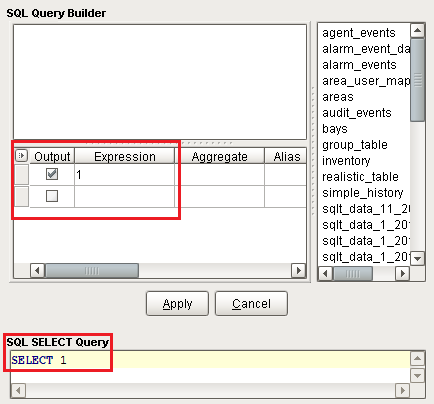
Clicking this button will open the Builder workspace with an empty query. If a query was already written before the button was pressed, then the Builder will attempt to load the query into the Builder's interface. For example, if the following query was typed before pressing the button:
SELECT 1
The following would be loaded into the Builder's workspace. Note that the Building Area is empty, because we're not querying from a table.
The Builder attempts to parse your query based on the Syntax Parser.
Using the Syntax Parser
When starting with a pre-existing query, the Syntax Parser tells the Builder which implementation of SQL your query's syntax is using. In most cases, this can be left with the default value of Universal. When set to a specific implementation of SQL, this allows the Builder to understand/accept implementation-specific keywords and syntax.

Syntax Parser in Action
In MySQL, query results may be limited with the LIMIT keyword:
SELECT
    *
FROM
    myTable
LIMIT
    100
Attempting to open the Builder while using LIMIT, and the Syntax Parser is configured to a syntax that does recognize the LIMIT keyword, will result in an error:

In these scenarios, you can switch to a syntax that supports the query, or remove the offending lines.
Using the Builder
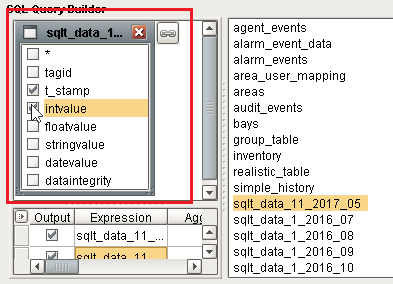
Once the Builder is open, (and if you have tables in your database connection), you can start building a query by dragging and dropping a table from the Table List into the Building Area. From here, you can select which columns on the Table Object you want to bring into the query, or drag and drop them into the Columns Table below.
The * option at the top of the table is special. If the * character is selected, then all columns from the table will be included in the results just like a "SELECT * " query.
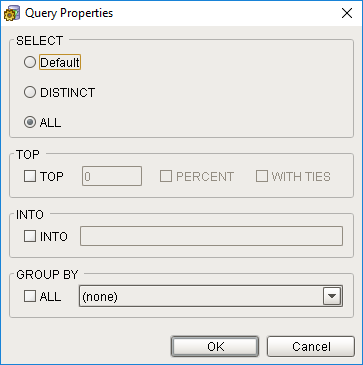
Query Properties
Right clicking on the empty space in the Building Area and selecting properties will bring up the Query Properties window that allows you to customize how the query works. How it looks and what it contains can vary, depending on what syntax parser you have selected.
| MySQL Query Properties | MSSQL Query Properties | PostgreSQL Query Properties |
|---|---|---|
 |  |  |
Joining Tables in the Query Builder
Multiple tables may be added to the Building Area. Once there, the Builder can JOIN the two tables by dragging from one column in a table on to another column on a different table.

Note that "tagid" and "id" are now linked together. This means the resulting query will JOIN the two tables based on the linked columns. Much like a SQL JOIN, the joining columns do not need to be selected to be utilized in the JOIN.
Joins Right-Click Menu
Right-clicking on the link will create a menu that allows you to remove the JOIN, as well as access properties of the JOIN.
Additionally, you can select all rows from one of the joining tables, which effectively creates a RIGHT OUTER JOIN or LEFT OUTER JOIN, depending on which table you select.

Join Properties
Clicking on Properties on the Right-Click Menu allows you to view the relation between each table, as well as apply LEFT or RIGHT JOINs, as mentioned above.

Columns Table
The Columns Table allows you to modify individual columns in the query. Typically, this allows you to add aggregates or aliases to each column from the Builder. Each row represents an expression, or combination of functions, columns, variables, and constants that will ultimately be a single column in the resulting query.

Right-Clicking on an Item
Right-clicking on a row of the Columns Table brings up a menu with the following options:
| Option | Description |
|---|---|
| Move up | Moves the selected row up in the table. This means the column will appear in the query results prior to the other listed columns. |
| Move down | Similar to move up, but moves the row down, or towards the end of the listed columns. |
| Delete item | Removes the row from the Columns Table, effectively removing it from the resulting query. |
| Insert empty item | Adds a new row to the Columns Table with blank values. |
Field Description
Each column in the Columns Table allows you to modify the resulting query in some way. The following is a description of each column:
| Option | Description |
|---|---|
| Output | Specifies if the row should appear in the resulting query. Disabling a row on the table removes the column from the results. |
| Expression | The column from one of the tables in the Building Area that this row represents. Left-clicking on this field will create a dropdown list of possible rows. |
| Aggregate | Allows you to aggregate the expression. Blank by default (no aggreggate), configuring this column allows you to do things like sum column, or return the average. Possible values are: - Blank (no aggregation will be performed) - Avg - Count - Max - Min - Sum You can also add the Distinct keyword to any non-blank option. For example, you could enter "Sum Distinct" or "Count Distinct". |
| Alias | Creates an Alias, or alternative name for the column. Effectively adds the SQL "AS" keyword to the column, which allows you to rename the resulting column. |
| Sort Type | Sorts the results based on this column. Enabling a Sort Type is similar to added an ORDER BY to your query. Possible values are: - Blank (no sorting on this column will be performed) - Ascending - Descending |
| Sort Order | When a Sort Type has been specified on multiple rows, this determines which row the query will sort on first. |
| Grouping | Allows you to group the results. Adds a GROUP BY statement to the resulting query. Enabling grouping on one of the columns makes the Criteria for column appear. |
| Criteria for | A dropdown list that sets how you want the Criteria column to apply to the grouping. Does not apply if both Grouping and the WHERE clause Criteria are not being used. - For Values will place the WHERE clause specified in the Criteria column first, filtering out rows that don't apply, and then applying the grouping. - For Groups will instead change the WHERE clause into a HAVING clause that is used to filter after the grouping has taken place. |
| Criteria | Allows you to add a WHERE clause. Supports the use of both the OR and AND keywords for multiple conditions. Example: assuming a column named "myColumn", we could limit the results of our query to rows where myColumn has a value greater than 10 AND less than 100:  |
| Or... | Allows you to add an additional condition to a WHERE clause. Will separate each grouped condition with "()" characters to maintain logic. |
The Query Builder is a third party tool that we brought into Ignition and while we go over how to use it here, you can also check out the Active Query Builder's documentation for more information on how this feature works.