Looking to upgrade to 8.3? Check out our upgrade guide!
This is documentation for Ignition 7.9, which is no longer actively maintained.
For documentation on the latest stable release, see the latest version (8.3).
Version: 7.9
Project Properties
There are a number of properties you can set for your projects within the Designer, Vision Clients, and Mobile devices. For example, there are properties for setting the touchscreen mode, customizing a client's auto-login, or configuring how the clients receive updates, and many more.
The property settings on the Project Property window apply to the whole project. This page identifies and describes all the available project properties.
In the Designer, either double-click on the Project > Properties node in Project Browser, or click on Project > Properties on the menu bar at the top of the Designer. Project properties span several functional areas each containing settings applicable to that area.
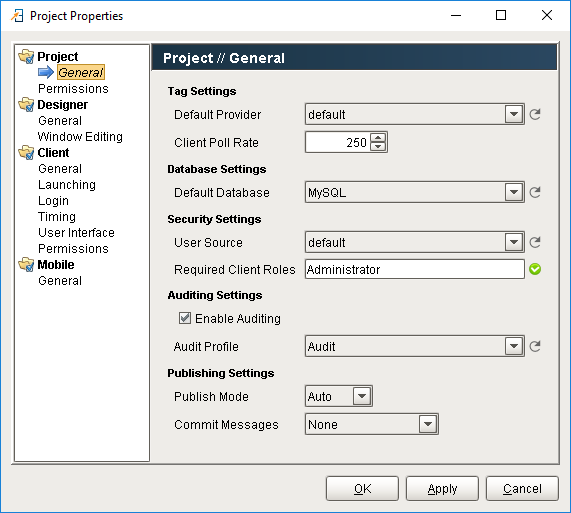
A project's General properties apply to the project as a whole, across all module functionality. For a new project, there are many default settings that you can use (see next). For example, there are default settings for the Tag provider, database, publish mode, initial comm mode, window editing, and Client launching.
Note: There are a few properties of a project, such as its name, description, and title that are not available from the Designer and you need to set them in the Gateway. To do so, go to the Gateway Webpage, under the Configuration > Projects section, click on the edit link next to the project. You cannot edit these settings while the project is open in the Designer.
Important Concept: Defaults
Under Project > General is where you set the project's Default Database and its Default Tag Provider. It is important to understand how to use defaults effectively for proper project design.
Wherever you use a database connection or a Tag in a project, you are always given the option to use the project's default, or an explicitly named connection or provider. If your project is like most typical projects, it primarily uses a single database and a single Tag provider. By consistently using the default option, you make your project more resilient to change.
For example, suppose you have a project, and it has a database connection named Production_DB. Now you want to adapt the project to a new, similar plant, while leaving the existing project intact. You copy the project and create a new database connection, named New_DB. If your project consistently used its default database connection, the switchover will be as simple as changing the copied project's default database. However, if you used the explicit Production_DB connection in your groups and screens, you will need to laboriously switch the bindings over to New_DB.
The Tag provider chosen here will act as the project's default tag provider. To use the default provider, simply omit the source section of a Tag path, or leave it blank, for example: Path/To/MyTag or []Path/To/MyTag. See also: Keeping Tags Organized
Client Poll Rate
The Client poll rate (in milliseconds) is the rate at which a Vision Client or Ignition Designer polls the Gateway for updates to its subscribed Tags.
This is the default database connection to use for this project. To use the default database connection, use the special <default> connection, or in scripting, the empty-string connection "".
Choose the User Source that governs this project's security: specifically, which group of users (User Sources) is allowed to log into the client. The User Sources are all defined in Gateway's Configure section under the Security > User, Roles page.
Required Client Roles
This property is for Client logins, and determines what role(s) a user must have before they can log into the Client. You can optionally specify a list of roles that are required for a user to log into this project. Use commas to separate the roles. Users must have at least one of the roles in order to log in. If no roles are specified, the user only needs to correctly authenticate with the User Source in order to log in. To define the roles, go to the Gateway's Configure section under the Security > User, Roles page, click the manage users link, and then go to the Roles tab. See also: Security
Here you specify how project publishing is handled. By default, the project is set to Auto, which means both the staging and published version of the project will always be synchronized.
Manual: In this mode, you can do a File > Save to update the Staging version, and then a File > Publish to update the Published version.
Auto: In this mode, the only command available for saving your project is File > Save and Publish which saves and then publishes, so the two Staging and Published versions are always the same.
You can specify whether or not commit messages are required, and if so, under what conditions. You can specify the condition as: None, OnPublish, or OnSaveandPublish.
The Designer starts up in the default Comm Read-Only mode. The property allows you to change the mode the Designer starts in when viewing the project. The options are: Comm Off, Comm Ready-Only, Comm Read/Write.
Comm Off - In this mode, all database query traffic and Tag subscriptions and writes are blocked.
Comm Read-Only - Tag subscriptions and SELECT queries work, but Tag writes and UPDATE/INSERT/DELETE queries are blocked.
Comm Read/Write - The Designer may freely request tag and database values from the Gateway, as well as write or change these values.
Prompt - By default, every time you close a window, you are prompted whether or not you wish to commit the window: i.e., maintain any changes that have been made in the Designer session.
Always - This option allows you to skip the commit prompt, opting to always commit the window on close.
Template Auto-Commit
On - Automatically commits template definitions when switching to another window or template.
Off - In this option you commit the templates manually, it reverts all changes to the last time the window was committed.
Component Manipulation - Affects how the user interface acts in manipulating components
Property
Description
Constrain to Parent Container Bounds
Disabling the constraint on parent bounds allows you to position components outside of their parents bounds, which can be helpful in advanced layouts.
Nudge Distance
The number in this box is the distance (in pixels) that a nudge moves (when using the arrow keys) or resizes a component.
Alt-Nudge Distance
The number in this box is the distance (in pixels) that an alt-nudge moves (when using the arrow keys plus the Alt key) or resizes a component.
Default Component Layout - Used for all newly added components
Property
Description
Layout Mode
Relative - All newly created components will be configured with a Relative layout, further configured by the Relative Layout Options property.
Anchored - All newly created components will be configured with an Anchored layout, further configured by the Anchored Layout Options property.
Relative Layout Options
When the Layout Mode property is set to Relative, these options determine the layout options of new components. For more information, refer to Component Layout.
Anchored Layout Options
When the Layout Mode property is set to Anchored, these options determine the layout options of new components. For more information, refer to Component Layout.
Default Color Mapping
The initial color mapping when configuring a new number-to-color binding.
The Vision Client can emulate any timezone. By default, it will appear to be in the same timezone as the Gateway Timezone. This has the effect of all Clients behaving the same, regardless of the timezone setting on the Client's host operating system. Depending on your project's requirements, this may not be optimal. You can have the Client use the host's timezone by choosing the Client Timezone option, or you may specify any explicit timezone for all Clients to emulate.
Update Mode - Affects how Clients receive updates when the project is saved/published
Property
Description
Notify
This is the default option, which means that a notification bar will appear at the top of the Client when an update is available. The update gets applied when the user clicks on the notification bar.
Push
This option automatically pushes all project changes and updates to all running Clients with no user interaction. This is often desirable when a Client is running in a situation where mouse access is inconvenient, such as a large overhead display.
All Clients can operate in touch-screen mode. When enabled, clicking on editable numeric and text entry fields (i.e., Text Fields, Numeric Text Fields, etc) will pop up on-screen keyboards that can be used for data entry. You can optionally set the width of any scrollbars (number of pixels wide/tall).
Touch Screen Mode Active on Startup
Configures the Clients to start up with the touch-screen mode active. More details can be found on the Using Touch Screen Mode page.
The Clients normally maintain a cache of data retrieved from Tags History, improving repeat operations on graphs and tables. When this option is disabled, no data is cached, and the full queries execute against the Gateway each time data is required.
Determines the mode on Clients launched from the Launch button that appears next to the project in the Gateway Home page. Available modes are Windowed or Full Screen.
Windowed Button/Full Screen Button
Each launch mode can also be enabled individually, which allows that mode to appear in the Dropdown list next to the Launch button on the Gateway Home page.
The image specified here is used to represent the project on the launch page and desktop shortcut. This needs to be a path to an image that has been uploaded to the Gateway. Use the browse button to choose or upload a new image.
This property is displayed as the project is launching through Java Web Start, as well as in the JWS application manager.
Homepage
A URL that is displayed in the JWS application manager.
Width
The width of the Client window when launched in Windowed mode.
Height
The height of the Client window when launched in Windowed mode.
Screen Index
The number here is the index of the screen to use for Full Screen mode, it starts at 0. This property is not supported on all operating systems.
Start Maximized
If the box is selected, when the Client is launched in Windowed mode, it starts maximized. Note that this is not the same thing as Full Screen mode, which is only available when the Client is launched in Full Screen mode. In Full Screen mode, the width, height, and start maximized properties have no effect. When launched in Full Screen mode, the user is given an Exit button on the login screen by default. For terminals where the application should not be exited, this button can be removed by checking the Hide Exit Button box.
Hide Exit Button
If the box is selected, when the Client is launched in Full Screen mode, the exit button is hidden to prevent the application from closing.
Client Memory - Governs how the Client use RAM resources on its host machine
Property
Description
Initial
The initial memory setting is how much memory the Client will require on startup. While this is typically left alone, boosting it a bit can improve performance somewhat.
Maximum
The maximum memory setting sets a cap on how much memory the Java VM is allowed to use. When you launch a Client on a machine with plenty of RAM, you'll also need to boost this setting to allow the Client to use more RAM.
By enabling auto-login, you can have the launched Client skip the login process. The Client will log in behind the scenes using the credentials supplied here. If they fail, the login screen will be presented. See also: Setting up Auto Login
Enable Single Sign-On for the project. The Project's default Authentication Profile must use Active Directory, and SSO must be enabled in the Profile. See Active Directory Authentication for more details.
The base rate, in milliseconds, for all polling bindings.
Connect Timeout
The maximum amount of time to wait for connections to the Gateway to be established. Specified in milliseconds.
Read Timeout
The maximum amount of time for socket connection to the Gateway to remain open. Specified in milliseconds.
Connection Concurrency
By default, Clients are not limited by the number of concurrent connections to the Gateway. These connections are used to send Tag writes, return database results, as well as any other action that requires information to be passed between the Gateway and the Client. Depending on what is running in the Client, your network's bandwidth could be hindered. Enabling this property will limit the amount of concurrent connections the Client can maintain. Note that this may negatively impact Client performance, but is usually preferable on busy networks.
Typically, a Vision Client is designed to run on multiple different resolution and sizes of monitors. The various component layout features help design elastic screens, but sometimes you need to set a lower bound as to how small you'll allow the Client's usable area to shrink. This is what the Minimum Size settings are for. You can see these settings visually represented in the Designer as lines on the Vision workspace when the Root Container is smaller than the configured Minimum Size. Whenever the usable space shrinks smaller than these bounds, scrollbars will appear, capping the width and height to these minimums. This defaults to 800x600. In the image below, the project was set to a minimum size of 400 x 300. Since the window is smaller, the outline is visible.
Client Background Color
This option allows you to specify the color of the Vision workspace which will be visible when not obscured by windows.
Client Menu - Options to alter the appearance, or remove completely, the menu bar that appears in a running Vision Client
When windows are docked on adjacent sides, this property determines which sides should take precedence. When set to "East/West", windows docked to the East or West sides will expand vertically from the top to the bottom of the Client, and will push any North or South docked windows out of the way.
Prevent Popup/Docking Overlap
By default, popup windows are not allowed to overlap any docked window. Disabling this property will allow Popup windows to be placed on top of docked windows in the client.
Infinite Desktop
By default, the desktop area will be expanded if floating windows are dragged out of frames. If false, popups are prevented from being dragged beyond the bounds of a window so they don't get distorted.
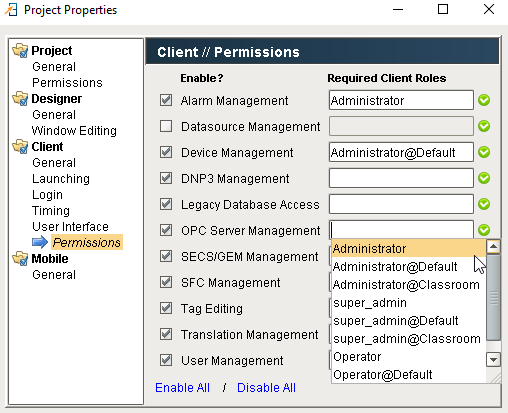
These properties allow you to limit the Client's ability to perform certain tasks. The tasks are grouped by category. Access can be configured statically for all users, or require specific roles.
Property
Description
Enable?
Determines if the Client has access to this category. If unselected, the category will be disabled in the Client for all users. If selected, the Required Client Roles text field will also be used to determine if the Client has access.
Required Client Roles
A comma separated list of Managing Users and Roles and/or Security Zones that have access to the category while the Enabled checkbox is selected. While these fields have focus, the down arrow key on the keyboard may be pressed to make a list of available roles appear. There are several ways to use roles and zones in this field, and they can be used together in the comma separated list.
Blank Field - anyone can use this, regardless of their roles.
Role name - users with this role can use this regardless of their zone.
roleName@zoneName - users must have this role AND be logged in from this zone.
Note that when you create a new project, all of these settings will be disabled by default.
Category Descriptions
The following is a list of the initial categories. Note that the categories you see in your Designer are dependent on which modules are installed on the Gateway. Additionally, third-party modules can add to this list.
Alarm Management - Allows the Client to cancel, shelve, and acknowledge alarms. Applies to both local and remote Alarms.
Datasource Management - Allows the Client to modify datasources.
Device Management - Allows the Client to modify devices.
DNP3 Management - Allows the Client to freeze DNP3 operations via scripting.
EAM Task Execution -
New in 7.9.12
Allows the Client to execute system.eam functions.
Legacy Database Access - Allows Client database access outside of named queries ad Transaction Groups.
OPC Server Management - Allows the Client to modify OPC server connections.
SECS/GEM Management - Allows the Client to disable equipment or delete programs via SECS/GEM scripting.
SFC Management - Allows the Client to start or stop Sequential Function Charts.
Tag Editing - Allows the Client to add, edit, or delete Tags through scripting.
Translation Management - Allows the Client to modify translations in the localization system.
User Management - Allows the Client to modify schedules, holidays, and users through scripting or components.
The image below contains the following configuration:
Alarm Management is only available if the logged in user has the "Administrator" role (regardless of their current zone).
Datasource Management has been disabled for all users.
Device Management is available if the logged in user has the "Administrator" role and the Client is in the Security Zone named "Default".