Gateway Security
By default, the Configure section of the Gateway is password protected, and this cannot be removed. You can also optionally protect the Status and the Home sections of the Gateway webpage. The roles that are required to access any of these sections can be changed in the Configure section of the Gateway webpage under System > Gateway Settings.
The default username and password for the Configure and Status sections of the Gateway is:
username: admin
password: password
Changing the 'admin' Password
When Ignition is first installed, a default "admin" user automatically gets created. Once you're logged into Ignition, you have access to everything in the system as the 'admin' user. You can modify projects, add users and roles, add database connections, setup the Gateway, and literally do everything.
The first step in securing your Ignition installation is to change the default username/password for the 'admin' user.
-
On the Gateway webpage under the Configure section, go to Security > Users, Roles. The default user source contains the 'admin/password' combination to access the Configure section.
-
Click on manage users and you will see the admin user.
-
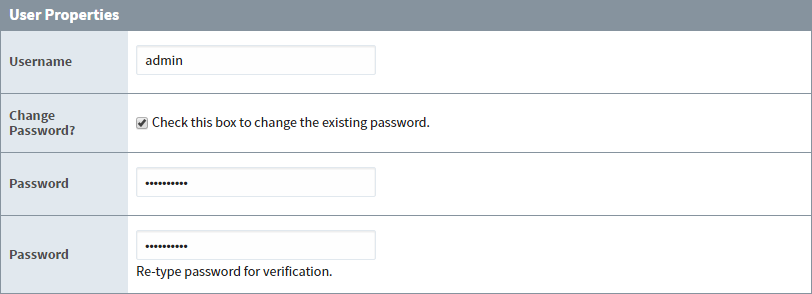
On the right side, click edit to change the password for the admin user.

- Click the checkbox to change the existing password.
Enter the new password, then re-type the new password to confirm it.
-
When you're finished, click Save Changes.
-
To test the new password, logout and log back in as the admin with the new password.
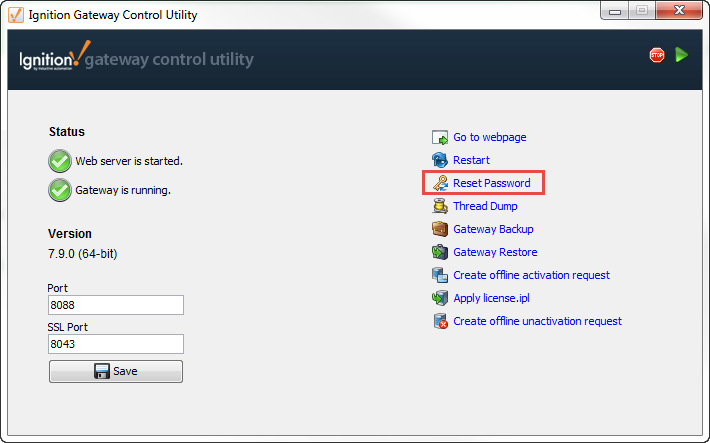
Password Reset
Ignition provides you with the capability to reset the admin password from the Gateway Control Utility (GCU). The default is user/password combination is 'admin/password,' and will grant access to the Gateway webpage. Normally, this is not considered a security risk because the GCU can only be used from the machine the software is installed on, which should be secure. However, it is important to know about this feature so that the GCU can be removed if the machine can't be properly secured, for example, when the server is also used as a client.
Locking the Gateway
You can set up security for the Gateway webpage sections and the Designer. The Gateway can use any existing authentication profile independent of any projects. Each of the Status, Home, and Configure pages can be restricted by role. Outside of logging into a Client, the Designer as well can require a special role.
Here is where you should start thinking about your security policy. Roles play an important part. Roles allow you to provide access to different areas of the Gateway (and project). We recommend that you create separate roles for the Gateway Configure Page, Status Page, Home Page, and Designer so that individual users only have access to specified areas where they will be working.
To Setup Security for the Gateway
-
Go to the Configure section of the Gateway.
-
Choose System > Gateway Settings from the menu on the left.
The Gateway Settings page is displayed. -
Enter the roles the user must have in order to access the Gateway Config Roles, Status Page Roles, Home Page Roles, and Designer Roles.
Each option can accept any number of roles as long as they are separated by commas. Also, if the option is blank, any user can log in. The Global Resource Protection will shelter the Global Resources (like Alarm Pipelines or SFCs) from edits by users without a matching role.

Enabling SSL
To enhance security in Ignition, you may opt to enable SSL encryption. This will affect all communication to and from the Gateway that is done over the HTTP protocol. This includes not only browsers interacting with the Gateway's web interface, but all Vision Client communication as well. Turning on SSL will encrypt all data sent over HTTP. This protects your installation from anyone "snooping" the data as it passes over the network. This may be important if data transferred between the Gateway and Clients is sensitive in nature. This also helps to thwart a security vulnerability known as "session hijacking".
To Turn On SSL
-
Go to the Configure section of the Gateway.
-
Choose System > Gateway Settings from the menus on the left.
-
Select the checkbox for Use SSL, and click on Save Changes at the very bottom of the page.
 After SSL is enabled, all Clients, Designers, and web browsers are redirected to the SSL port if they try to use the standard HTTP port. By default, the SSL port is 8043. You can change it to the standard SSL port of 443. To do this, follow the directions in Setting the Port.
If you are using a firewall, both SSL and HTTP ports must be open for a client to launch (i.e., 8088 and 8043). Following the initial connection, all traffic will happen over the SSL port.
-Dignition.https.sts.maxAge="47474747"
-Dignition.https.sts.includeSubDomains="true/false"
Each of those lines need to be added as a Java Additional Parameter to the ignition.conf file. Each parameter needs to be added as the next available uncommented parameter in the list of parameters. So if the last uncommented parameter is 4, then these lines should be added like the following:
wrapper.java.additional.5=-Dignition.https.sts.maxAge="47474747"
wrapper.java.additional.6=-Dignition.https.sts.includeSubDomains="true/false"
Once these have been added and Use SSL turned on, the Gateway can be restarted, at which point it will be using HSTS properly.
Do not place those parameters in the ignition.conf file without turning on Use SSL. If Use SSL is not turned on, those parameters may prevent your Gateway from starting.
When Using SSL
Ignition supports using SSL communications to the Gateway webpage as well as Client/Designer communication with the Gateway. It is highly recommended that you purchase an SSL certificate from a certificate authority if you turn this feature on. The procedures for How to Install a Genuine SSL Certificate are below.
Installing a Genuine SSL Certificate
When you turn on SSL in Ignition, the web browser uses what is called a "self-signed" certificate. This gives you the encryption benefits of SSL, but not the identity validation, and it isn't a "real" certificate. This is why a web browser will display nasty warnings to users that they shouldn't trust the website.
We are not able to ship a real certificate with Ignition because SSL certificates have to be purchased individually from a certificate authority, such as Verisign, GoDaddy, or Comodo.
This guide shows you how to purchase and install a real SSL certificate from a certificate authority and install it in Ignition. You'll need to be comfortable executing command-line programs to complete this guide. The examples in this guide assume a Windows environment, but the general procedure would be identical in Linux.
-
Install the Java Development Kit (JDK).
There are some command-line tools you'll need to use to create a certificate request and to install your certificate. These tools come with the Java Development Kit (JDK). It is likely that you only have the Java Runtime Environment (JRE) installed. Go to http://java.oracle.com and click on Java SE. Download the Java SE 6 JDK and install it. -
Open a command prompt.
Open a command prompt from Start > Run > cmd and change directory into your JDK tools directory.
cd C:\Program Files\Java\jdk1.6.0_24\bin -
Create your KeyStore.
SSL certificates for Ignition are stored in a file called aKeyStore. You'll need to create your ownKeyStorefile with a certificate in it before you can purchase the SSL certificate.- Enter the following command:
keytool -genkey -alias tomcat -keyalg RSA -keysize 2048 -keystore C:\ssl.key
you can put the file wherever you want for now, but you should call itssl.key - At the prompt, enter a password. Use the password:
ignition - At the prompt, you are asked for your
first and last name. Do not use your first and last name. This value must be one of the following for your Ignition Gateway:- Fully Qualified Domain Name, for example
secure.yourdomain.com - Public IP address, for example
202.144.8.10 - Full Server Name of your internal server, for example
scadaserver - Private IP address, for example
192.168.0.1
- Fully Qualified Domain Name, for example
- At the prompt, you are asked for information about your company. Input all data accurately, as the certificate authority needs to verify this information.
- Lastly, at the prompt, you are asked for the password for
alias <tomcat>. Press RETURN to use the same password as theKeyStorefile.
- Enter the following command:
-
Generate a Certificate Signing Request.
You have aKeyStorefile namedssl.keyat the root of yourC:\drive (or wherever you specified it to be in step 3a).
In your command prompt window, enter this command:
keytool -certreq -alias tomcat -file C:\csr.txt -keystore C:\ssl.key
It will prompt you for theKeyStorepassword (ignition). You now have a certificate request file atC:\csr.txt -
Buy the SSL certificate.
Now you need to get your SSL certificate signed by a certificate authority. When you go to a certificate authority (Verisign, GoDaddy, Comodo, and so on), they'll ask for your CSR, which is thecsr.txtfile that you created in step 4. Typically they'll ask you to paste your CSR into their web form. Open csr.txt in notepad, and copy-and-paste it into the certificate authority's form.
If prompted what software generated the CSR, choose Tomcat or Java. After the certificate authority has processed your payment and reviewed your CSR, they will send you your certificate via email. -
Install the SSL certificate.
After your SSL certificate has been emailed to you, follow the instructions provided for installing the certificate into a Java KeyStore. Your certificate authority provides these instructions. The following is the procedure for installing a Comodo SSL certificate, provided as an example:- Extract the certificate files that were emailed to you, in this example they were extracted to
C:\cert - Install the root certificate with the following command:
keytool -import -trustcacerts -alias root -file C:\cert\AddTrustExternalCARoot.crt -keystore C:\ssl.key - Install the COMODO intermediate certificate:
keytool -import -trustcacerts -alias INTER -file C:\cert\COMODOHigh-AssuranceSecureServerCA.crt -keystore C:\ssl.key - Install your server's certificate:
keytool -import -trustcacerts -alias tomcat -file C:\cert\192_168_1_7.crt -keystore C:\ssl.key
- Extract the certificate files that were emailed to you, in this example they were extracted to
-
Replace Ignition's default
KeyStore.
You now have a KeyStore file atC:\ssl.keythat holds your SSL certificate. The certificate alias istomcatand the password isignition. You can now replace theKeyStorefile that ships with Ignition with your file. Make a backup of the file atC:\Program Files\Inductive Automation\Ignition\tomcat\ssl.keyand replace it with yourKeyStorefile. You need to restart the Ignition service after replacing this file.
Make sure your SSL port is allowed through your server's firewall. The default SSL port is 8043, and can be changed to the standard SSL port (443) through the Gateway Control Utility (GCU).
If you have a redundant installation, you'll need to repeat this procedure on your backup server and buy a second certificate for it.
Metro KeyStore System Properties
ignition.conf file. Making these changes is similar to the process described under the To Turn SSL On header above. Thus:
wrapper.java.additional.5=-Dmetro.keystore.alias="New Alias"
wrapper.java.additional.6=-Dignition.ssl.keystore.alias="Another Alias"
Once these have been added, the Gateway must be restarted for the change to take effect. A listing of possible properties are shown below.
KeyStore File Path: $IGNITION/webserver/metro-keystore
| System Property | Default Value | Description |
|---|---|---|
| metro.keystore.password | metro | The SSL KeyStore password. |
| metro.keystore.password | metro-key | The alias of the target SSL KeyStore entry. |
| metro.keystore.password | The value of system property metro.keystore.password | The encrypted private key password. |
SSL KeyStore System Properties
KeyStore File Path: $IGNITION/webserver/ssl.key
| System Property | Default Value | Description |
|---|---|---|
| ignition.ssl.keystore.alias | tomcat | The alias of the target SSL KeyStore entry. |
| ignition.ssl.keystore.password | ignition | The SSL KeyStore password. |
| ignition.ssl.privatekey.password | The value of system property ignition.ssl.keystore.password | The encrypted private key password. |