Scheduling Actions
Scheduling Actions
Actions can be configured to run once the report has generated at the scheduled time. Each action has its own custom configuration interface to make adding and editing Actions simple. The Actions you can perform following report generation are Print, FTP, Save, Email, and Run Script. You can even have multiple actions on the same schedule. So you can save the report to the hard drive, as well as email it out to multiple users.
Before creating any Scheduling Actions, you must first create a schedule.
To create an Action, click the Actions tab, click the plus icon ![]() and select an Action. Actions can be deleted using the trash can button
and select an Action. Actions can be deleted using the trash can button ![]() , and executed immediately using the double arrow button
, and executed immediately using the double arrow button ![]() .
.

Print Actions
The Print Action is used to send a report to a printer that is accessible from a computer Ignition is installed on. Here are a list of property descriptions for the Print Action.
| Property Name | Description |
|---|---|
| Primary Printer | The primary method of printing the report |
| Backup Printer | A backup method of printing the report. Will print using this option if the Primary Printer fails. [Optional] |
| Print Mode | The mode to print the report in. Can be either Vector or Raster.
|
| Copies | The number of copies of the report that will print. |
| Print on both sides | Will attempt to print on both sides of a sheet of paper, if supported by the printer. |
| Collate | Orders the pages so that a complete report prints before the next copy prints, if applicable. |
| Use AutoLandscape Mode | Evaluates the page dimensions and determines portrait or landscape orientation. |
| Page Orientation | The orientation of the page. Can either be Portrait or Landscape. |

FTP Action
The FTP Action can be used to automatically upload your reports to a file server for backups or storage. Here are a list of property descriptions for the FTP Action.
| Property Name | Description |
|---|---|
| Server Address | The server address where the report file will be transferred. |
| Port | The port of the file transfer. |
| Folder Path | The folder path that the report file will be transferred to. |
| Format | The file format of the report. |
| Username | The username that will be used to access the FTP server. |
| Password | The password that will be used to access the FTP server. |
| SSL | Will use SSL encryption if True. |
| Filename | The name of the report file. The Filename property is constructed using the expression language. |

Save File Action
The Save File Action will save a copy of the report to any folder the Ignition server has access to, such as a local folder or network shared drive. Here are a list of property descriptions for the Save File Action.
| Property Name | Description |
|---|---|
| Folder Path | The folder path to save the report files to. This folder path is for the Ignition Gateway server. |
| Format | The file format of the report. |
| Filename | The name of the report files. The Filename property is constructed using the expression language. |

Email Action
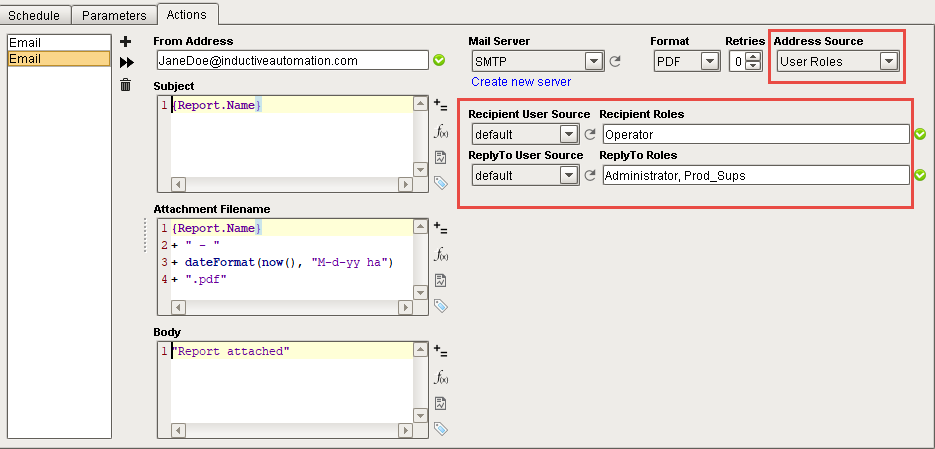
The Email Action distributes a report via email when the report is finished executing. There is a Recipients Source property that allows you to send emails using either Email Addresses or User Roles. The 'From Address,' 'Subject', 'Body,' and 'Attachment Filename' are all configurable. The Subject, Filename, and Body editors can utilize Expressions to dynamically add content or change names.
Email Server settings must first be configured on the Gateway webpage under Configure > Networking > Email Settings page, or in Email Actions and clicking the Create new server link. Once you create and save an SMTP profile, you can test your email settings for your mail server on the Gateway webpage under Email Settings.
Before you setup any reports to be emailed, an email server must be configured. To create an email server if one doesn't exist, use the 'Create new server' link. This link will take you to Configure > Email Settings on the Gateway webpage. There, you will be able to create an SMTP server. For more information, refer to Gateway Settings.
Here are a list of property descriptions for the Email Action.
| Property Name | Description |
|---|---|
| From Address | The Email address from which the report is sent from. |
| Mail Server | The mail server to use to email the report. If one doesn't exist, click on the Create new server link. Refer to Email Settings for more information on that page. |
| Format | The file format of the report. |
| Retries | The number of retry attempts if the email that was sent failed to be delivered the first time. |
| Address Source | Will decide how email addresses are collected. Can be either Email Addresses or User Roles. See the source property tables below for more information. New in 7.9.8 A new ReplyTo Email function was added, allowing you to reply to email actions using the Email Address and User Roles. This simply adds those emails to the "ReplyTo" header of the email sent to the recipient list, so that if recipients choose to reply to that email, their reply is sent to those email addresses as well. |
| Subject | The subject of the Email. The Subject property is constructed using the expression language. |
| Attachment Filename | The name of the attached report. The Attachment Filename property is constructed using the expression language. |
| Body | The body of the email. The Body property is constructed using the expression language. |
Email Address Source Properties
| Property Name | Description |
|---|---|
| Addresses | A list of email addresses |
| Method | The corresponding method of what to do with the email addresses. Options are To, CC, BCC, and ReplyTo.} |
User Roles Source Properties
| Property Name | Description |
|---|---|
| Recipient User Source | The User Source to pull users from that match the Recipient Roles to get an email. |
| Recipient Roles | A list of roles to match with users. Any user that has any of the listed roles will get an email. |
| ReplyTo User Source | The User Source to pull users from that match the ReplyTo Roles that will be listed in the reply to of the email. |
| ReplyTo Roles | A list of roles to match with users. Any user that has any of the listed roles will have their email listed in the reply to of the email that gets sent out. |
Configuring an Email Action
- In the Schedule panel, create a Schedule to automatically email a report by clicking on the plus icon
 , if you don't already have one.
 - Next, click on the Actions tab.
- Click on the plus icon , and select the New Email Action from the dropdown list.
- Enter the sender's email address in the From Address field.
- Select the Mail Server from the dropdown list. If one does not exist, click the Create new server link to create one.
- Select the Format from the dropdown list.
- Enter the number of Retry attempts in the event the email failed to be delivered the first time.
- You can send emails to users using either Email Addresses or User Roles. Under Address Source enter either Email Addresses or User Roles. Note, email recipients can choose to reply to the email if they prefer, since the email address is added to the 'Reply To" header of the email.
- Email Addresses - enter individual email addresses under in the Recipient and ReplyTo Emails area. To add multiple addresses, click the plus icon on the right side of the window. Next, specify the Method of how to send the email: To, CC, BCC, or ReplyTo.
- User Roles - select the User Source from the dropdown in the Recipient User Source field.
- In the Recipient Roles field, begin typing a configured role and Ignition will validate it.
- In the Reply to User Source, select the User Source from the dropdown. (Optional).
- In the RepyTo Roles field, enter the role(s) you want listed in the 'ReplyTo' header of the email. (Optional).
- Email Addresses - enter individual email addresses under in the Recipient and ReplyTo Emails area. To add multiple addresses, click the plus icon
- Enter in values for the Subject, Attachment Filename, and Body fields, or use the defaults.
Recipients and ReplyToEmails

Recipients Source - User Roles
Run Script Action
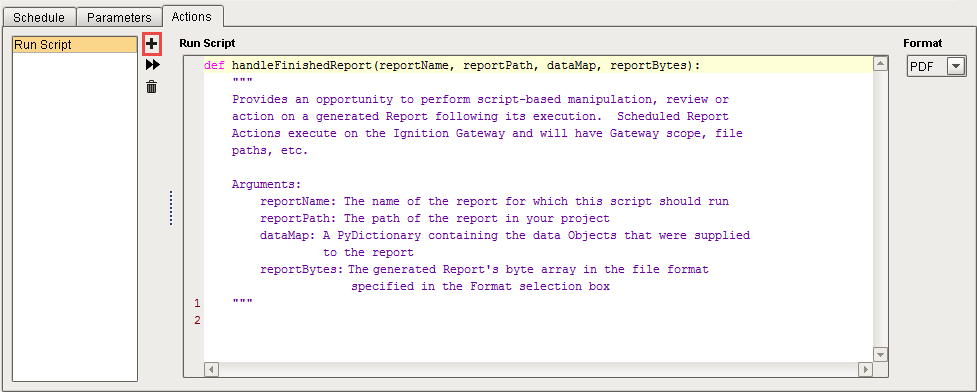
The Run Script Action allows you to store your report in a database, provide special email code, or anything else you can think of. Run Script exposes the function handleFinishedReport() which gives you the report name and path, a mapping of the report parameters and datasets, and the bytes in whatever format you want.
Here are a list of property descriptions for the Run Script Action.
| Property Name | Description |
|---|---|
| Run Script | An area where a script can be created to do something at the scheduled time. |
| Format | The file format that the reportBytes parameter should be. |
Arguments
The handleFinishedReport method has the following arguments:
| Argument Name | Data Type | Description |
|---|---|---|
reportName | String | The name of the report for which this script should run. |
reportPath | String | The path to the report in your project |
dataMap | PyDictionary | The Python Dictionary containing the Parameters and Data Sources that were supplied to the report. This argument allows you to directly access Parameters and Data Sources in the report. Note that once handleFinishedReport() has been called, the report has already been generated, so changing the parameters from this function will not alter the resulting report. Instead, parameters should be altered from the Parameters tab. |
| reportBytes | byte[] | The report, presented in a byte array. The format of the report depends on the format specified in the Format dropdown list. |
DataMap
The dataMap argument contains the raw data that was used to generate a report. Below is a demonstration using dataMap.
# The dataMap argument is simply a Python Dictionary with the name of each Parameter and Data Source
#  acting as a key.

# Assuming a Report Parameter named 'shift', the value of 'shift' may be accessed with the following
dataMap['shift']

# Similar syntax may be used to extract the value from a Data Source.
data = dataMap['myDataSource']

# Rows objects, while similar in nature to a dictionary, are different objects.

# Individual rows in the Data Source may be accessed by index.
firstRow = data[0]

# getKeys() may be called on a row to list all of the column headers in the row.
firstHeader = firstRow.getKeys()[0]

# getKeyValue() may be used to access the value of a column in the row.
firstColumnInRow = firstRow.getKeyValue(firstHeader)