Report Schedules
Execute and Distribute Reports Automatically
Perhaps one of the most compelling features of the Reporting module is the Scheduling system. Once a report has been designed, it can be run and delivered automatically without using a client. Since reports run on the Gateway, it gives you total flexibility when reports should run, and how they should be delivered.
Scheduling a Report
For any Scheduled Report, there are three settings that need to be configured:
- When the Scheduled report executes (i.e., date, time, and frequency). There can be multiple schedules on a report, and each schedule can be refined down to a minute resolution.
- What Parameters will be used to determine the report data. Can use the default parameter values or have new values passed in.
- The Actions that occur following report generation. There can be multiple actions per schedule.
It is important to note that schedules execute on the Ignition Gateway, not in the client. This means that schedules should be created to Gateway local time, not Client or Designer time. Reports can also be run in the client using the Report Viewer component.
Schedule Table
The Schedule Table is at the top of the Schedule tab and will display a list of all currently configured schedules and actions. A single report can have multiple scheduled times and actions configured, allowing it to be saved with different parameters, at different times, and with different actions.
Creating a scheduled report is easy. To add a new schedule click on the plus icon on the top-right corner of the Schedule panel. In doing so, you've created a new Schedule which can now be configured. To remove any rows, simply select the row in the table and click the delete button
on the right side of the panel. To configure the schedule, select it, and fill in the tabs below the table: Schedule, Parameters, and Actions.
Schedule Tab
The Schedule tab is where the scheduled time is set for the report to run. Schedules are driven via Cron formatted strings, a popular scheduling format used in computing. If you aren't familiar with Cron, don't worry, we've created an intuitive user interface that allows you to set schedules easily without having to learn anything new. The Schedule UI provides some convenient pre-made Common Settings. If there isn't a setting for you in the Common Settings combo box, choose one that is close and then simply customize it using any of the selection boxes below. For more information on the UNIX crontab scheduling, see the Scheduled Backups section.
You can also enable or disable the schedule by checking the Enabled option.
Parameters Tab
The Parameters tab is where you can override the default values of your parameters when the schedule runs. You can alter these default values to tailor scheduled reports without having to change the Report's design or configuration. For instance, imagine a report which summarizes how many widgets a factory produced during a given shift. Rather than create a separate report for each shift, we can create multiple schedules (one for each shift) and simply alter a shift parameter. Using Parameters and Schedules, users can avoid creating multiple reports while keeping projects more maintainable.
Each parameter of the report will be listed, and they can either be set to their default parameter value by selecting the checkbox, or can be customized by deselecting the checkbox and specifying a parameter value to pass in at the time the scheduled action executes.
In this example, the parameter "Line" is being overridden to the value of the "Reporting/ActiveRun" Tag.

Actions Tab
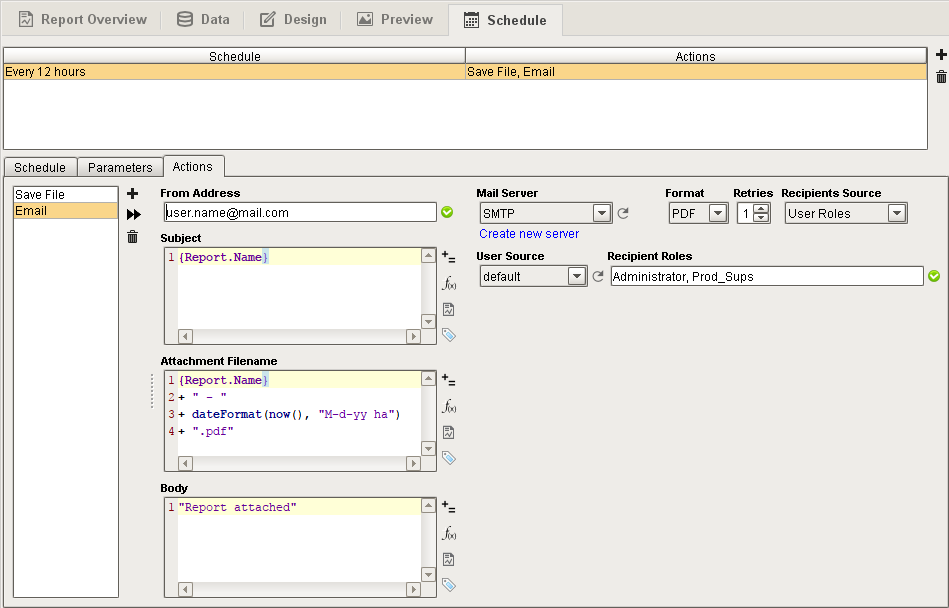
The Actions tab is where you can setup actions that will run following the generation of a scheduled report. There can be any number of Actions associated with a Schedule, covering virtually any requirement for automatically storing, distributing, or notifying upon completion of the report. Each action has its own custom configuration interface to make adding and editing Actions simple. To learn more about how to configure Actions, refer to Scheduling Actions.
The Actions you can perform following report generation are the following:
- Print File - Configure print settings which execute when the report is generated. This is often used to create hard copies of reports automatically.
- FTP - Send your report to a file server for backups or storage. Automatically backs up your reports to a service.
- Save File - An easy way to save a report to a location on your local Gateway computer or shared network drive.
- Email - Your report can be emailed to a list of email addresses or users with specific roles. You can configure the Subject, Filename, and Body of the email.
- Run Script - A Run Script Action provides the ability to fully customize how a finished report is handled. The Run Script Action provides the report's data as well as the bytes generated according to the Format option in the configuration panel.
With any of these scheduling actions, you also have the option of running the report immediately, by clicking the double arrow next to the action.


