Template Canvas
Component Palette Icon:
Description
The template canvas is similar to the template repeater but allows for more control of the templates than the template repeater.
The "Templates" property on the template canvas is a dataset. Each row in this dataset represents a manifestation of a template. It can be the same template or a different template on each row. This dataset allows for control over the size, position and layout of the template. There are two methods of controlling the layout of each template inside the template canvas:
- Absolute Positioning: The location of the template is explicitly managed through the "X" and "Y" columns of the "Templates" property's dataset. Consequently the columns labeled "width" and "height" control the size of the template.
- Layout Positioning: The template canvas uses "MiGLayout" to manage the location of the template. MigLayout is a common albeit complicated layout methodology. It supports layouts that wrap the templates automatically as well as docking the template to one side of the template canvas. You can learn more about MiG Layout at http://www.miglayout.com.
In addition, control over data inside each template can be achieved by adding a column with the name "parameters" to the dataset and populating this column with dictionary style key words and definitions.
Additional templates can be added to the template canvas by inserting an additional row to the "Templates" property's dataset. The same applies to removing the templates but with removing the rows from the dataset.
Properties
| Name | Description | Type | Scripting | Category |
|---|---|---|---|---|
| Background Color | The background color of the component. | Color | .background | Appearance |
| Border | The border surrounding this component. NOTE that the border is unaffected by rotation. | Border | .border | Common |
| Data Quality | The data quality code for any tag bindings on this component. | int | .dataQuality | Data |
| Layout Constraints | The overal layout constraints for the canvas. | String | .layoutConstraints | Behavior |
| Name | The name of this component. | String | .name | Common |
| Scroll Behavior | Controls wich direction(s) the canvas will scroll in. | int | .scrollBehavior | Behavior |
| Templates | A dataset containing a row per template to instantiate. | Dataset | .templates | Data |
| Visible | If disabled, the component will be hidden. | boolean | .visible | Common |
Template Canvas Walkthrough
The following example will create a form for users to input data.
Step 1: Template Creation and Absolute Positioning
The example uses a template named Form Input. Form Input contains a Label component and Text Field component. Form Input also has two Template Parameters: Label_Text and TextField_Text
- The Text property on the Label component is bound to the Label_Text parameter
- The Text property on the Text Field component is bound to the TextField_Text parameter bi-directionally. This will allow the user to write to this property, and this makes reading the value later on easier.
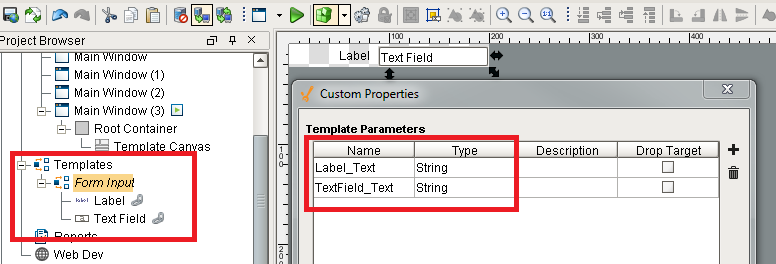
Both Form Input and the components inside had their height set to 20 by right clicking on the components and selecting Size and Position... (Ctrl-P)
Once the template is in place, create a new window, place a Template Canvas Component down, and open the Template Canvas Customizer from either the right-click menu or Ctrl-U
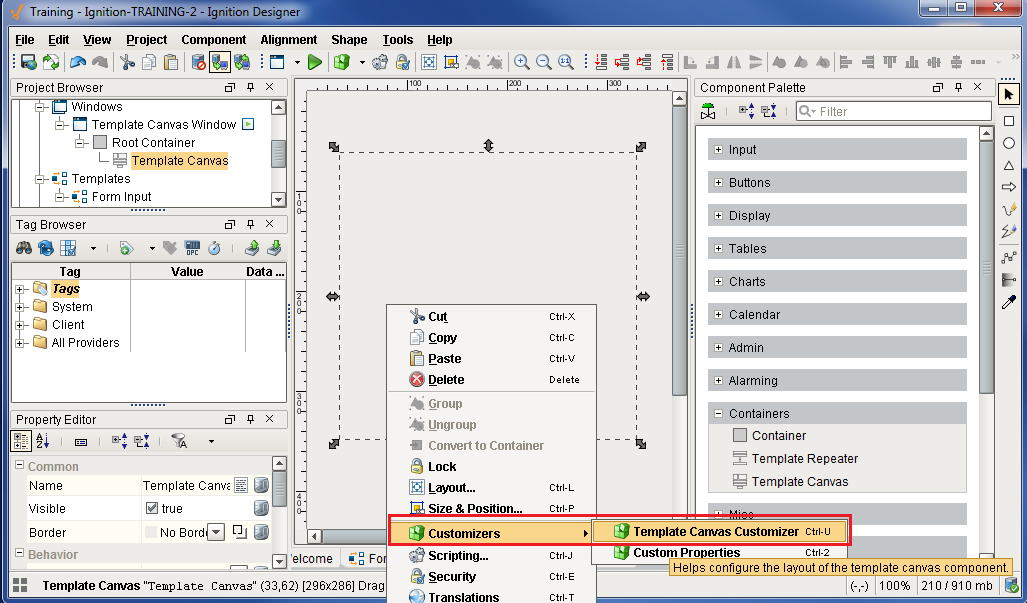
Once open, the customizer allows us to specify the location of each template instance as well the value of any template parameters. Use the following values for the first instance of Form Input:
- Name: First Name
- Template: Form Input
- Position: Absolute, (0,0) [200x20]
- Parameters: Label_Text = First Name, TextField_Text = "" (blank)
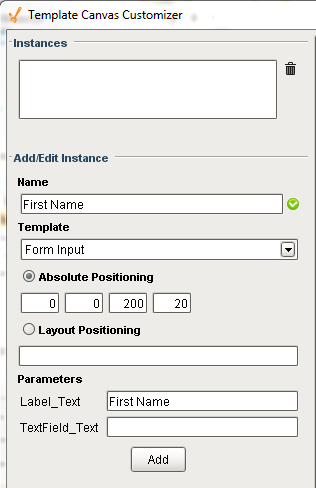
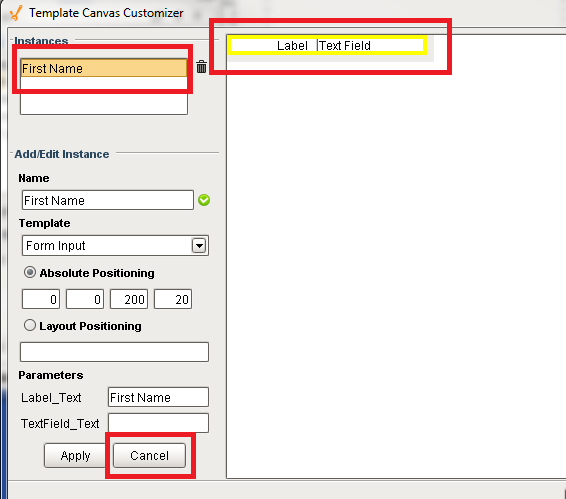
Click the "Add" button to add an instance. Doing so will add an instance of Input Field. The instance will be visible in the preview section. Note that values for the components are still using the default values for the Label_Text and TextField_Text. This is intentional. The new values will appear once we close the customizer.
Take note of the yellow outline around the instance, and how First Name is highlighted at the top of the customizer. This means that the instance is selected, and the customizer is in edit mode. This allows use to make changes to the selected instance (First Name). To exit edit mode and add a new instance click on the "Cancel" button in the lower left of the window
Clicking on the "Cancel" button in the lower right will cancel out of the customizer.
Once out of edit mode, start adding values for a new instance:
- Name: Last Name
- Template: Form Input
- Position: Absolute, (0,20) [200x20]
- Parameters: Label_Text = Last Name, TextField_Text = "" (blank)
Once entered, click the add button again.
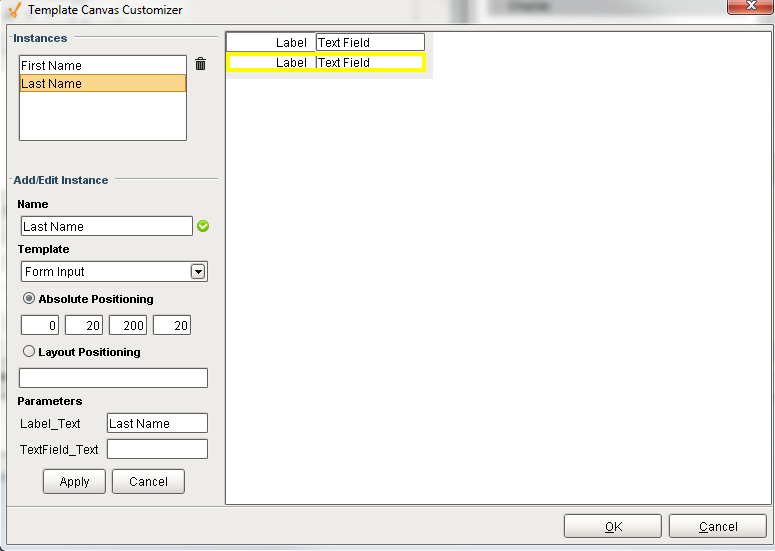
Once both instances have been configured, click the "OK" button. You will see the instances appear in the canvas.
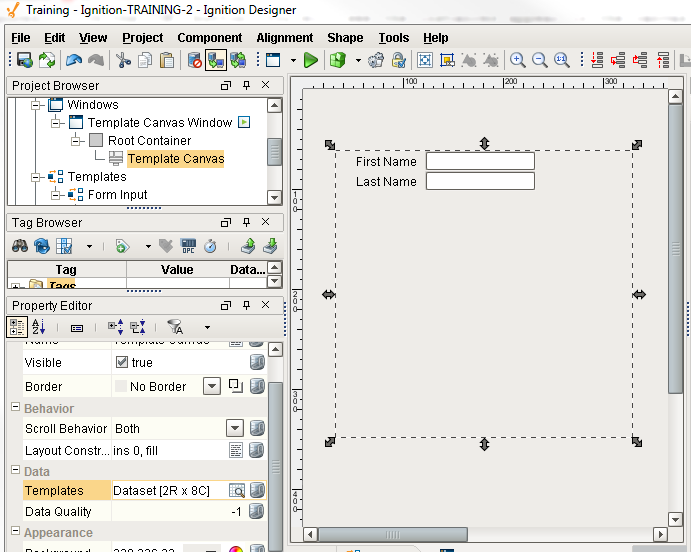
If a new instance needs to be added, it can be added through the customizer. However, the Template Canvas also has a Templates property. This property stores all of the data that was entered into the customizer, so new instances can be configured directly on the Templates property. View the dataset by clicking the Dataset Viewer button next to the Templates property.

Furthermore, template instance configurations could be stored in a database table, and the template canvas could fetch the data with a SQL Query binding on the Templates property.
Step 2: Layout Positioning (MiG Layout)
Instead of having to manually enter a size and position for each instance, we can make use of layout positioning to have the template canvas determine the best position for each instance, while also making suggestions as to where each instance is placed in relation to another. The layout positioning uses a grid-methodology to instance placement. Each instance, unless otherwise specified, is considered a single "cell" in the grid. We will tell the First Name instance to use the "wrap" parameter. This means the next cell in the grid should be placed on the next row.
Open the the Template Canvas Customizer again, and make the following modification to the First Name instance:
- Position: Layout Positioning
- Value: "wrap"
Click Apply, and the First Name instance will appear to overlap with the Last Name instance. This is because the grid only accounts for instances using the Layout Positioning.
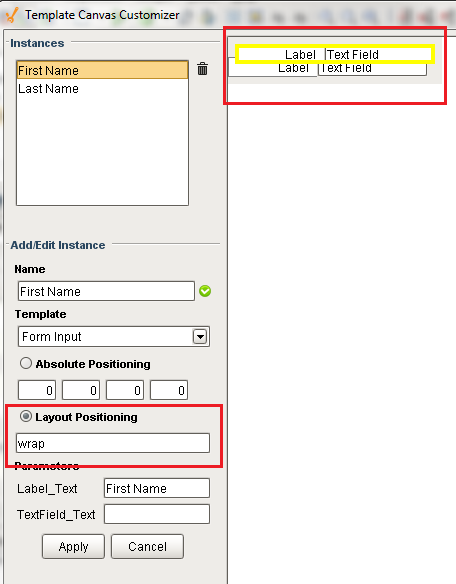
The easy way to fix this is to configure Last Name with Layout Positioning as well. Make the following changes to Last Name:
- Position: Layout
- Value: "" (blank)
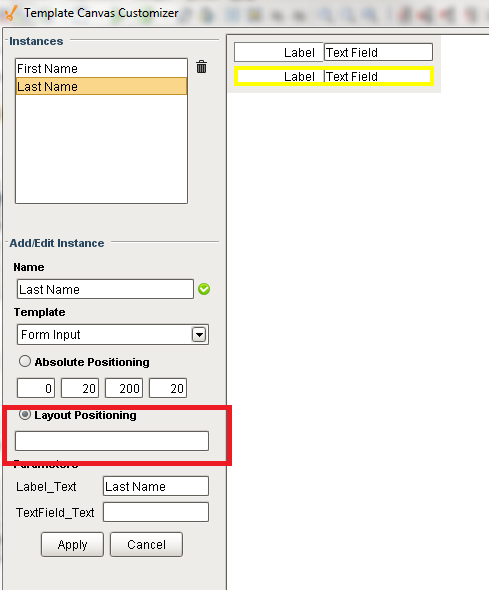
Once the changes have been applied, Click "OK". Check the Templates property again. Notice that the x, y, width, and height columns are no longer used, but the layout column for First Name now has a value.
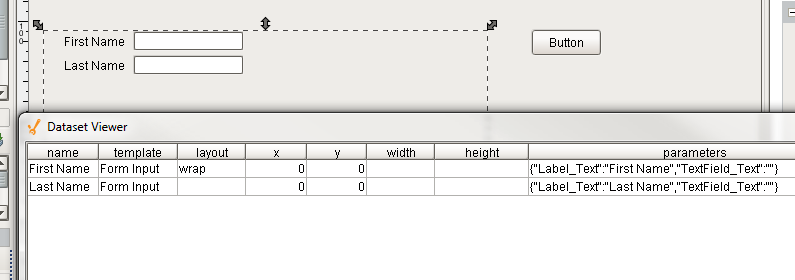
Like the previous example, new rows can be added directly to this dataset. Furthermore, the "wrap" value means the next template instance will begin on a new line. Add two new instances for Street Address and Account Name. Use either the customizer or simply add two new rows in the dataset viewer with the following values. Note that the layout value for First Name and Last Name have been changed since the previous image:

Step 3: Read User Input
The last step is to read the user input. Put the Designer into preview mode and add some values for each text field component. Once finished, Switch the Designer back to design mode, and add a button component to the window (not the template canvas)
Add a script to the button component using the Code Snippet - Read User Input Example below in the Examples section. Place the code on the actionPerformed event of your button.
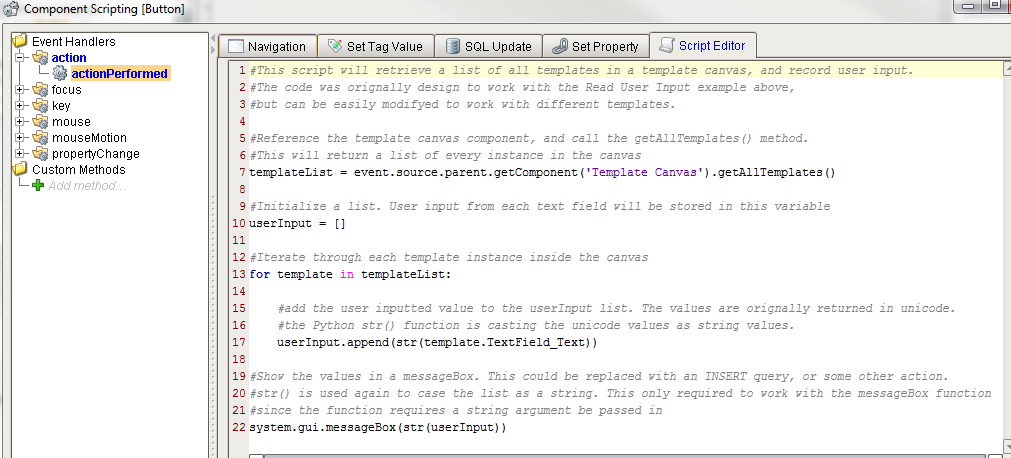
Click "OK" to close the Component Scripting window. Save the Project, put the Designer in preview mode, and click the button
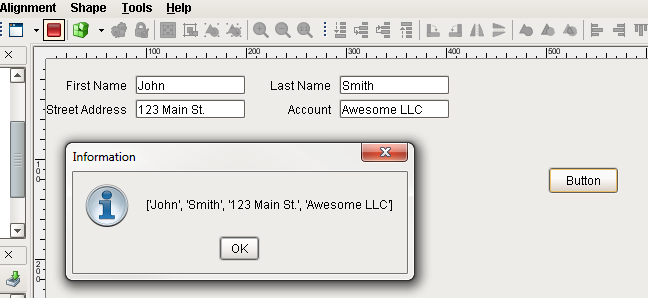
Each value should appear in the message box. This example can easily be expanded to do something more meaningful with the input, like store to a database table.
Scripting
See the Template Canvas Scripting Functions page for the full list of scripting functions available for this component.
Event Handlers
Event handlers allow you to run a script based off specific triggers. See the full list of available event handlers on the Component Events page
Customizers
This component has its own customizer called the Template Canvas Customizer. The Template Canvas Customizer allows you to create multiple instances of a template. Here is where you can configure some of the properties of the template instance that are inside the Template Canvas. To edit a template instance, select it from the Instances list. To cancel your edit and add a new instance instead, click the Cancel button in the bottom left.
The "Templates" property, in the Property Editor, stores all the data that is entered into the customizer. New template instances can be created directly on the "Templates" property as well. To edit or view the dataset, click the Dataset Viewer next to the "Templates" property.
Template Canvas Customizer - Property Descriptions
| Property | Description |
|---|---|
| Instances | A list of the templates currently in the Template Canvas. |
| Add/Edit | Instances Section of the Template Canvas Customizer where you add new instances and edit existing instances. Select an instance from above to edit that instance. |
| Name | Name of the selected template instance. |
| Template | The template path for the selected template instance. |
| Absolute Positioning | Sets the position and size of the components inside the template. In order from left to right, the 4 boxes are X, Y, Width, and Height. |
| Layout Positioning | Uses MiGLayout to manage template location. It allows you to easily determine the layout of components or templates within a container (ie: "span,wrap"). To learn more, go to http://www.miglayout.com |
| Parameters | Shows a list of all the parameters that are defined in the selected template. Specify the values for each template parameter. To make this dynamic, you must bind the Templates property of the Template Canvas. |
More information on the Template Canvas Customizer can be found on the Component Customizers page.
Data Types and the Parameters Field
The "Parameters" field in the customizer accepts string values, but attempts to convert the value if the underlying template parameter is set to a non-string type. In some cases this may require special formatting on the supplied string. The table below provides some examples.
| Data Type | Expected Format | Format Examples |
|---|---|---|
| Color | Colors may be entered in as either a name, or an RBG string | red 0,0,255 |
| Date | Date objects may be entered as either a UNIX timestamp in milliseconds, or in the following notation. In all cases, quotation marks should not be added. yyyy-MM-dd HH:mm:ss.SSS | 1591374627000 2020-03-28 06:38:00:000 |
Examples
#This example demonstrates how to pull value information from templates that are inside the template canvas.
#This example assumes that each template has a custom property called ContentValue

#Get all the template instances of the canvas.
templates = event.source.parent.getComponent('Template Canvas').getAllTemplates()

#The templates are a list therefore you can iterate through them.
for template in templates:

    #You can access the properties of the template. This example prints the ContentValue custom property to the console.
    print template.ContentValue
#This example demonstrates how to iterate through each template in a template canvas
#looking for a named instance. Once found, print the value of a property on a component in
#that instance.

#This assumes that the canvas contains a template instance named "timerTemplate" and
#a Timer component (named Timer) is inside the instance.

#Create a reference to the Template Canvas
canvas = event.source.parent.getComponent('Template Canvas')

#Retrieve all template instances in the canvas
tempInstance = canvas.getAllTemplates()

#Iterate through each template instance
for template in tempInstance:

    #Compare the name of each instance.
    if template.getInstanceName() == "timerTemplate":

        #Print the Value property on the Timer component inside the template
        print template.getComponent("Timer").value
#This script will retrieve a list of all templates in a template canvas, and record user input.

#The code was originally design to work with the Read User Input example above,
#but can be easily modified to work with different templates.

#Reference the template canvas component, and call the getAllTemplates() method.
#This will return a list of every instance in the canvas
templateList = event.source.parent.getComponent('Template Canvas').getAllTemplates()

#Initialize a list. User input from each text field will be stored in this variable
userInput = []

#Iterate through each template instance inside the canvas
for template in templateList:

    #add the user inputted value to the userInput list. The values are originally returned in Unicode.
    #the Python str() function is casting the Unicode values as string values.
    userInput.append(str(template.TextField_Text))

#Show the values in a messageBox. This could be replaced with an INSERT query, or some other action.
#str() is used again to case the list as a string. This only required to work with the messageBox function
#since the function requires a string argument be passed in
system.gui.messageBox(str(userInput))
