Using the SECS/GEM Module
This page walks you through setting up a basic SECS/GEM environment using a simulator and a demo project. By the end of this tutorial, you will have a working equipment connection and be able to send and view SECS/GEM messages in Ignition.
Downloading and Installing the Module
You can download the SECS/GEM module from the Ignition Downloads page under the Device Connectivity section. After downloading the module, install it from the Gateway by navigating to Platform > System > Modules. For detailed installation steps, refer to Installing or Upgrading a Module.
Before getting started, establish a consistent naming convention for simulators, equipment connections, databases, and table prefixes. This makes it easier to identify related components when working with multiple tools and environments.
Configuring the Database Connection
To set up a database connection for use with the SECS/GEM module, go to the Gateway and navigate to Connections > Databases > Connections, then create a new database connection. In this tutorial, the database connection name used is SecsGem.
The SECS/GEM module supports common relational databases such as MySQL, Microsoft SQL Server, and Oracle. The SECS/GEM Demo Project used later in this tutorial currently supports MySQL only. For more information about database configuration, see Connecting to Databases.
Configuring the Simulator��
The simulator can be used to emulate SECS/GEM equipment for development and testing without requiring access to physical equipment. To set up a simulator, follow the steps below.
-
On the Gateway, go to Connections > SECS/GEM > Simulators.
-
Click Create Simulator +.
-
Configure the following fields:
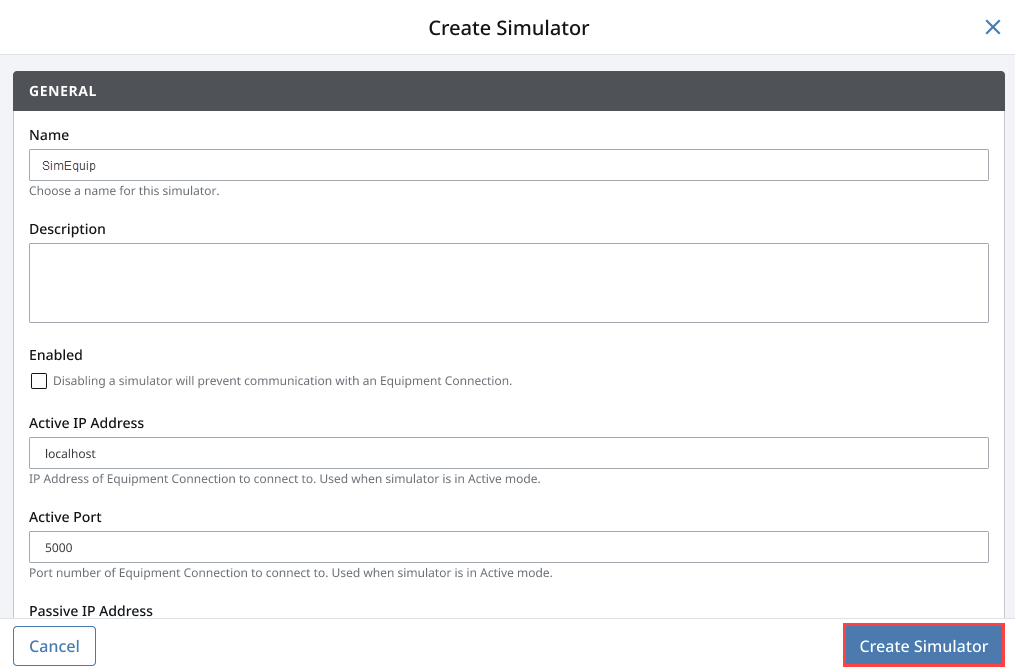
- Name: Enter a name for the simulator. For example, SimEquip.
- Active Port: Use 5000.
- Passive Port: Use 5000.
- Device ID: Use 0, unless you need a different unique equipment identifier.
- Connection Mode: Use Passive.
Multiple Configured SimulatorsIf multiple simulators are configured, each simulator must have a unique Active and Passive port number.
-
Click Create Simulator.
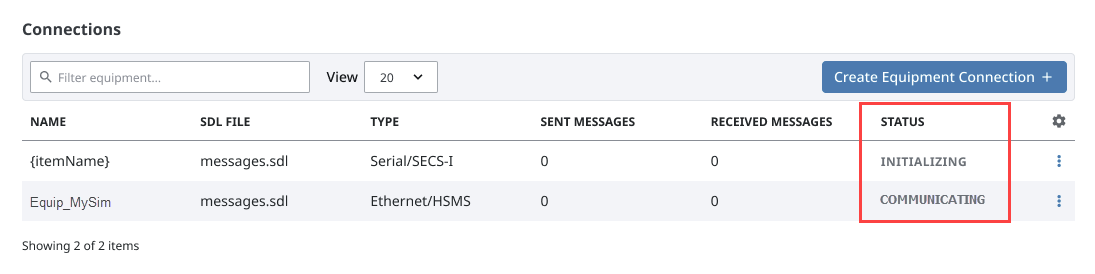
After creation, the simulator appears in the list with a status of Not Connected or Connecting. The status changes to Communicating once an equipment connection is configured to connect to the simulator. For more information, see the SECS/GEM Simulator page.
If the SECS/GEM module is running in trial mode, simulator and equipment communication stops when the Gateway trial period expires after two hours. Reset the trial mode from the Gateway to resume communication. For more information, see the Trial Period section.
Creating an Equipment Connection
After configuring the simulator, or when connecting to physical equipment, you'll next need to create an equipment connection. To create an equipment connection, follow the steps below.
-
On the Gateway, navigate to the Connections > SECS/GEM > Equipment page.
-
Click Create Equipment Connection +.
-
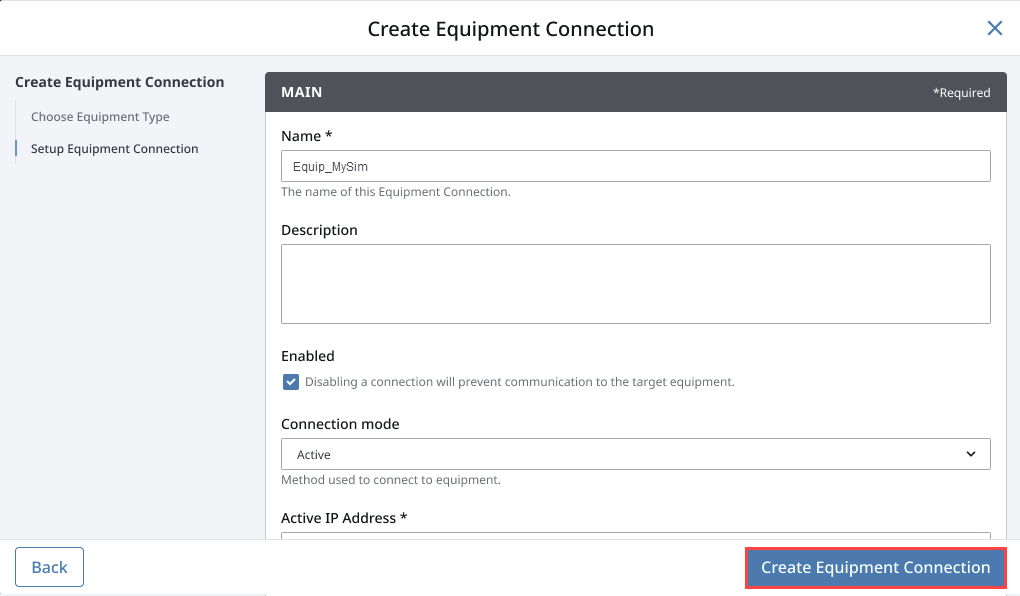
Select Ethernet/HSMS Connections for this example, then click Next.
-
Configure the following fields:
- Equipment Name: Enter a name for the connection. For example, Equip_MySim.
- Database Connection: Select the database connection used for SECS/GEM message storage. For example, SecsGem.
- Active Port: Use 5000. This must match the simulator configuration.
- Passive Port: Use 5000.
-
Click Create Equipment Connection.
After creation, the equipment connection appears in the list with a status of Initializing. When the status changes to Communicating, the connection to the simulator or equipment is established and ready to exchange SECS/GEM messages. For more information, see the SECS/GEM Equipment Connections page.
Using the SECS/GEM Demo Project
You can use the SECS/GEM Dem Project to explore messaging and visualization features once you have an equipment connection. The demo project includes prebuilt views for sending SECS messages and inspecting responses. The demo project is available from the SECS/GEM Demo Project page. For information on importing projects from the Exchange, see Ignition Exchange.
After restoring the demo project, launch a Client from the Gateway under the Home section. For more information, see Launching Clients.
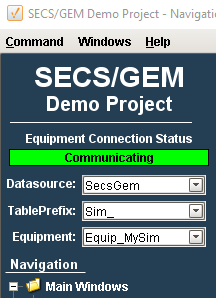
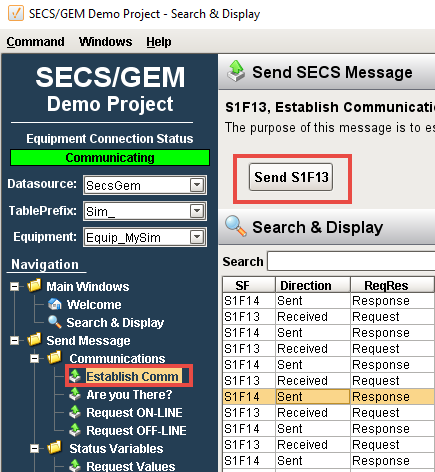
When the Client opens, select the following values from the dropdown menus in the upper-left corner of the application:
- Datasource: Select SecsGem.
- TablePrefix: Select Sim_.
- Equipment: Select Equip_MySim.
You can now view and send SECS messages. From the navigation tree, select Establish Comm, then click Send S1F13. Messages appear in the Search & Display table.
Display Tabs
The Display tabs show detailed information for each SECS request and response. The available tabs are Simple, Tree, Table, JSON, and Python. Select a request or response from the Search & Display table, then switch tabs to view the message in different formats.
The examples below show the response message S1F14 returned from the Establish Comm request (S1F13).
Simple Tab
The Simple tab provides a human-readable summary of the SECS message. It displays the message name, a short description, and key header information such as whether a reply is expected and the message direction. For the S1F14 – Establish Communications Request Acknowledge message, the Simple tab indicates that the request was accepted by the equipment.

Tree Tab
The Tree tab displays the SECS message as a hierarchical structure. The message is divided into header and body sections, which can be expanded to view individual fields and nested items. This view is useful for understanding how message elements are organized and how lists and values relate to one another.
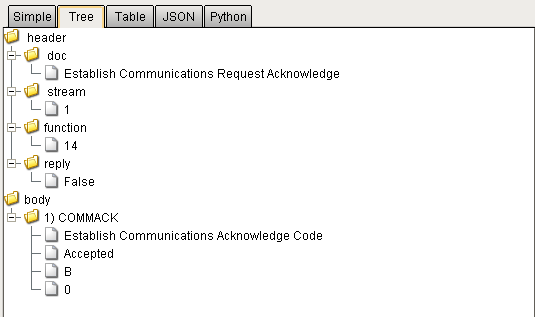
Table Tab
The Table tab presents the message data in a tabular format. Each row represents a single message element and includes the element path, description, data format, and value. This view is helpful for quickly scanning message contents or locating specific fields.

JSON Tab
The JSON tab shows the message in the JSON format used internally by Ignition. This is the same structure used when sending and receiving SECS messages through scripting. This view is useful when comparing received messages to SDL definitions or when writing scripts that construct or parse SECS messages.

Python Tab
The Python tab displays the message as a Python dictionary. This reflects how the message appears when accessed in Python scripts, such as when handling responses or processing messages in Message Handlers. This view is useful for understanding how to reference message fields programmatically.
