Native Client Launchers
The Ignition Gateway contains downloadable native executables that can launch Clients directly without invoking Java Web Start. Using the native executables you can set up Clients in ways that are impossible to achieve with Java Web Start, such as being able to launch Clients automatically as part of a machine startup script.
The Native Client Launcher automatically searches the network for existing Ignition Gateways and lists existing projects. It is a more robust shortcut than the default desktop shortcuts created by Java.
The Native Client Launchers require Java to be installed on the Client machine.
Download and Installation
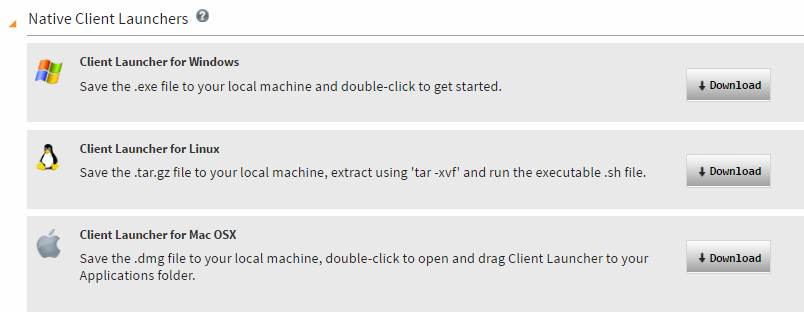
Native client launchers for Windows, Linux, and Mac OSX are available on the Gateway Home page. Click on the Download link to download the native launcher that you need for your operating system. You can hide the native client launcher section on the Gateway Configure page by disabling the section under the Gateway Settings > Homepage Config tab.

- Windows
- macOS
- Linux
Move clientlauncher.exe to a convenient location after it has downloaded to your local machine. Double-click clientlauncher.exe to start.
Double-click on the ClientLauncher.dmg file. Drag the Client Launcher.app into the Applications folder. Double-click the Client Launcher.app to get started.
Open the downloaded .tar.gz file using an archive manager, or use tar -xvf on the command line. Run clientlauncher.sh (the file is already executable, so you can simply double-click on the file).
Starting in 14.04, Ubuntu has turned off the list of execution options that pops up after double-clicking on a .sh file (display the file, execute directly, or execute in a shell). This means that double-clicking clientlauncher.sh will open the text editor and display a bunch of garbage. To re-enable the list of execution options, open a File Manager. Navigate to Edit > Preferences and click on the Behavior tab. Change the Executable Text Files setting from "View executable text files when they are opened" to "Ask each time".
Configuration
When the client launcher opens for the first time, you must select a Gateway on the Gateway Configuration screen. If your Gateways have multicast enabled, and multicast transmission is allowed on your network, you can see a list of Gateways under the Available Gateways tab. Select a Gateway from the list and click the Select Gateway button. The client launcher will attempt to connect to the Gateway that you selected.
If you do not see your Gateway, you can still manually enter Gateway address under the Manually Input Gateway tab. The format is host:port.
If you are using SSL, the Gatway address will need to specify both the Ignition Gateway port and the SSL port using the format host:port:port. See Gateway Port Reference for more information.
// The following will connect to a Gateway using an IP address
10.10.10.1:8088

// The following will connect to a Gateway running on the local machine
localhost:8088

// The following will connect to a Gateway using SSL
10.10.10.1:8088:8043
After you entered your address, click the Apply button. The client launcher will attempt to connect to the Gateway that you selected.
After you selected a Gateway, the client launcher will attempt to contact the Gateway and will update the Status field at the top of the screen. If there was an error while attempting to contact the Gateway, you can hold your mouse over the Status field to see what the error was. You can also check <user home folder>/.ignition/clientlauncher-data/clientlauncher.log for error information.
You cannot use a client launcher to connect to older Gateways.
The minimum Gateway versions that can be used by client launchers are 7.5.11 for the 7.5 Ignition platform and 7.6.4 for the 7.6 Ignition platform.
Any 7.7 or later Ignition platform can be used with the client launchers.
Temporary Configuration
The client launcher is typically used to open different projects residing on a single configured Gateway. However, you can also create temporary connections to other Gateways by checking the Temporary Connection checkbox on the Gateway Configuration screen. This prevents the selected Gateway from being saved in launch.xml, which may be helpful if you have already configured a default Gateway and you do not want to lose its connection settings. After the connection has been established and saved, the Projects screen will be shown for the temporary Gateway. You can then launch a project or the Designer as you normally would. If the Create desktop icon checkbox is checked for the launched project, the temporary Gateway network address is saved in the desktop shortcut.
Pre-configure for Remote Clients
The client launcher can be pre-configured locally and then deployed to remote client machines via a zip file. Using this capability allows a client launcher to immediately connect to a Gateway on the very first launch.
- Configure a client launcher on a local machine to point to a Gateway.
- Copy the
<user home folder>/.ignition/clientlauncher-datafolder next to the launcher executable. - Zip everything together and distribute the zip to other machines.
-
- Windows & Linux
- macOS
The launcher can use theclientlauncher-data/folder that was placed next to the executable.Copy theclientlauncher-data/folder to the user's home directory and place the Client Launcher.app where convenient.
Redundancy
The client launcher can take advantage of a redundant Gateway setup. Whenever a connection is established with a Master Gateway, the Backup Gateway IP address is automatically stored in the client launcher configuration file. If the Master Gateway cannot be contacted the next time the client launcher is run, an attempt is made to contact the Backup Gateway. If the Backup cannot be contacted, the client launcher switches between contacting the Master Gateway and the Backup Gateway until one responds or the user closes the launcher.
Managing Multiple Gateways
It is possible to configure the client launcher to always start on the Gateway Configuration screen. This allows you to connect to any number of Gateways using the same launcher. To enable this configuration, open the launch.xml file (details on this file are in the Custom Launch Settings section below). Set the initconnect property to false and save the file.
Gateway Favorites
If you are managing multiple Gateways, it may be helpful to mark some Gateways as favorites. These Gateways are always listed first when accessing the Gateway Configuration screen. You can also filter out non-favorite Gateways by checking the Favorites Only checkbox on the Gateway Configuration screen. By setting the initconnect property to false (as documented above in the Managing Multiple Gateways section), you can force the client launcher to always display your favorite Gateways list any time you start the launcher.
Using the Native Client Launchers
-
Go to the Home page on the Gateway webpage.
-
Scroll to the bottom of the page to see the Native Client Launchers section.
-
Click on the Download button to download the native launcher that you need for your operating system.
- For Windows, you will see a clientlauncher.exe file.
- For macOS, double-click clientlauncher.dmg, drag Client Launcher.app into the Applications folder.
- For Linux, you will see a clientlauncher.sh file.
-
Click on the .exe, .app, or .sh file (depending on your OS) to open the page that shows URLs for available Gateways.
-
Choose the Gateway you want, click SELECT Gateway button, and click Save & Close.
- On the window that is displayed you can launch your project.
- If your Gateways have multicast enabled (Multicast Enable check box is selected on the Configure > Gateway Settings page), and multicast transmission is allowed on your network, you can see a list of Gateways under the Available Gateways tab.
-
Select a Gatweay from the list and click the SELECT Gateway button.
- The Client launcher will attempt to connect to the Gateway you selected.
-
If you don't see your Gateway, you can manually enter the Gateway address under the Manually Input Gateway tab with the format
host:port. After you have entered your address, click Apply.- The Client launcher will attempt to connect to the GAteway you selected.
- After you selected a Gateway, the Client launcher will attempt to contact the Gateway and will update the Status field at the top of the screen. If there was an error while attempting to contact the Gateway, you can hold your mouse over the Status field to see what the error was.
- You can also check
<user home folder>/.ignition/Clientlauncher-data/Clientlauncher.log for error information.
You can hide the Native Client Launcher section on the Gateway Configure page by disabling it in the Gateway Settings > Homepage Config tab.
Launching Projects
After the Gateway has been configured, you can launch a client project or the Designer from the Projects screen. After a project has been launched, a desktop shortcut is created. You can use the desktop shortcut to directly launch the project from the client launcher without needing to select the project again from the Projects screen. A client project will not be visible for launch unless all the conditions below are satisfied:
- The project has at least one main window
- The project is not disabled in the Gateway
- The project is not hidden from launch via the project properties
- The project's configured window launch mode matches the client launcher window mode. For example, if a project's default launch mode is Windowed mode and the "Full Screen" button is not enabled in the project's properties, this means that the project cannot be launched when the client launcher is running in fullscreen mode.
If a project is no longer available in the Gateway, launching the desktop shortcut for the old project will cause the client launcher to display the Projects screen along with an error message at the top of the screen.
Custom Launch Settings
Client launcher configuration settings, log files and temp files are stored by default in <user home folder>/.ignition/clientlauncher-data/. The following settings can be configured in launch.xml:
| Setting Name | Setting Description | Example Setting |
|---|---|---|
| gateway.addr | The gateway that you have configured which contains your launchable projects. | 10.20.7.122:8088 |
| gateway.backup.addr | Automatically set by client launcher when using a redundant setup. | 10.20.7.122:8088 |
| gateway.fallback.addr | Allows a fallback Gateway to be specified if neither the master Gateway nor the backup Gateway cannot be reached after a specified number of attempts. This setting is particularly useful for the local client fallback scenario, where you can still launch a local client if remote Gateways cannot be reached. Note that you must still specify the fallback.project setting, and your retries setting must be 0 or greater. | localhost:8088/main |
| fallback.project | The project to launch if the native launcher is attempting to launch using the specified fallback Gateway. | myproject |
| timeoutsecs | The maximum number of seconds allow for any gateway communication. Any communication that exceeds this amount will cause the client launcher to abort the communication and try again if configured. | 30 |
| retries | How many times to attempt to contact a gateway again if an error occurred during communication. The default setting of -1 cause the client launcher to try again forever until the client launcher is manually closed. A setting of 0 will cause the client launcher to abort communication after the first failure and display the Gateway Configuration screen. A setting of 1 or more will cause the client launcher to make X more attempts before aborting and showing the Gateway Configuration screen, or attempting to load the fallback project if configured for fallback. | -1, 0, 1 |
| windowmode | Controls whether or not to launch the client launcher in fullscreen mode. The fullscreen setting will cause the client launcher to take over the entire screen. When launching a client that also has fullscreen mode configured, the fullscreen client will replace the fullscreen client launcher after launch. The default setting is "window", which launches the client launcher in windowed mode. | window, fullscreen |
| screen | The screen index indicates which monitor to use when launching in fullscreen mode. | 0,1 |
| show.closebutton | When this is set to false, all close buttons on the client launcher are hidden. Use this setting along with the fullscreen mode to set up a dedicated touch-screen terminal. | true, false |
| multicast.addr | This setting must match the gateway's multicast address setting in order to see a list of available gateways on the Gateway Configurations screen. | 231.1.1.1 |
| multicast.receive.port | This setting must match the gateway's multicast receive port in order to see a list of available gateways on the Gateway Configurations screen. | 4446 |
| initconnect | When this is set to false, the client launcher will not attempt to contact the configured Gateway, but instead will immediately open the Gateway Configuration screen. This allows you to choose different Gateways using a single client launcher. | true, false |
| tempconnection | When this is set to true, the Temporary Connection checkbox on the Gateway Configuration screen will be checked when the client launcher is started. By setting this property to true and setting the initconnect property to false, you can use the client launcher to access any number of Gateways without saving the selected Gateway address in launch.xml. | true, false |
| jvm-args | Allows JVM-specific settings to be set on the client that is launched, such as MaxPermSize memory allocation. | |
| other-args | See the "Setting client tags" section below. | -XX:MaxPermSize=512m |
Startup Parameters
The settings below can also be passed to a client launcher executable as startup parameters. Note that many of the settings overlap with the custom launch settings above, and if present, they will override the settings in launch.xml.
| Setting Name | Setting Description | Example Setting |
|---|---|---|
| gateway.addr | The gateway that you have configured which contains your launchable projects. | 10.20.7.122:8088 |
| gateway.backup.addr | Automatically set by client launcher when using a redundant setup. | 10.20.7.122:8088 |
| gateway.fallback.addr | Allows a fallback Gateway to be specified if neither the master Gateway nor the backup Gateway cannot be reached after a specified number of attempts. This setting is particularly useful for the local client fallback scenario, where you can still launch a local client if remote Gateways cannot be reached. Note that you must still specify the fallback.project setting, and your retries setting must be 0 or greater. | localhost:8088/main |
| fallback.project | The project to launch if the native launcher is attempting to launch using the specified fallback Gateway. | myproject |
| timeoutsecs | The maximum number of seconds allow for any gateway communication. Any communication that exceeds this amount will cause the client launcher to abort the communication and try again if configured. | 30 |
| retries | How many times to attempt to contact a gateway again if an error occurred during communication. The default setting of -1 cause the client launcher to try again forever until the client launcher is manually closed. A setting of 0 will cause the client launcher to abort communication after the first failure and display the Gateway Configuration screen. A setting of 1 or more will cause the client launcher to make X more attempts before aborting and showing the Gateway Configuration screen, or attempting to load the fallback project if configured for fallback. | -1, 0, 1 |
| windowmode | Controls whether or not to launch the client launcher in fullscreen mode. The fullscreen setting will cause the client launcher to take over the entire screen. When launching a client that also has fullscreen mode configured, the fullscreen client will replace the fullscreen client launcher after launch. The default setting is "window", which launches the client launcher in windowed mode. | window, fullscreen |
| screen | The screen index indicates which monitor to use when launching in fullscreen mode. | 0,1 |
| show.closebutton | When this is set to false, all close buttons on the client launcher are hidden. Use this setting along with the fullscreen mode to set up a dedicated touch-screen terminal. | true, false |
| scope | Indicates whether the project being launched is a client (scope C) or a Designer (scope D) | C, D |
| project | The project name. This field is required if the scope is set to C, indicating that a client is being launched. | myproject |
| initconnect | When this is set to false, the client launcher will not attempt to contact the configured Gateway, but instead will immediately open the Gateway Configuration screen. This allows you to choose different Gateways using a single client launcher. | true, false |
| jvm-args | Allows JVM-specific settings to be set on the client that is launched, such as Xmx, which is the maximum size of the Client/Designer. | -Xmx1024M |
| tempconnection | When this is set to true, the Temporary Connection checkbox on the Gateway Configuration screen will be checked when the client launcher is started. By setting this property to true and setting the initconnect property to false, you can use the client launcher to access any number of Gateways without saving the selected Gateway address in launch.xml. | true, false |
Client Startup Examples
Windows:
"C:\ClientLauncher\clientlauncher.exe" scope=C project=myproject windowmode=window

Linux:
./clientlauncher.sh scope=C project=myterminal windowmode=fullscreen screen=0 show.closebutton=false
For another example of automatically launching clients with the Native Client Launcher, please see the following Knowledge Base Article: Launch Project to Multiple Monitors
Setting Client Tags
Client Tag values in Ignition clients can be set by the client launcher upon startup. There are two ways you can do this. The examples below assume that you have two client tags in the root folder of your project, called LaunchTag and LaunchTag2.
Using the launch.xml
The first way is to add the tag info to the other-args section in launch.xml, as shown below. These settings would take effect for all clients started from the client launcher.
<other-args>
<arg>-Djavaws.launchparams=LaunchTag;LaunchTag2</arg>
<arg>-Djavaws.launchparam.LaunchTag=AAA</arg>
<arg>-Djavaws.launchparam.LaunchTag2=ZZZ</arg>
</other-args>
Using the Command Line to Launch
The second way is run the client launcher from a command line or a desktop shortcut and add these lines to the end of the command:
-Djavaws.launchparams="LaunchTag;LaunchTag2" -Djavaws.launchparam.LaunchTag="AAA"-Djavaws.launchparam.LaunchTag2="ZZZ"
Starting the client launcher from a command line in this case would look like the example below (Linux example shown).
./clientlauncher.sh scope=C project=myterminal windowmode=window -Djavaws.launchparams="LaunchTag;LaunchTag2" -Djavaws.launchparam.LaunchTag="AAA" -Djavaws.launchparam.LaunchTag2="ZZZ"