Setting Up Redundancy
Since both nodes in redundancy will share the exact same configuration state by default, the following should be considered for your backup node:
-
Start with a fresh install.
Because the current configuration of the backup node will be overwritten, make sure that it does not contain anything valuable. It is a good idea to export any projects that are unique to the backup before enabling redundancy. -
Determine if any system configurations need to differ from the master node.
Any system configurations that will vary from the master node require a Backup version to be created for the backup node to load instead. For instance, if you have two machines in a redundant pair that are on different parts of a network needing to connect to an OPC-UA server, the OPC-UA network address may be different on the backup Gateway since it's on a different part of the network. You can create a Backup version of the OPC-UA connection settings on the Edit panel, so that the redundant master uses the Primary OPC-UA address setting and the redundant backup uses the Backup OPC-UA address setting.Using Backup VersionsBackup versions are always available to create so that configurations can be completed even before becoming part of a redundant pair. Once the backup node is created, then the Backup version configuration will be applied. Any changes saved to Backup versions after a backup node exists will be applied to the backup node accordingly.
-
Configure firewalls between the redundancy nodes.
Redundant systems need TCP connectivity between each other on the default Gateway network ports. Turning off software firewalls or adding special exception rules for each others' addresses is required. The default Gateway Network port is port 8088 (without SSL), and port 8060 (with SSL), and the backup node must be able to send outgoing data on that port. The port can be changed from Gateway Network settings.
Two Edge Gateways can be set up with redundancy. An Edge Gateway can only failover to another Edge Gateway (not a standard Ignition Gateway). Also, an Edge Gateway cannot be used as backup to a Standard Ignition Gateway.
While the OS platform (i.e., Windows, OS X, Linux) for the master and backup can differ, it is recommended to have similar OS platforms. If the OS platforms do differ, the Windows machine should be the master system or else the Force Failover option will not work.
However, different versions of the same operating system such as Windows 10 and Windows 8 or OSX 10 and OSX 11 have full functionality.
Configure Redundancy On the Master Gateway
-
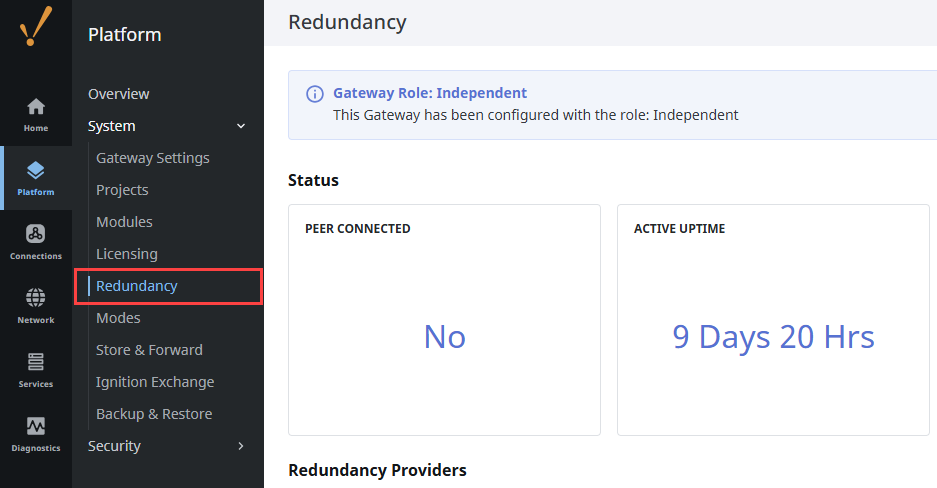
Go to the Platform section of the Master Gateway Webpage.
-
Select System > Redundancy. The Redundancy page is displayed showing different sections and settings. See the table below for a description of all settings.
-
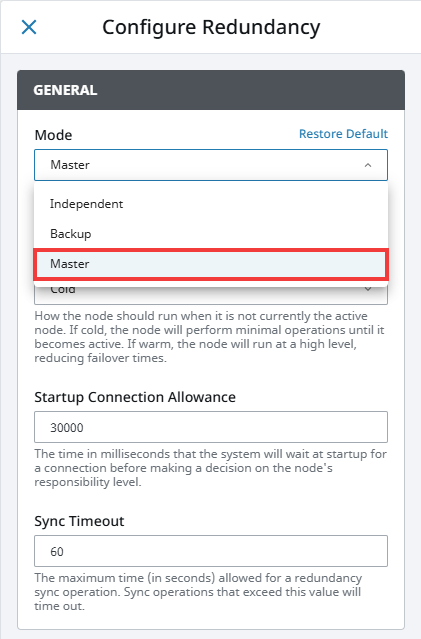
Click Configure Redundancy to change the following settings:
-
Under General settings, set Mode to Master.
-
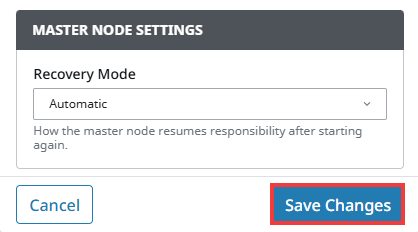
Optionally, configure any desired settings under Master Node Settings.
-
-
Click Save Changes.
-
Ensure the redundancy mode and state is properly set on the Status banner.
Configure Redundancy On the Backup Gateway
-
Go to the Platform section of the Backup Gateway Webpage.
-
Select System > Redundancy.
-
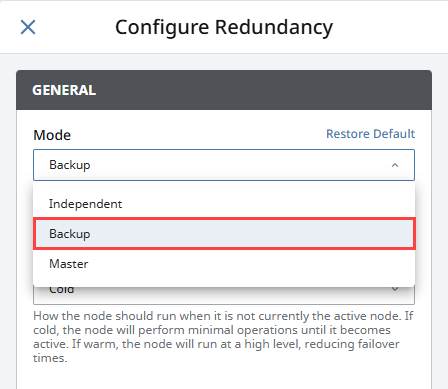
Click Configure Redundancy to change the following settings:
- Under General settings, set Mode to Backup.
- Under Backup Node settings, configure the Master Node Address to point to the Master Gateway. The Master Node address is listed as the Local Address on the Master Gateway's Redundancy page under Properties. The Port setting (assuming default configurations) should be 8060 if using SSL, otherwise 8088.
-
Confirm the redundancy mode and state is properly set on the Status banner.
-
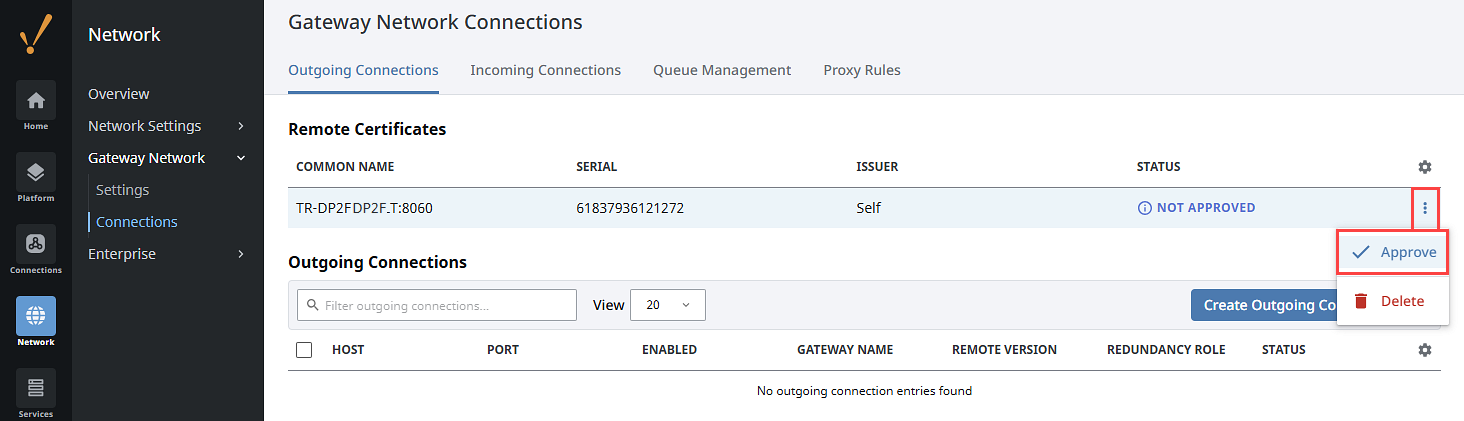
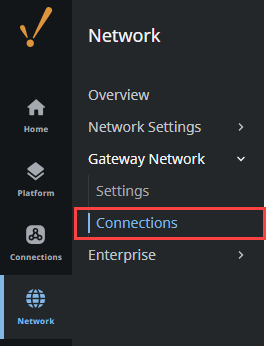
Now, navigate to Network > Gateway Network > Connections. On the Outgoing Connections tab, the Master Gateway certificate will be listed under Remote Certificates.
-
Expand the three dots menu and select Approve. Select Approve Certificate on the confirmation popup.
Approve Redundancy On the Master Gateway
-
Return to the Master Gateway.
-
Select Network > Gateway Network > Connections.
-
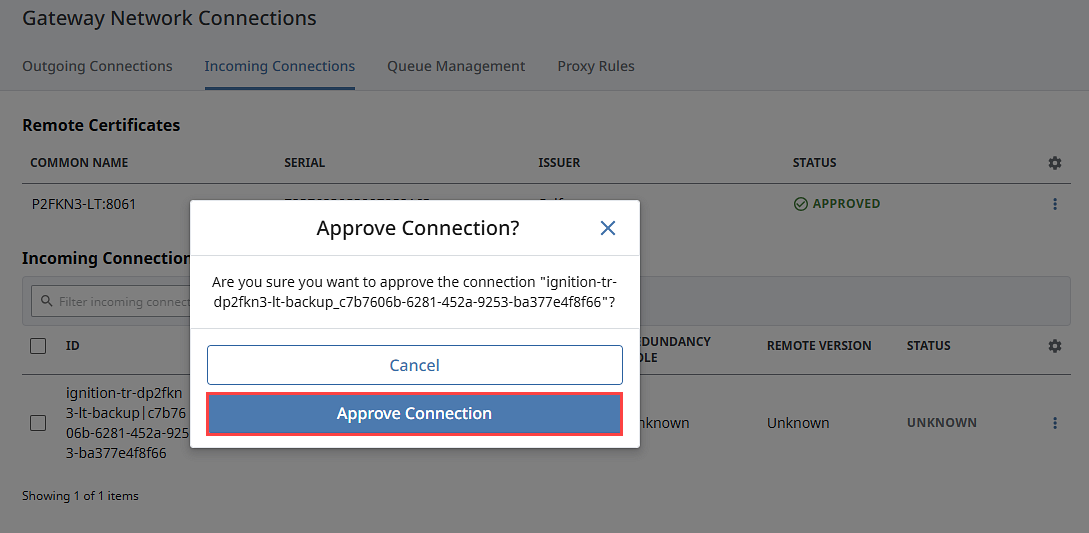
Navigate to the Incoming Connections tab. You will now see a new remote certificate from the Backup Gateway.
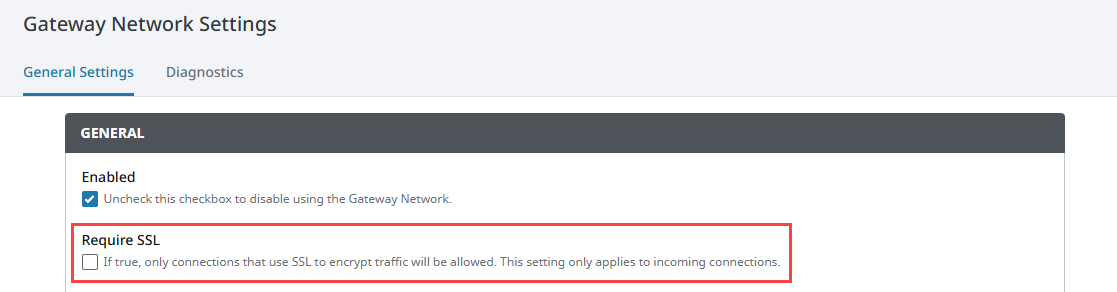
cautionIf you are not using SSL and your connection isn't displayed, make sure the Require SSL box is unchecked on the Network > Gateway Network > Settings page under the General Settings tab. Clearing the checkmark and returning to the Connections page Incoming Connections tab will now populate your new incoming connection.
-
Expand the three dots menu. Select Approve. Select Approve Certificate on the confirmation popup.
-
Your Backup Gateway connection is now listed under under Incoming Connections. Expand the three dots menu and select Approve. Select Approve Connection on the confirmation popup.
-
To verify the redundancy setup with the Master and the Backup Gateways connected, go the Platform tab of the Gateway Webpages and click on System > Redundancy. The Redundancy pages will show the connected nodes and their current states.
After approving the connection, the backup connects to the master and downloads a system backup, then restarts. Once the restart is complete, the backup node is synchronized and in communication with the Master.
Create a Backup Version Configuration
Backup version configurations are used to override master Gateway settings for any resource that needs different settings on the backup Gateway. Backup versions are created on the Gateway resource page or Edit panel, as described in the process below. Once created, you'll see two version options to edit and save settings: Backup and Primary. The Backup configurations are saved in a backupConfig.json file, instead of the config.json file. Primary configurations will continue to be saved in the config.json file and apply to master Gateways and a subsequent backup Gateway configuration if no Backup version is specified.
Backup versions can be created at any time, even before a redundant pair is connected. This allows users to prepare backup and master Gateway settings so that they are ready to go when the redundancy setup steps are complete.
Although the backupConfig.json file can be created and updated before redundancy is configured, it will only be used to override settings when a Gateway's NodeRole=Backup.
To create a Backup version:
-
Access the Gateway page that includes the resource requiring different settings.
-
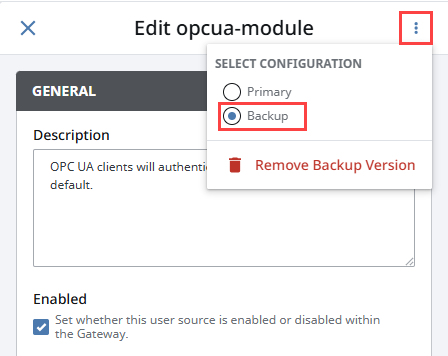
If your resource settings are displayed on the main Gateway page, expand the three dots menu at the top of the page. If the Gateway page lists multiple resources, open the Edit panel for the individual resource and expand the three dots menu at the top of the panel.
-
Select Add Backup Version.

-
Select Backup.
-
Make required setting adjustments.
-
Click Save Changes.
Keep in mind that any further changes made to a resource once a Backup version is created will need to have the Primary or Backup version selected first. The Primary version will be selected by default.
There are a few pages on the Gateway where you can create a backupConfig, but no changes will be applied to it. This is to protect properties where differences between the Backup and Master Gateways would cause issues, such as conflicting Gateway System Name settings. These pages include:
- Platform > System > Gateway Settings
- Platform > System > Ignition Edge > Edge Settings
- Platform > Security > General Settings
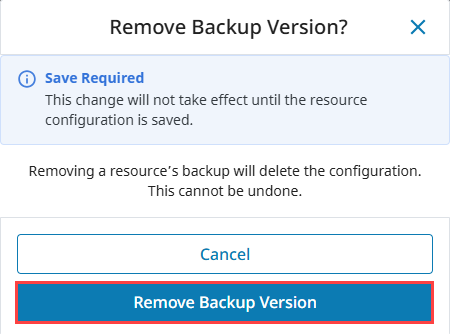
Backup versions can be deleted by expanding the same three dots menu used to create the Backup and selecting Remove Backup Version. When clicked, a popup will appear to confirm the selection with a warning that the change will not take effect until the resource configuration is saved and that deleting the backup cannot be undone.
Redundancy Settings
All redundancy settings are configured in the Gateway Webpage under the Platform tab, Systems > Redundancy. Most settings are used by both the Master and Backup nodes, with their individual settings broken out into separate categories.
It is important to know that while the full system configuration is shared between nodes, redundancy settings are not shared between nodes. Therefore, it is perfectly acceptable to have different values for the same settings on the two nodes. For example, it is possible to have a different Standby Activity Level on both nodes. The network settings will often be different.
The Designer can never be opened from a Backup node, even if the Master is currently offline.
General Settings��
| Property | Description |
|---|---|
| Mode | Enable or disable redundancy, and specify this node's role. There should be one master and one backup node per redundant pair. Independent turns off redundancy.
|
| Standby Activity Level | How the node should run when it is not currently the Active node.
|
| Startup Connection Allowance | The time in milliseconds that the system will wait at startup for a connection before making a decision on the node's responsibility level. This is used to prevent unnecessary switch over caused by a node starting as active, only to connect and find that the other node is active, resulting in one of the nodes being deactivated. Default is 30000 milliseconds. Note: It is important to notice that this setting can interfere with the Master Recovery mode:
|
| Sync Timeout | The maximum time in seconds allowed for a redundancy sync operation. Sync operations that exceed this value will time out. Default is 60 seconds |
Network Settings
| Property | Description |
|---|---|
| Auto Detect Network Interface | If true, the system will automatically select which network interface to use. Most commonly disabled on systems with multiple network cards, in order to explicitly specify which interface to use. If false, the system will bind itself to the interface of the specified address. |
| Network Bind Interface | The IP address of the network interface to use for redundancy. Only used if "Auto Detect" is false. |
Master Node Settings
| Property | Description |
|---|---|
| Recovery Mode | How the Master node resumes responsibility after starting again.
|
Backup Node Settings
| Property | Description |
|---|---|
| Master Node Address | The address of the Master Ignition system. |
| Port | The Gateway Network port used by the Master to listen on. For the Backup, the port to connect to on the Master. |
| Use SSL | Use SSL to connect to the remote machine. Default is true. |
| Send Threads | Number of threads to use for sending messages. Default is 5. |
| Receive Threads | Number of threads to use for receiving messages. Default is 5. |
| Ping Rate | How often, in milliseconds, to send a message from the Backup to the Master. |
| Ping Timeout | The maximum time, in milliseconds, allowed for a ping response. Pings that time out are counted as missed pings. |
| Ping Max Missed | The amount of missed pings that will force the connection to the master to be considered faulted. |
| Websocket Timeout | The maximum time, in milliseconds, allowed for a new web socket to connect to the Master. |
| HTTP Connect Timeout | The maximum time, in milliseconds, allowed to establish an HTTP connection to the Master. |
| HTTP Read Timeout | The maximum time, in milliseconds, allowed to read or send HTTP data to the Master. |
| History Mode | How history is treated by the Backup system. If Full, history will be stored normally, as it would be on the Master system. If Partial, history will be cached until the Master is available again and the Backup node is able to determine the exact time that the Master was down. |
| Use Active Uptime to Resolve Conflicts | When enabled, the system will resolve data conflicts by examining if the Master node or Backup node have been active for longer. The redundancy data from the longer running active node will be selected, and will overwrite the data on the other node. |
Troubleshooting
Redundancy Connectivity
If the two nodes cannot connect, check the following:
-
Verify the Master address is correct in the Backup. Try to ping the Master machine from the Backup machine, and verify you're using the correct address for the network card that the Master is connected through.
-
If using system names (or domain names), verify the name is resolving to the correct address by performing a ping.
-
Verify the firewall on the Master is set to allow TCP traffic to the designated port.
-
Verify the Backup is not connecting and then immediately disconnected for some reason. Viewing the error log in the Gateway console section should show this. If errors are occurring at regular intervals, look at the message for an indication of what is happening. An example of a potential problem is when the failover time is set too low for the given network, which results in many socket read timeout exceptions, which in turn leads to many disconnect/reconnect attempts.
-
If errors are occurring, but the cause isn't clear, contact Inductive Automation Support.
Advanced Troubleshooting
A variety of loggers can be found under the Gateway console section by going to Levels and searching for "Redundancy". By setting these loggers to a finer level, more information will be logged to the console. This is generally only useful under the guidance of Inductive Automation support personnel, though more advanced users may find the additional logged information helpful.