Perspective Event Scripts
Perspective Event Scripts let you configure project level scripting that responds to key events in Perspective Sessions or on the Gateway. These scripts enable interaction between the client session, mobile devices, and the Gateway at various points in a session's lifecycle.
Scripts fall into two categories:
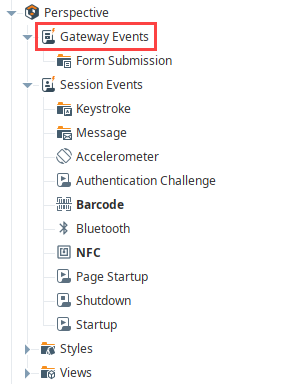
- Gateway Event Scripts: Events handled at the Gateway level, useful for centralized processing or offline functionality, like form submissions.
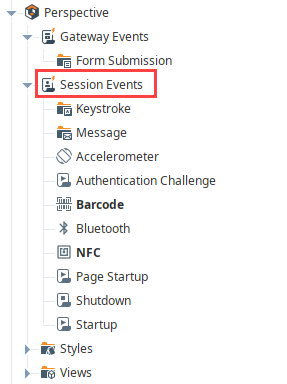
- Session Event Scripts: Events tied to an individual Perspective Session. For example, session startup, shutdown, and keystroke.
Gateway Event Scripts
Gateway Event Scripts run in response to Perspective events that require centralized, Gateway-scoped execution. These events are often related to device independent workflows or features that support Offline Mode. Gateway Event Scripts are not tied to a specific active session context and may occur outside of a live connection (e.g., queued form submission from a disconnected mobile device).
For a full list of available Gateway Event Scripts across the platform, see Gateway Event Scripts.
Form Submission
The Form Submission event script runs in the Gateway when a form is submitted from a Perspective Session. Unlike other events, this submission process is managed by an internal Form Submission Manager, which allows for offline submission, automatic retries, and response handling.
Form Submission Parameters
| Name | Description |
|---|---|
| session | The Perspective Session handling the form submission event. |
| name | The name of the submitted form. |
| data | A dictionary containing the submitted form data, with key-value pairs matching the form fields. |
| formContext | A dictionary containing additional context relevant to the submission, as defined by the user. |
| sessionContext | A dictionary of session-related data captured at the time of submission, such as:
|
| retry | A boolean value indicating whether this is a resubmitted form due to a previous failure. |
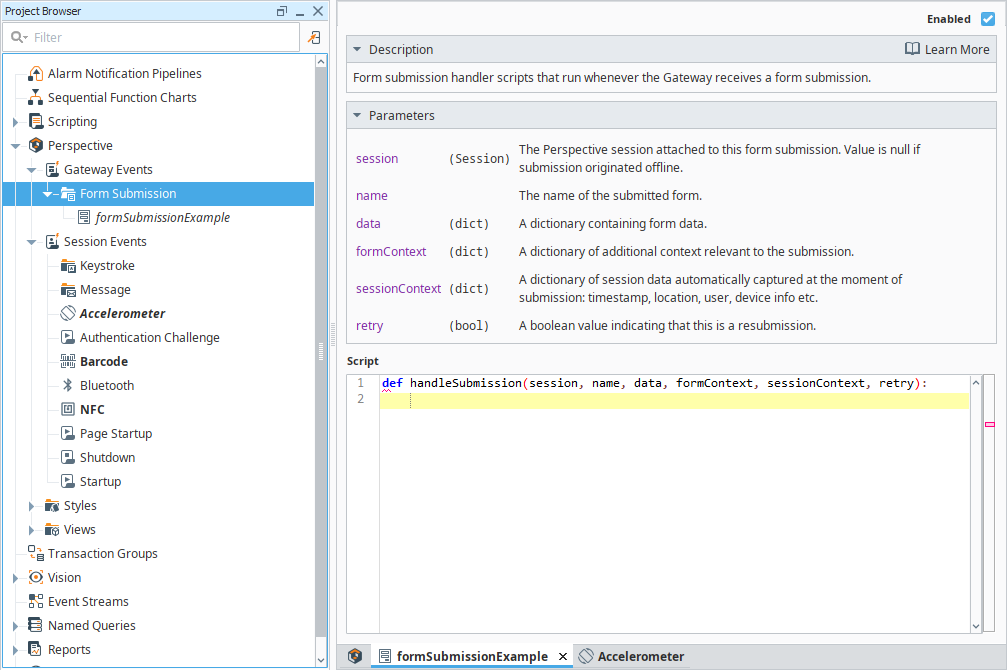
Form Submission Example
This example logs form data in the Gateway and returns a validation error if a required field is missing.
-
In the Project Browser, navigate to Perspective > Gateway Events.
-
Right-click Form Submission and select New Form Submission Script.

-
Enter formSubmissionExample into the Name field, and click Create Form Submission.

-
Add the following script to the editor and click Save.
# Example script for handling form submissions
logger = system.util.getLogger("formSubmissionExample")

# Log submission data
logger.info("Received form submission: " + str(data))

# Example validation: Ensure 'email' field is provided
if 'email' not in data or not data['email']:
    response = {
        "success": False,
        "title": "Missing Required Field",
        "message": "Email address is required.",
        "fieldErrors": {"email": {"title": "Required", "message": "Please enter your email."}}
    }
else:
    response = {"success": True, "title": "Form Submitted", "message": "Thank you for your submission!"}

# Return response
response
Test the Example
To test the form submission:
- Add a Form component to a view.
- Ensure the Form component name matches the Form Submission event name.
- Configure the form with an Email input field and a Submit button.
- Launch the Perspective Session and submit the form.
- Verify the response:
- If the email field is empty, an error will appear.
- If the email is provided, a success message will be displayed.
Session Event Scripts
Session Event Scripts run in the Gateway scope and respond to events initiated by a Perspective Session.
Session Events include:
- Startup
- Shutdown
- Page Startup
- Authentication Challenge
- Message
- Keystroke
- Barcode
- Bluetooth
- Accelerometer
- NFC
Configuring Session Events
To configure a Session Event Script:
-
In the Project Browser, navigate to Perspective > Session Events.
-
Select the event type you want to configure.
noteIf configuring Keystroke or Message scripts, right-click the event folder and select New Script.
-
Add your script in the provided editor.
-
Click Save.
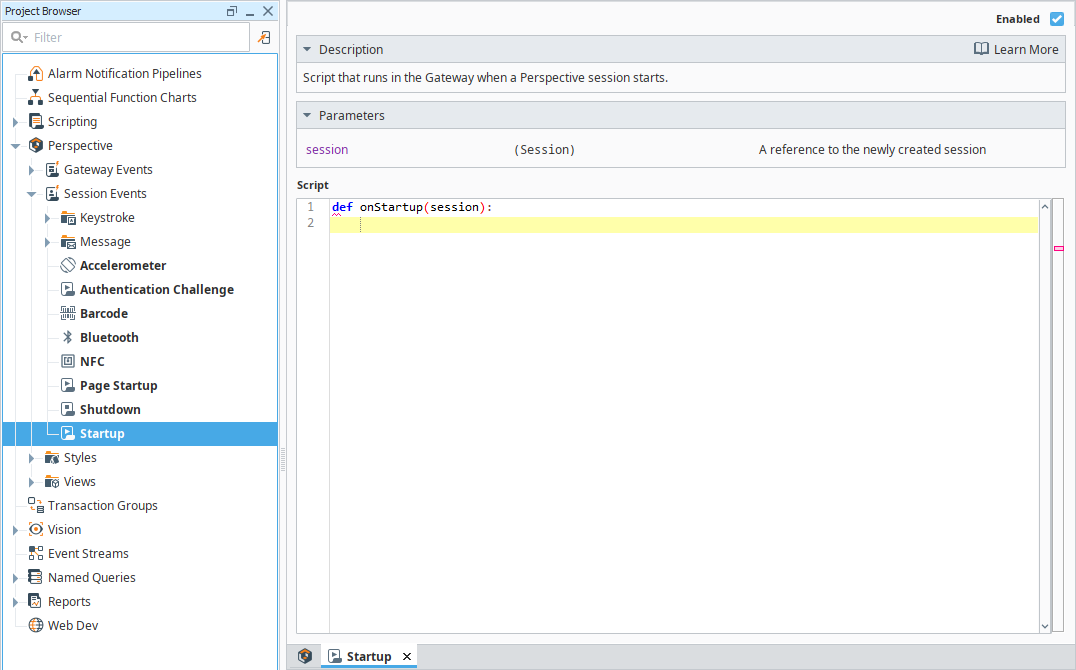
Startup
The Startup event script runs when a Session starts. The Gateway has access to the session object and all its properties.
You can use custom Session properties to pass information between the Session and the Gateway.
Startup Parameters
| Name | Description |
|---|---|
| session | Represents the Perspective Session that is starting. The session object contains all Session properties. |
Startup Example
This example logs the Session start time in a database.
Create a Named Query
-
In Named Queries, create a new query called Startup Query.
-
Set the Query Type to Update Query.
-
Add a Value type parameter named
SessionID(string). -
Enter the following query:
Startup QueryINSERT INTO sessions (session_id, start_time)
VALUES (:SessionID, CURRENT_TIMESTAMP)
Add the Startup Script
-
In the Project Browser, navigate to Perspective > Session Events > Startup.
-
Enter the following script:
Startup Script# Log the Session start time.
queryParams = {'sessionID': session.props.id}
system.db.runNamedQuery('My Project', 'Startup Query', queryParams) -
Click Save.
Test the Example
- Open a Perspective Session on a mobile device or browser.
- Verify the database has a new entry in the sessions table with the Session ID and start time.
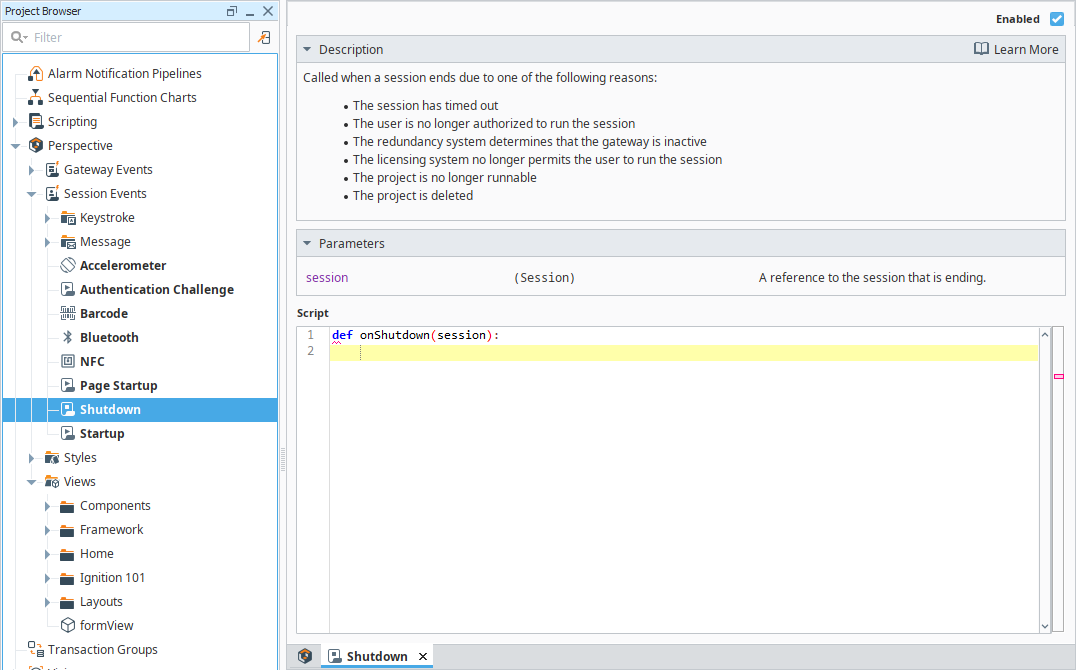
Shutdown
The Shutdown event script runs when a Session ends. The Gateway has access to the session object and all its properties.
You can use custom Session properties to pass information between the Session and the Gateway.
A Shutdown script executes when a Session ends due to:
- The Session closes due to a timeout. Session timeout is configurable in the Perspective > General section of Project Properties.
- The user losing authorization.
- Gateway redundancy failing over.
- Licensing issues preventing access.
- The project being deleted or made unrunnable.
Closing a browser tab does not immediately close a Session. The Session will remain open until it times out.
Shutdown Parameters
| Name | Description |
|---|---|
| session | Represents the Perspective Session that is ending. The session object contains all Session properties. |
Shutdown Example
This example logs the Session end time in a database.
Create a Named Query
-
In Named Queries, create a new query called Shutdown Query.
-
Set the Query Type to Update Query.
-
Add a Value type parameter named SessionID (string).
-
Enter the following query:
Shutdown QueryUPDATE sessions
SET end_time = CURRENT_TIMESTAMP
WHERE session_id = :SessionID
Add the Shutdown Script
-
In the Project Browser, navigate to Perspective > Session Events > Shutdown.
-
Enter the following script:
Shutdown Script# Log the Session end time.
queryParams = {'sessionID': session.props.id}
system.db.runNamedQuery('My Project', 'Shutdown Query', queryParams) -
Click Save.
Test the Example
- Open a Perspective Session on a mobile device or browser.
- Close the Session using one of the methods described above and wait for the timeout period to pass..
- Verify the database entry for the Session ID has an updated end time.
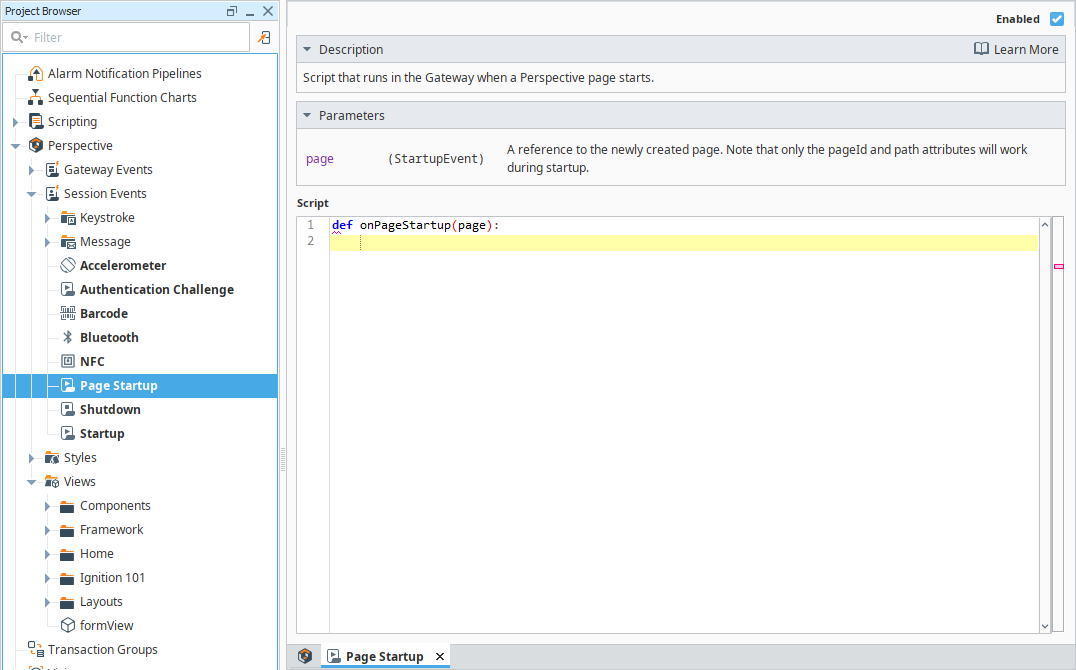
Page Startup
This script runs in the Gateway when a Perspective page starts in a new tab or window.
Navigating to an already open page does not trigger the Page Startup event (such as when using system.perspective.navigate).
Page Startup Parameters
| Name | Description |
|---|---|
| page | Represents the newly created page. Use .props. to access page properties. |
Page Startup Example
pageid = page.props.pageId # Retrieves the page ID.
pagePath = page.props.path # Retrieves the page path.
sessionId = page.session.props.id # Retrieves the session ID.
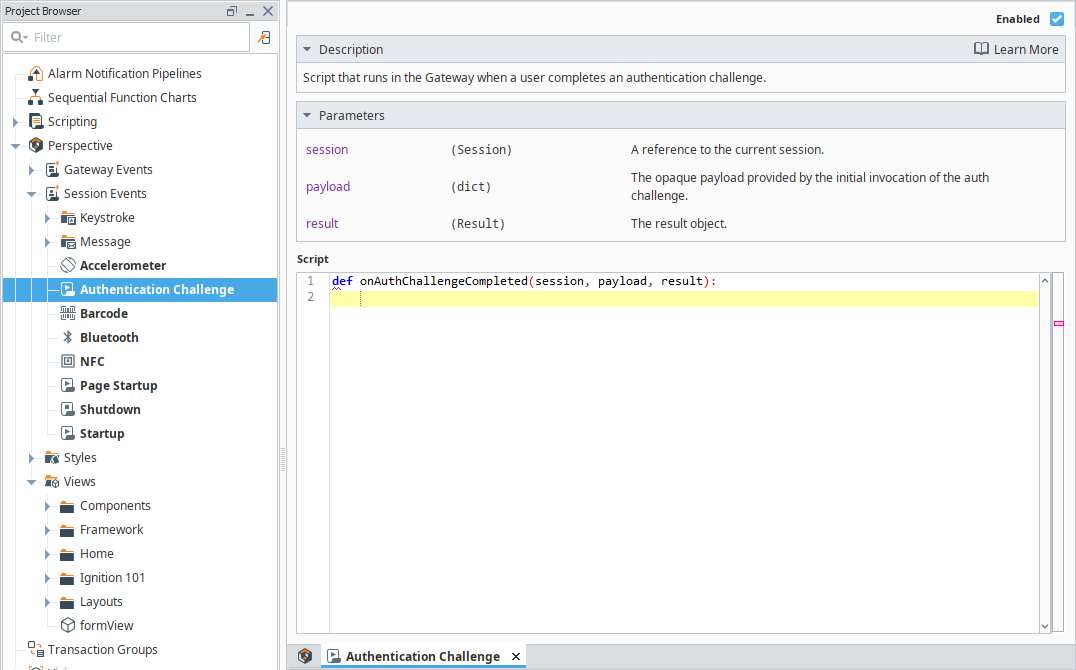
Authentication Challenge
This script runs in the Gateway when a user completes an authentication challenge.
Authentication Challenge Parameters
| Name | Description |
|---|---|
| session | An object that references the Project Session that triggered the authentication challenge. Use this to identify the specific Session that triggered the authentication challenge. |
| payload | The opaque payload provided by the initial Authentication Challenge Action or Scripting function invocation. |
| result | A result object that can be parsed by the result functions below. |
Results Functions
| Function | Description |
|---|---|
| isSuccess() | Returns true if the authentication challenge was a success. If true, optionally call getAsSuccess() to get the result as a Result.Success object for further parsing. If false, optionally call getAsError() to get the result as a Result.Error object for specific details pertaining to the error. |
| getAsSuccess() | Returns the result as a Result.Success object if the result is successful, otherwise throws an UnsupportedOperationException if the result is an error. Check isSuccess() or isError() before calling this function to ensure you get the correct result type. Note: It is not necessary to call getAsSuccess(). If isSuccess() returns true, the result type is Result.Success, so all of the properties and functions of a Result.Success object are available on the original result reference. |
| isError() | Returns true if the authentication challenge resulted in an error. If true, optionally call getAsError() to get the result as a Result.Error object for specific details pertaining to the error. |
| getAsError() | Returns the result as a Result.Error object if the result is an error, otherwise throws an UnsupportedOperationException if the result is successful. Check isSuccess() or isError() before calling this function to ensure you get the correct result type. Note: It is not necessary to call getAsError(). If isError() returns true, the result type is Result.Error, so all of the properties and functions of a Result.Error object are available on the original result reference. |
Result Objects
This object contains different properties depending on whether the authentication challenge result is a success or an error.
Result.Success
An object that represents a successful authentication challenge result. Call getContext() to return a WebAuthUserContext object with the following properties.
| Property | Description |
|---|---|
| idp | The Identity Provider that challenged the user. |
| securityZones | A string array containing the names of the security zones associated with the challenged user. |
| user | A WebAuthUser object that contains the properties in the User Properties table below. |
| securityLevels | An array of SecurityLevelConfig objects representing all of the security levels associated with the challenged user. |
User Properties
| Property | Description |
|---|---|
| id | The unique identifier associated with the challenged user |
| userName | The challenged user’s username. |
| firstName | The challenged user’s first name, or null / None if not defined for this user. |
| lastName | The challenged user’s last name, or null / None if not defined for this user. |
| The challenged user’s email address, or null / None if not defined for this user. | |
| roles | The challenged user’s roles as a string array. |
Result.Error
An object that represents an error authentication result. It can be parsed by the following functions.
| Function | Description |
|---|---|
| isGeneric() | Returns true if the error is not related to a timeout or user cancellation. Optionally call getAsGeneric() to get the Result.Error as a Result.Error.Generic object for specific details pertaining to the generic error. |
| getAsGeneric() | Returns the result as a Result.Error.Generic object if the error is generic, otherwise throws an UnsupportedOperationException. Check isGeneric() before calling this function to ensure you get the correct result type. Note: It is not necessary to call getAsGeneric(). If isGeneric() returns true, the result type is Result.Error.Generic, so all of the properties and functions of a Result.Error.Generic object are available on the original result reference. |
| isTimeout() | Returns true if the error is due to a timeout. Optionally call getAsTimeout() to get the Result.Error as a Result.Error.Timeout object for specific details pertaining to the timeout error. |
| getAsTimeout() | Returns the result as a Result.Error.Timeout object if the error is due to a timeout, otherwise throws an UnsupportedOperationException. Check isTimeout() before calling this function to ensure you get the correct result type. Note: It is not necessary to call getAsTimeout(). If isTimeout() returns true, the result type is Result.Error.Timeout, so all of the properties and functions of a Result.Error.Timeout object are available on the original result reference. |
| isCancelled() | Returns true if the error is due to user cancellation. Optionally call getAsCancelled() to get the Result.Error as a Result.Error.Cancelled object for specific details pertaining to the cancellation error. |
| getAsCancelled() | Returns the result as a Result.Error.Cancelled object if the error is due to user cancellation, otherwise throws an UnsupportedOperationException. Check isCancelled() before calling this function to ensure you get the correct result type. Note: It is not necessary to call getAsCancelled(). If isCancelled() returns true, the result type is Result.Error.Cancelled, so all of the properties and functions of a Result.Error.Cancelled object are available on the original result reference. |
Result.Error Objects
This object contains different properties depending on the cause of the authentication error.
| Object | Description |
|---|---|
| Result.Error.Generic | An object representing a generic error authentication result. Call getMessage() to return a diagnostic message pertaining to the error, or null if such a message does not exist. |
| Result.Error.Timeout | An object representing a timeout error authentication result. Call getTimeout() to return the integer timeout value (in minutes) that that was used to configure the timeout. |
| Result.Error.Cancelled | An object representing an error result due to user cancellation. This object has no functions or properties. |
Authentication Challenge Example
This script determines whether a user can proceed with an action after a completed Authentication Challenge Action. The action is allowed only if the authenticated user has the supervisor role. If authorization fails or an error occurs, the script logs the result.
if result.isSuccess():
    # Parse the authentication result
    context = result.getAsSuccess().getContext()
    user = context.user
    roles = user.roles

    # Check if the user has the "supervisor" role
    if "supervisor" in roles:
        proceedWithSomeAction()  # Execute the action
    else:
        # Log unauthorized access
        logger = system.util.getLogger("Authentication Challenge")
        logger.info("%s is not authorized" % user.userName)

# Handle authentication failure
else:
    error = result.getAsError()
    logger = system.util.getLogger("Authentication Challenge")

    # Log the error based on its type
    if error.isGeneric():
        logger.info(error.getAsGeneric().getMessage())

    elif error.isTimeout():
        timeout = error.getAsTimeout().getTimeout()
        logger.info("Authentication challenge timed out after %d minutes." % timeout)

    elif error.isCancelled():
        logger.info("Authentication challenge was cancelled.")

    else:
        logger.info("Unknown authentication error occurred.")
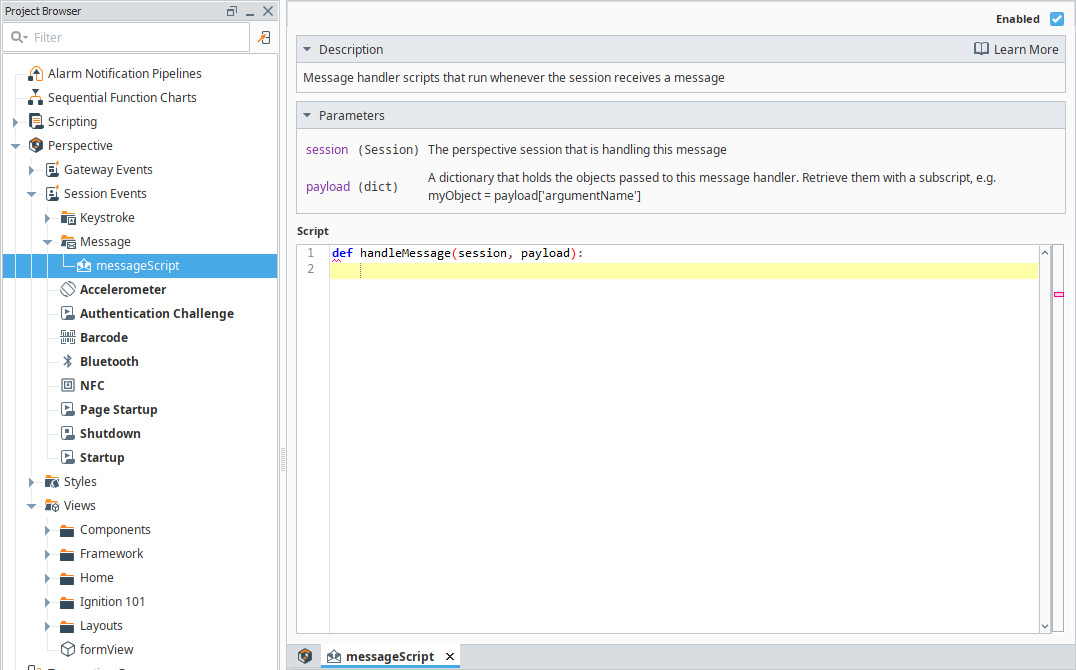
Message
The Message event script runs when a Session receives a message from system.util.sendMessage or system.util.sendRequest.
Session Message Handlers are different from component-based message handlers, which are accessed with system.perspective.sendMessage. Session Message Handlers cannot be called using system.perspective.sendMessage.
For user-driven operations, you can use system.perspective.getSessionInfo to retrieve session data and filter sessions by specific users.
Message Parameters
| Name | Description |
|---|---|
| session | The Perspective Session that is handling this message. |
| payload | Retrieve them with a subscript, e.g., myObject = payload['argumentName'] |
Message Example
This example demonstrates how to configure a Session Message Handler to log messages received from system.util.sendMessage.
Configure a Message Handler
-
In the Project Browser, navigate to Perspective > Session Events.
-
Right-click the Message folder and select New Message Script.
-
Enter "messageScript" as the script name.
-
Click Create Message.
-
Add the following script:
Logging Incoming Messagesmessage = payload["message"]
sessionId = session.props.id
logger = system.util.getLogger("SessionMessage")
logger.info("Session %s received message: %s" % (sessionId, message))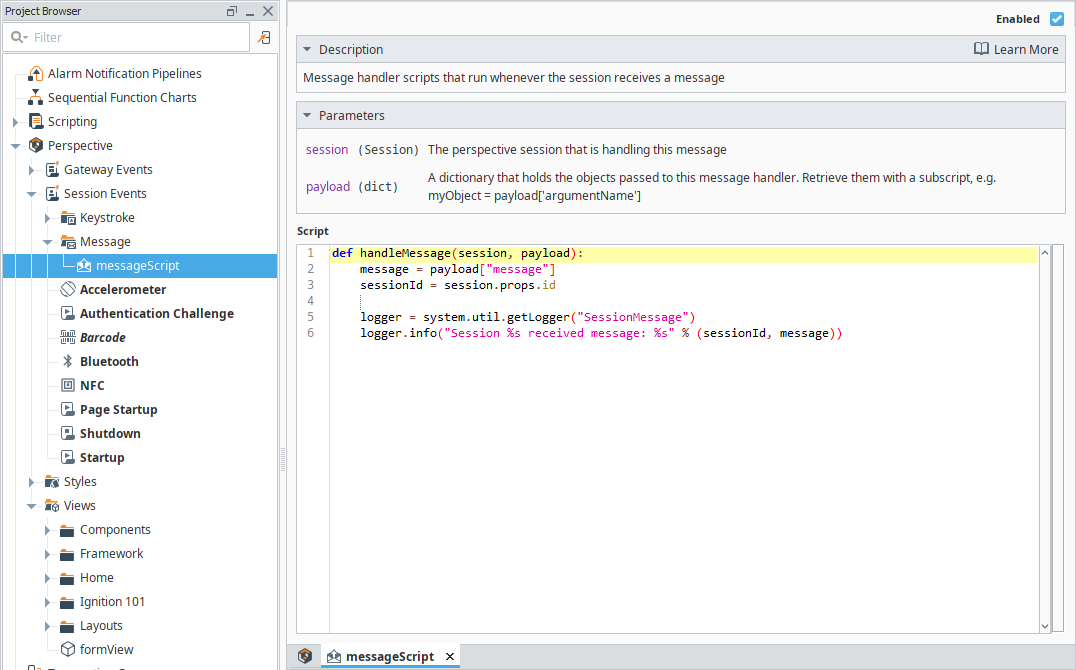
-
Click Save.
Send a Message Using a Button
-
Add a Button component to a view.
-
Right-click the Button component and select Configure Events.
-
On the Event Configuration screen, select Component Events > onActionPerformed.
-
Click the Add icon and select Script.
-
Enter the following script:
Sending a Message to the Sessionsystem.util.sendMessage("samplequickstart", "messageScript", {"message": "Hello World"}, "S")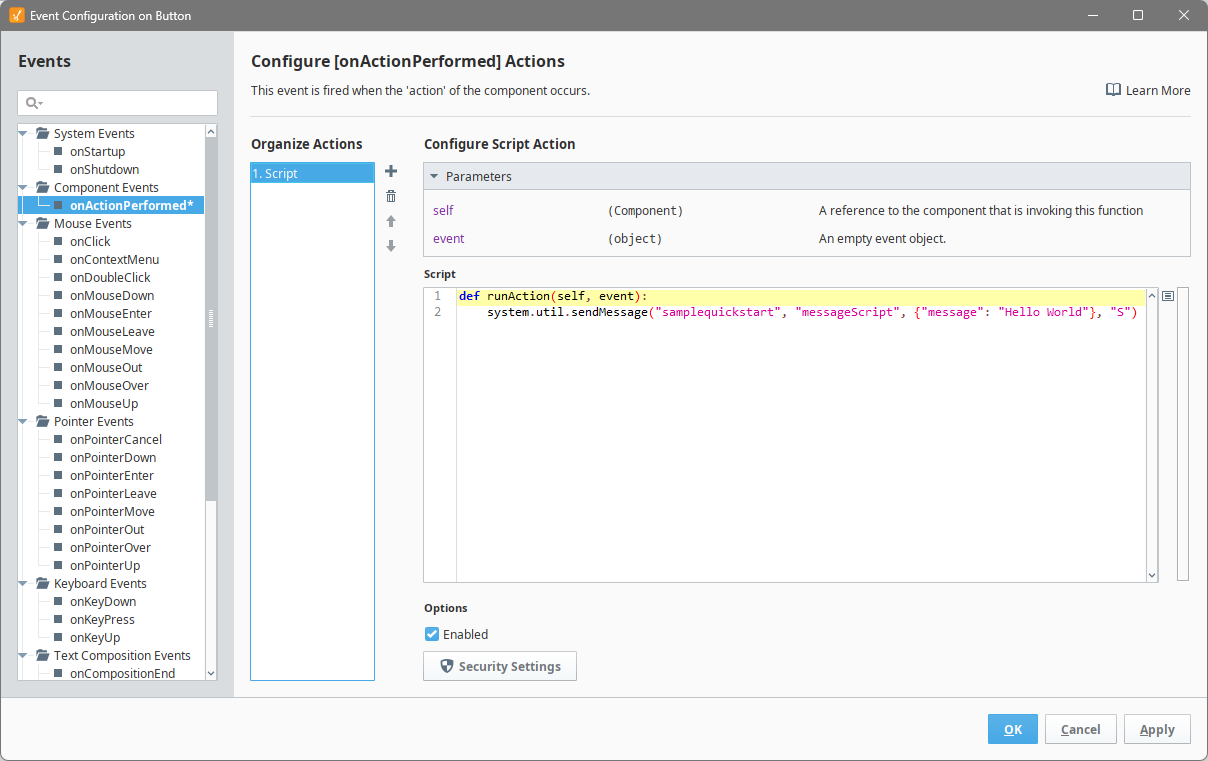
-
Click OK.
-
Click Save.
Test the Example
- Launch a Perspective Session.
- Click the Button to send a message.
- Navigate to Gateway > Diagnostics > Logs to verify that the message was received.
Keystroke
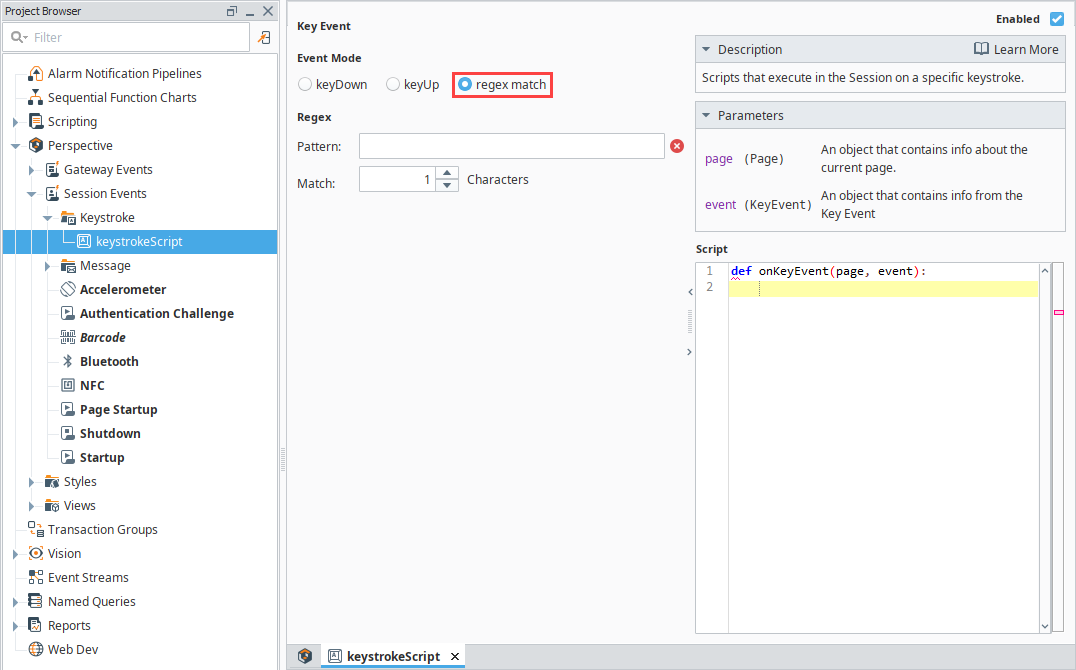
Keystroke scripts run when a Perspective Session detects a KeyboardEvent that matches either a single key or a regex pattern.
- Single Key: Matches on key press (keyDown) or key release (keyUp).
- Regex Match: Always detected on key release.
Keystroke event scripts can be triggered by keyboards or any HID barcode scanner that generates KeyboardEvent data.
Keystroke detection is only active inside a Perspective Session and does not function in the Designer.
The device triggering the keystroke event must generate a KeyboardEvent. HID barcode scanners generate KeyboardEvents because they simulate physical keyboard input. Scanners and input devices that do not create KeyboardEvents will not trigger this logic.
Keystroke Parameters
| Name | Description |
|---|---|
| page | Represents the current page. See the Page Arguments table below for parameter arguments. |
| event | Contains details about the Keyboard Event. See the Event Arguments table below for parameter arguments. |
Page Arguments
Arguments for the Keystroke Page parameter.
| Argument | Description |
|---|---|
| props | Properties of the page object. |
| session | Represents the current session. |
Event Arguments
Arguments for the Keystroke Event parameter.
| Argument | Description |
|---|---|
| altKey | True if the Alt (Option on macOS) key was active when the event was generated. |
| code | A string representing the physical key code. |
| ctrlKey | True if the Control (Ctrl) key was active when the event was generated. |
| isComposing | True if the event occurred between compositionstart and compositionend. |
| key | A string representing the key value of the event. |
| location | A number indicating the location of the key on the keyboard or input device. |
| metaKey | True if the Meta key (⌘ Command, ⊞ Windows) was active when the event was generated. |
| repeat | True if the key was held down long enough to repeat automatically. |
| shiftKey | True if the Shift key was active when the event was generated. |
| matches | A list where the first entry is the matched text for the regex, and all subsequent entries are capture group contents. |
Single Key Match
For single key matches, the match can be either:
- A physical key typed
- The code generated by the key
Modifiers (Alt, Ctrl, Shift, Meta/Command) can be detected in the event data.
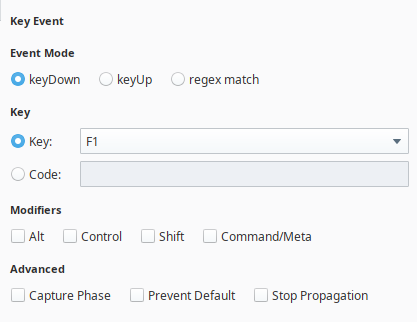
Additionally, key event matches include advanced settings:
- Capture Phase: Executes the script before other interface events. By default, key events run during the bubbling phase, meaning they execute after other events in the Document Object Model (DOM).
- Prevent Default: Stops default browser actions (e.g., form submission, page navigation) for a given key press.
- Stop Propagation: Prevents the key event from affecting deeper DOM elements (e.g., text inputs).
Regex Match
For a regular expression (regex) match, the match is based on:
- A regex pattern
- A match buffer (stores the most recently typed characters)
The buffer length should be set to the exact number of characters needed to match the regex.
Keystroke Example (Regex Match)
This example updates a custom Session property when a regex match is found.
-
Add a Label component to a view.
-
Create a custom Session property called
scannerInput. -
Bind the Label’s text to the custom Session property.
-
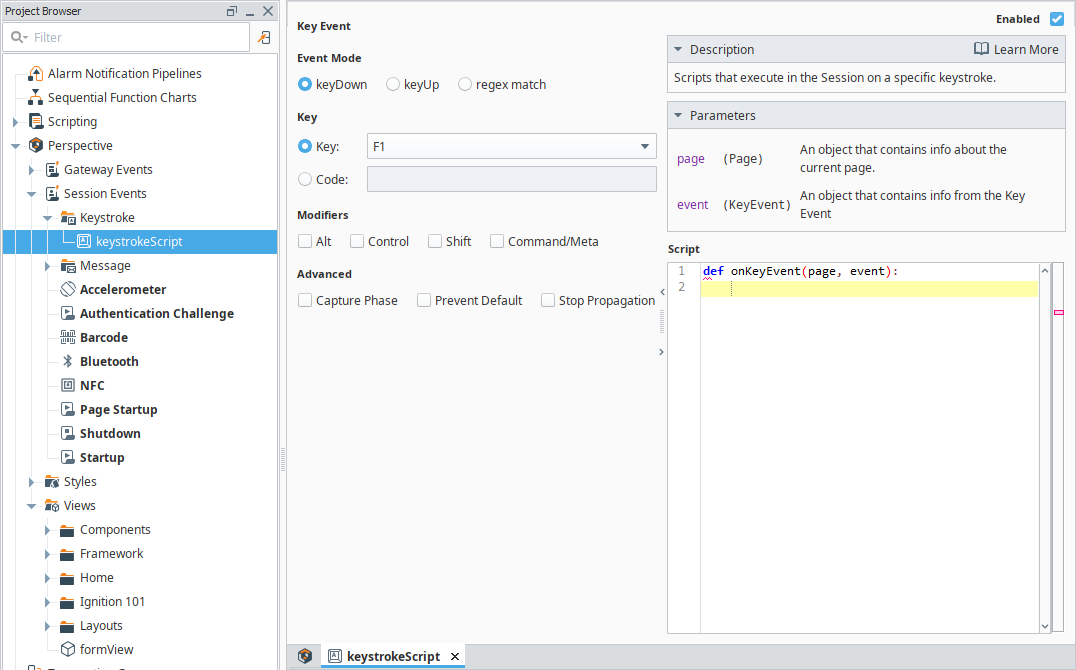
In the Project Browser**, navigate to Perspective > Session Events.
-
Right-click Keystroke and select New Key Event Script.
-
Enter a name and click Create Keystroke.
-
Under Event Mode, select Regex Match.
-
Enter the regex pattern to detect:
- Example:
[0-9]{12}@$(matches 12 digits followed by @).
- Example:
-
Set Match Buffer Length to
13(minimum required characters). -
Add the following script:
Updating a Session Property on a Regex Matchpage.session.custom.scannerInput = "Match found" -
Click Save.
Test the Example
- Launch a Perspective Session.
- Open the view with the Label.
- Type characters matching the regex pattern.
- The Label’s text updates when a match is found.

Perspective App Event Scripts
When the Perspective App is running on a mobile device, it enables users to use tools available on the device, such as GPS location data, the camera, or the accelerometer. The remaining Session events are designed specifically to handle the Perspective App Actions.
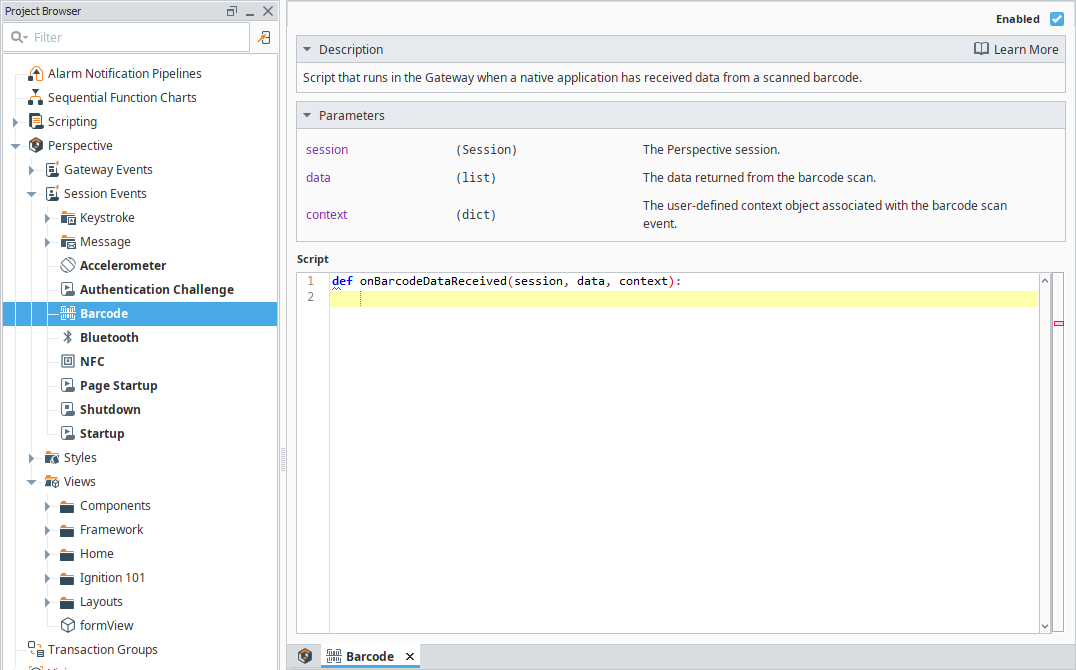
Barcode
The scanned barcode action can make use of a mobile device's built in camera.
Barcode Parameters
| Name | Description |
|---|---|
| session | An object that references the project Session that called the Barcode Scanned event. Use this to identify the specific Session that scanned the barcode. |
| data | The data returned from the barcode scan. Access the underlying barcode data using:# The value that was scannedNew in Perspective Mobile app version 0.98 Version 0.98 of the Perspective Mobile App added the following property:# The type of barcode that was scanned. |
| context | The user defined context object that can be defined on the action. |
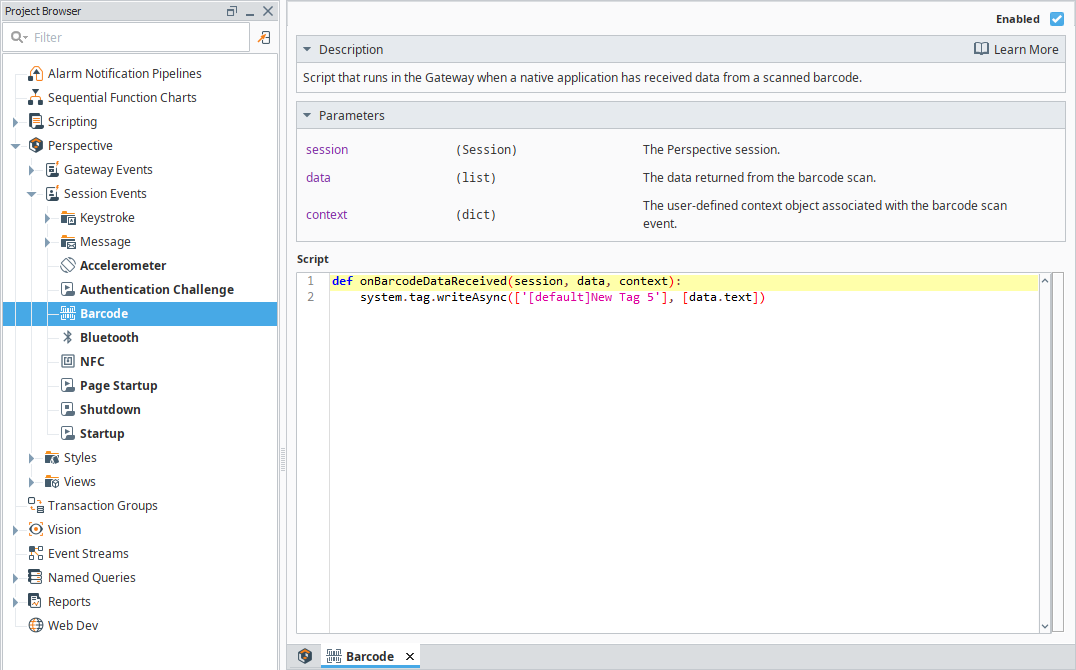
Barcode Example
This example will scan a barcode, and write its value to a tag.
-
For this example, drag a Button component and a Label component onto a view.
-
Create a new Memory tag with a data type of String. Set the value to Please scan a barcode.
-d35bfb7aba1bef912939be15fda39592.png)
-
Bind the text of the Label to the new tag.

-
Right-click on the Button component and choose Configure Events.
-
On the Event Configuration screen, select Mouse Events > onClick.
-
Click the Add icon and select Scan Barcode action.

-
Click OK. Next we need to set up a session event so that Perspective knows how to interpret the scanned barcode data.
-
Under the Project Browser navigate to Perspective > Session Events, and select Barcode.
-
Add the following script to the page:
system.tag.writeAsync(['[default]New Tag 5'], [data.text])noteWe used the tag created for this example, New Tag 5. You can enter your own tag name if different.
-
Save your project.
Test the Example
To test the example, open the Perspective App on your mobile device and load the project.
-
Click Scan Barcode.

-
If this is the first time scanning a barcode, you'll get a message requesting permission for Perspective to take pictures and record.

-
Click Allow.
-
You can now use the camera on the mobile device to scan the barcode.

-
Ignition scans the barcode. Once it recognizes the barcode, the script will run and the text is written to the tag. The Label then shows the new tag value.

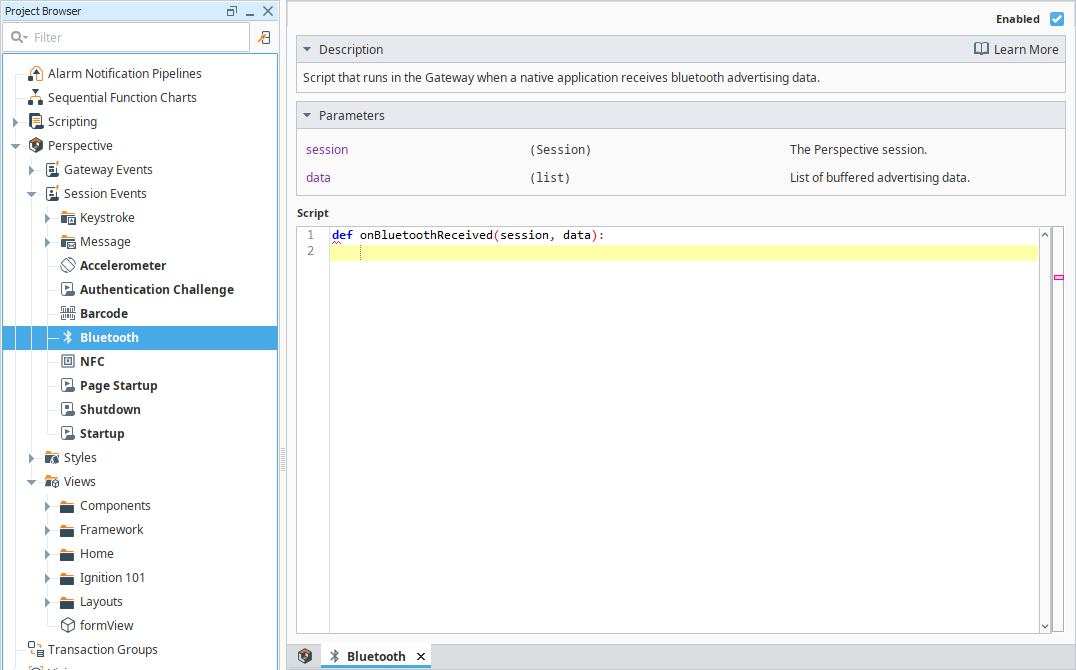
Bluetooth
This Session Event Script sends received Bluetooth advertising data to Perspective. It supports iBeacon and Eddystone formats.
- Eddystone will work on iOS and Android
- iBeacon on iOS requires user to specify the specific region (iBeacon UUID) located on Session props bluetooth.config.iBeaconRegion.
Bluetooth "advertising data" is the name of the communication data according to the Bluetooth spec. There is no connection to advertising as an industry.
Bluetooth Parameters
| Name | Description |
|---|---|
| session | An object that references the Project Session. |
| data | List of buffered advertising data. The data comes in as a data object, which has various parts. See the example output below. |
Example Output
{
    "values":
        [
            {
                "rssi":-48,
                "timestamp":1570147485167,
                "manufacturerData":{
                    "companyId":6,
                    "dataBase64Encoded":"AQkgAl_edccdnHClMvecMCiM--aAkLHAPibd"
                }
            },
            {
                "rssi":-48,
                "timestamp":1570147486012,
                "serviceUUIDs":[
                    "FEAA"
                    ],
                "serviceData":{
                    "uuid":"FEAA",
                    "dataBase64Encoded":"AOyqqqqqqqqqqqqqAAAAAAAA"
                    },
                "eddystoneUID":{
                    "txPower":-20,
                    "namespaceID":"AAAAAAAAAAAAAAAAAAAA",
                    "instanceID":"000000000000"
                    }
            },
            {
                "rssi":-54,
                "timestamp":1570147485919,
                "manufacturerData":{
                    "companyId":76,
                    "dataBase64Encoded":"AhV88isfQjVLY4VnXXfYqpTyAAAAAL8="
                    },
                "iBeacon":{
                    "uuid":"7CF22B1F-4235-4B63-8567-5D77D8AA94F2",
                    "major":0,
                    "minor":0,
                    "txPower":-65
                    }
            },
            {
                "rssi":-54,
                "timestamp":1570147485987,
                "manufacturerData":{
                    "companyId":65535,
                    "dataBase64Encoded":"vqwSNFZ4EjQSNBI0EjRWeJASAAAAAOwA"
                    },
                "AltBeacon":{
                    "manufacturerId":65535,
                    "uuid":"12345678-1234-1234-1234-123456789012",
                    "instance":"00000000",
                    "txPower":-20,
                    "manufacturerReserved":"00"
                    }
            }
    ]
}
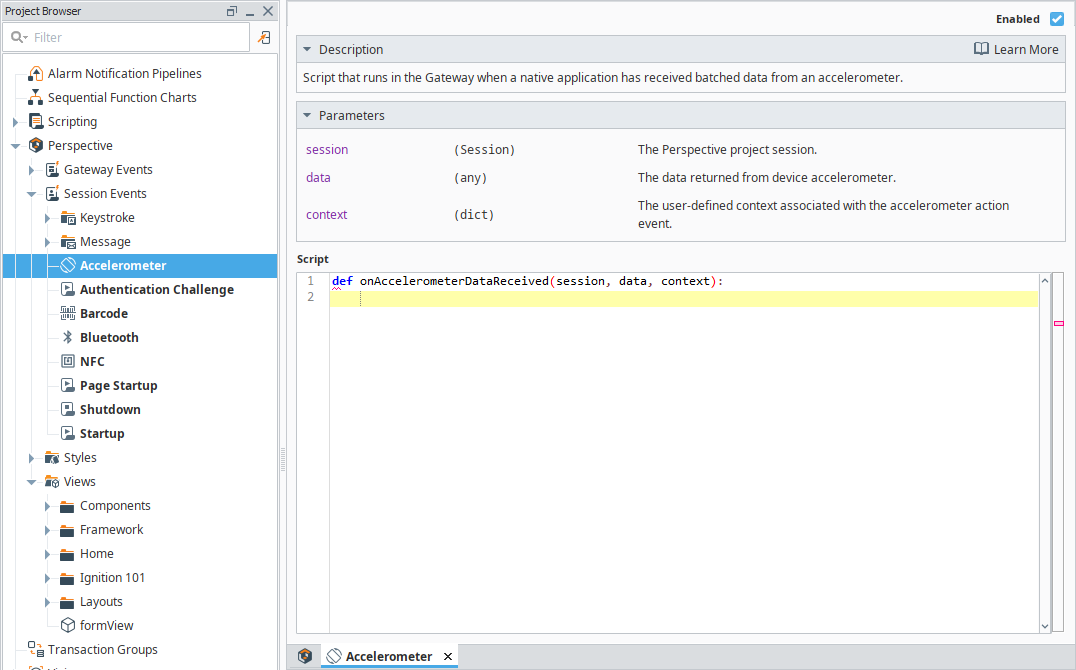
Accelerometer
The Accelerometer event is only used when data is coming in from a batched Accelerometer Action.
Accelerometer Properties
| Name | Description |
|---|---|
| session | An object that references the Project Session that called the Accelerometer Data Received event. Use this to identify the specific Session that triggered the batching of accelerometer data. |
| data | The data returned from the batched accelerometer. The data comes in as a data object, which has various parts. Access the various parts like: logger = system.util.logger('accelerometer') |
| context | The user defined context object that can be defined on the action. |
Accelerometer Example
This example will write accelerometer data to the Gateway logs.
-
Place a Button component onto a view.
-
Next right-click on the Button component and choose Configure Events.
-
On the Event Configuration screen, select Mouse Events > onClick.
-
Click the Add icon and select Accelerometer action.
-
Select Batch mode.
-
Set a Sample Rate of 400.
-
Set a Duration of 2000.

-
-
Click OK. Next we need to set up a Session Event so that Perspective knows how to interpret the accelerometer data.
-
Select Accelerometer under the Perspective > Session Events list.
-
Add the following script to the page:
# This script will take the accelerometer data and print it to the Gateway logs.

# Create the logger.
logger = system.util.logger('accelerometer')

# Loop through the list of batched events and pull out the x, y, and z values to print to the Gateway logs.
for row in data.values.data:
logger.info('X:' + str(row['x']) + ', Y:' + str(row['y']) + ', Z:' + str(row['z'])) -
Save your project.
Test the Example
To test the example, open the Perspective App on your mobile device and load the project.
-
Click the Accelerometer button.
-
The script will record accelerometer data for the next two seconds, so move the phone around.
-
After the two seconds, you should see the logged information appear in the Gateway logs.
NFC
The NFC event is used when the NFC Action is used and the mobile device scans an NFC tag.
NFC Properties
| Name | Description |
|---|---|
| session | An object that references the Project Session that called the NFC Ndef Scanned event. Use this to identify the specific Session that scanned the NFC tag. |
| data | The data returned from the NFC tag scan. The data object is a list which can contain multiple records from a single NFC tag. Access the underlying NFC data using:logger = system.util.logger('NFC') |
| context | The user defined context object associated with the NFC scan event. |
NFC Compatibility
NFC tag types must be NDEF-formatted as one of the following types:
- NFC_FORUM_TYPE_1 based on ISO14443A
- NFC_FORUM_TYPE_2 based on ISO14443A
- NFC_FORUM_TYPE_3 based on JIS X 6319-4
- NFC_FORUM_TYPE_4 based on ISO14443A/B
NFC Example
This example will write the NFC tag data to the Gateway logs.
-
Place a Button component onto a view.
-
Right-click on the Button component and choose Configure Events.
-
On the Event Configuration screen, select Mouse Events > onClick.
-
Click the Add icon and select Scan Ndef NFC action.
-
Select Single mode, then click OK.

-
Next we need to set up a Session Event so that Perspective knows how to interpret the NFC data. Select NFC under the Perspective > Session Events list.

-
Add the following script to the page:
# This script will take the NFC data and print it to the Gateway logs.

# Create the logger.
logger = system.util.logger('NFC')

# Loop through the list of records stored in the NFC tag and pull out the type, type name format, payload, string data, and raw byte data from each record and print it to the Gateway logs.
for row in data:
logger.info('Type:' + str(row['type']) + ', Type Name Format:' + str(row['typeNameFormat']) + ', Payload:' + str(row['payload']) + ', String:' + str(row['string']) + ', Bytes:' + str(row['bytes'])) -
Save your project.
Test the Example
To test the example, open the Perspective App on your mobile device and load the project.
-
Click the NFC button.
- After clicking the button, the script will pass the next NFC tag scanned to the script to be handled.
-
After scanning an NFC tag, you should see the logged information appear in the Gateway logs.