UDT Inheritance
Once you have a single data type created, it is possible to set up UDT inheritance where data types extend to other data types, to add additional members, or override default values. For example, you can create a new data type and using the inheritance feature it will inherit all Tags from the parent data type including the parameters. Then you can add additional Tags and/or override any settings in your new data type. UDT Inheritance is a way to extend to a class of data types to add more functionality to that class.
For example, you may have a simple motor and a complex motor. The complex motor can inherit from the simple motor, which means all simple motor values will be in the complex motor and you can add more.
Nesting (using one or more UDTs to make up a larger UDT) is different from inheritance and can be found under UDT Nesting.
To Inherit Property Values from an Existing UDT
Let's use our data type Motor from the previous sections to create another data type. We'll set the parent to Motor so our new data type automatically inherits all the properties of Motor.
-
In the Tag Browser, click on the UDT Definitions tab and click the Add
 icon to create a New Data Type. The Tag Editor window will open.
-
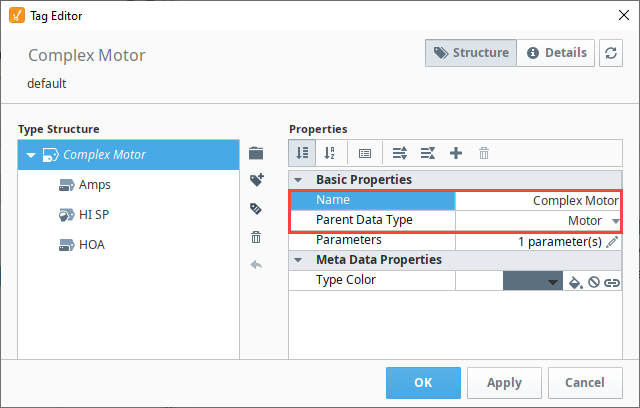
In the Name field, enter name for your new UDT (i.e. Complex Motor). Under Parent Data Type property go to the dropdown and select the Motor data type and click Apply. Now your new Complex Motor UDT is inheriting from all the properties of the parent Motor UDT: Amps, HI SP and HOA.
-
With the Tag Editor still open, let's add an OPC Tag to the Complex Motor UDT. Click on the Add Tag
 and select OPC Tag.
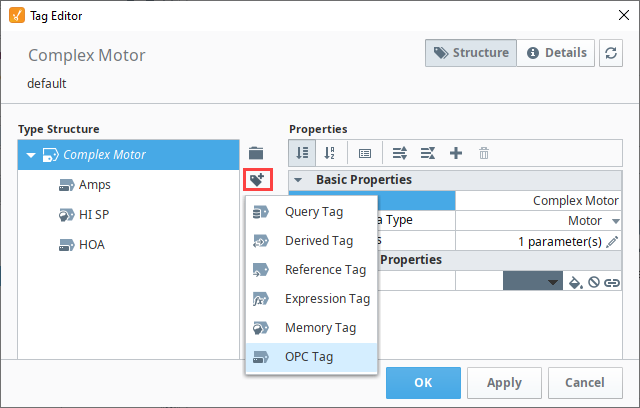
-
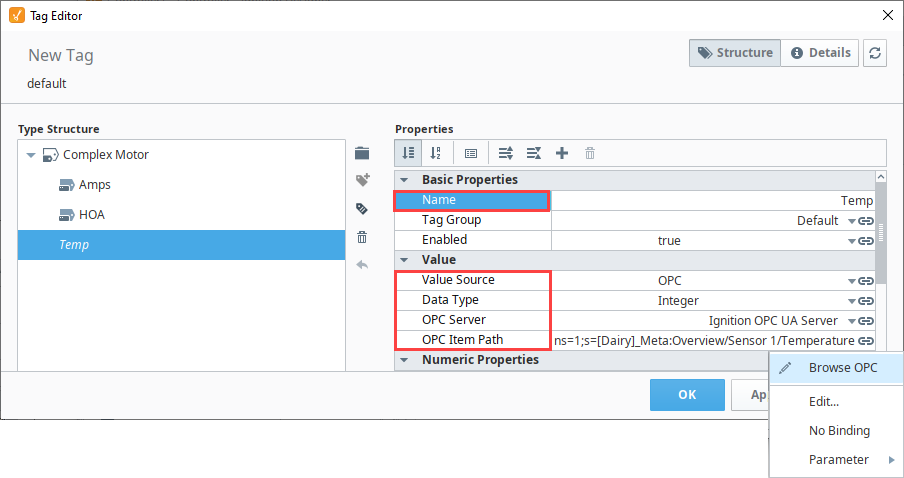
Enter the following properties for your new Tag and click Apply. You will see the new Tag was added to the Complex Motor UDT.
- Name: Temp
- Value Source: OPC
- Data Type: Integer
- OPC Server: Click on the binding () icon and select Ignition OPC UA Server
- OPC Item Path: Browse the OPC and find the Tag you want to use. This example uses a Temperature Tag from a Sensor in the Dairy program. Click Commit.
-
In the image below the Temp Tag is pointing to a specific address in the PLC. Because we're creating a new Tag in our UDT, we don't want to point to one specific set of 'Temp' Tags. We want each instance of the Complex Motor UDT to reference a different set of 'Temp' Tags. To do that, we need to add a parameter to the Complex Motor data type that we will call 'SensorNumber'.

-
With the Complex Motor UDT Tag Editor open, let's create a new UDT parameter. Right click the Edit
 icon next to the Parameters property. The Parameters window will open.
 -
Click the Add
icon and add the new parameter, 'SensorNumber' and click Commit.
-
With the Tag Editor still open, select the 'Temp' Tag. In the OPC Item Path field, click the binding
 icon, select Edit, and the Temp > OPC Item Path window will open. Place your cursor at the end of 'Sensor1', delete the '1', add a space, and enter
 {SensorNumber}. Don't forget the curly braces. Click Commit to save your updates and go back to the previous window.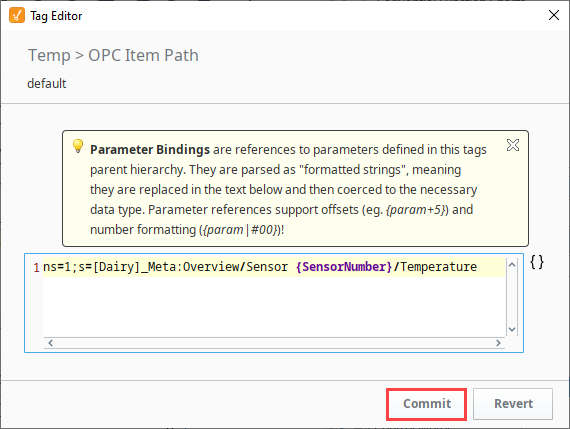
-
In the Tag Editor window, click OK to save your UDT. In the Tag Browser, the new data type is now visible in the , "Complex Motor." You can see all the inherited Tags from the Motor data type and the newly added Temp Tag.

Creating the Data Type Instance
Now that our Complex Motor UDT is set up, let's create a data type instance of the Complex Motor.
-
Click on the Tag tab, and from the context menu, select the Data Type Instance > Complex Motor.

-
Enter the Name for the instance (i.e., Complex Motor 100). Click the Edit
icon next to the Parameters property and enter the parameter value of '2' for MotorNumber and SensorNumber, and press Commit.
-
Click OK to create the instance. Now, you'll be able to see all the values for Complex Motor 100 including the Temp Tag that was added.

Overriding Properties of the Parent UDT
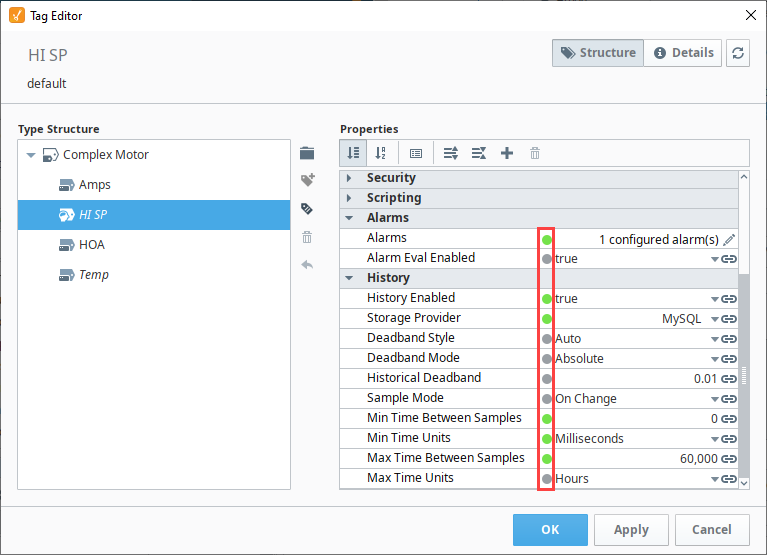
Another benefit of the UDT inheritance feature is it allows you to override some of the properties of the parent. For example, since the Complex Motor has Motor as the parent, you can go to any of the Tags and override any of the settings of that data type. Click the circle to the right of the property and enter a new value, or change a property's value and the green circle changes to green automatically. This overrides the property inherited from the parent.

You can also turn on Alarming and History that wasn't initially turned on in the parent UDT by simply using the override feature. Next to the Alarm property, click the green circle to change it to green, and click the pencil (![]() ) icon to configure the alarm if it is not already configured. If you want to turn on History, click the green circle or change any of the History properties which will cause any of the green circles to change from gray to green.
) icon to configure the alarm if it is not already configured. If you want to turn on History, click the green circle or change any of the History properties which will cause any of the green circles to change from gray to green.
UDT Inheritance Traits
UDT instances that are inherited and have properties that override the parent properties have a visual representation next to them.
