Drop Configuration
On view objects in Perspective, the dropConfig property (also called drop configuration) enables you to associate a view with a Tag, allowing for drag-and-drop from the Tag browser to a view in the designer to automatically create a view. There are two general approaches, which are displayed under the dropConfig property:
- udt: Allows a view to be associated with a UDT. Useful in cases when a system is making use of UDTs, and you'd like to be able to multiple bindings simultaneously.
- dataTypes: Allows the associated to be based on the data type of a Tag. For example, you can automatically create and bind a specific view when an Integer Tag is dropped onto another view.

Both of these configurations are made directly on the view you wish to instantiate.
The param and action Properties
While udt and data types drop configurations are listed separately in the Property Editor, they share some properties: namely param and action.
param
When using a drop configuration, param expects a string value to a view parameter on the same view. The idea being that when a Tag drop creates an instance of this view, the view parameter on the instance will be automatically set with something (determined by the action).
In the image below, the view has an element under dropConfig.udts configured, with param set to "udtMembers". Further down, under the "PARAMS" heading, there is a parameter with the same name of "udtMembers". Thus the next time the configured UDT (type of "My Type", as shown in the image) is dropped onto a view, the "udtMembers" view param will automatically update its value.

action
The action property determines what happens to the specified view parameters (determined by the param property). There are two options for action:
- bind: creates a Tag binding between the view parameter and the dropped Tag. This is useful if components in the view instance need to bind directly to the value of the dropped Tag.
- path: populates the view parameter with a Tag path leading to the dropped Tag. Useful if scripts and expression bindings in the view instance are more interested in the path to the Tag.
UDT Drop Config
The udt type drop configurations can associate an entire UDT instance, along with its members, to a view. Using a UDT drop configuration is exciting because if the associated view parameter is set to a JSON object, then the configurations will also expose values on the members of the UDT to elements in the JSON object. For example, say we have the following UDT.
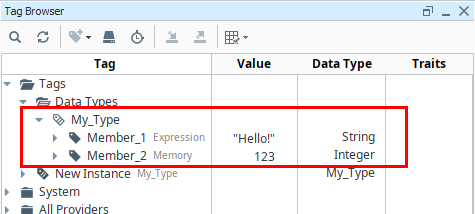
On a view we wish to embed elsewhere, we can add a view parameter as a JSON object, with a key ("value" type) for each member we want in the embedded view. As long as the name of the keys matches a UDT member, then the created view instance lookup values for the named members.
In the image below, the dropConfig>udts parameter named udtMembers is a JSON object with two values. The keys for the those values are Member_1 and Member_2, which matches the names of UDT members in our My_Type UDT. As a result, the drop configuration will result the new view instance having access to the value of the Member_1 and Member_2 Tags.

Example
First, create a UDT definition and instance. If you'd like to use the same Tags as this example, open the expand panel below, copy the JSON string, and paste it into the Tags folder in your Tag Provider.
{
"name": "",
"tagType": "Provider",
"tags": [
    {
    "name": "UDT_Drop_Target",
    "tagType": "Folder",
    "tags": [
        {
        "name": "New Instance",
        "typeId": "UDT_Drop_Target/My_Type",
        "parameters": {
            "thing1": {
            "dataType": "String",
            "value": "Hello!"
            }
        },
        "tagType": "UdtInstance",
        "tags": [
            {
            "name": "Member_1",
            "tagType": "AtomicTag"
            },
            {
            "name": "Member_2",
            "tagType": "AtomicTag"
            }
        ]
        }
    ]
    },
    {
    "name": "_types_",
    "tagType": "Folder",
    "tags": [
        {
        "name": "UDT_Drop_Target",
        "tagType": "Folder",
        "tags": [
            {
            "name": "My_Type",
            "tagType": "UdtType",
            "tags": [
                {
                "valueSource": "memory",
                "name": "Member_2",
                "value": 123,
                "tagType": "AtomicTag"
                },
                {
                "valueSource": "expr",
                "expression": "\"Hello!\"",
                "dataType": "String",
                "name": "Member_1",
                "tagType": "AtomicTag"
                }
            ]
            }
        ]
        }
    ]
    }
]
}
It should look like the image below. Notice, both the instance and definition are placed into their own separate folders.

Create two views. The first will be Big_View that we'll be dragging Tags onto, and the second will be Small-View that we'll associated to the UDT above. For the purposes of this example, we'll use Coordinate Containers as the root container for both views.

In the Small_View, we'll make a minor cosmetic change so it is easier to see when we're embedding it later. We'll change the background color to something other than the default.
Then, with the view selected, add a view parameter. When selecting the parameter type, choose Object. We'll name it UDT_Prop.

Add two object members to UDT_Prop. These members will represent the values on the two UDT members in our UDT. The values on our UDT members are integer and string, so both only have a single value. Thus, the object members we need to add here only need to show a single value each. Thus we'll make the object members Value typed.

For the view parameters to know which members in the UDT to associate with, we need to rename them so they match the name of a UDT member. Change the name of the view parameters to Member_1 and Member_2, to match our UDT members.

Now that we have some parameters that will eventually house values from our UDT, we can create components that use these parameters. Add a Label component to Small_View.
On the Label, configure a Property Binding on the Text property, leading to the Member_2. We're using Member_2 here since it's a memory Tag, and we can easily change the value of it later on.

Next, we need to configure the drop configuration settings on Small_View. Select the view, and locate the udts property.

Add an array element to the udts array. For type, click the dropdown and select our UDT definition.

For param, type in the name of the root view parameter we created earlier. If you followed along with the example, the name would be UDT_Prop.
For action, leave that with the default value of bind, which will create some bindings for us when we create an instance of this view.
Now we're ready to test this out. Save your project.
Switch over to Big_View.
Drag the UDT instance (or any UDT instance with a parent type of My_Type) onto Big_View. You'll be presented with a popup, which lists any and all views that are associated with that type.
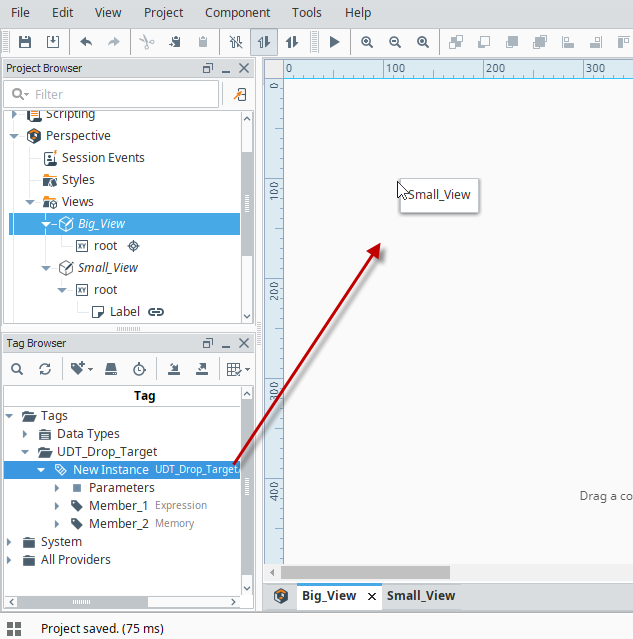
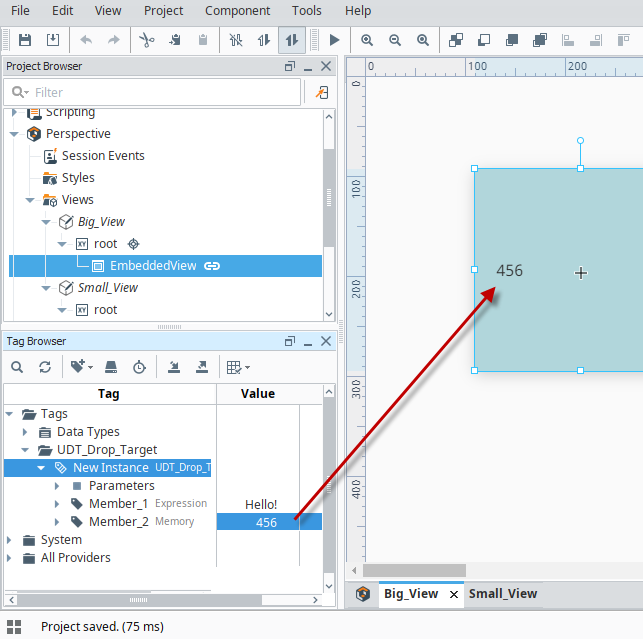
Select Small_View from the popup, and you'll see an instance of Small_View created. Further more, the values in our UDT instance are made available to the view instance, so the value on the Member_2 Tag will be shown on the label in the instance of Small_View.
Changing the value on the Member_2 Tag will update the label on the instance of Small_View.
Data Type Drop Configurations
Data type drop configurations allow you to associate a view with a certain Tag data type, as well as specify what bindings occur when dropping the view.
Let's use a Tag to create an embedded view with all the property bindings configured by simply dropping the Tag in a view.
In the Project Browser, select your original view that contains the Tank, LED Display, Slider, and Labels (i.e., Tanks3).
In the Property Editor, expand the dropConfig property, and then expand the dataTypes property. Configure the following properties:
- Select the data type - Int4
- Set the param - sliderValue
- Identify the action - bind

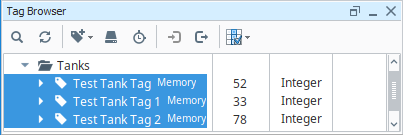
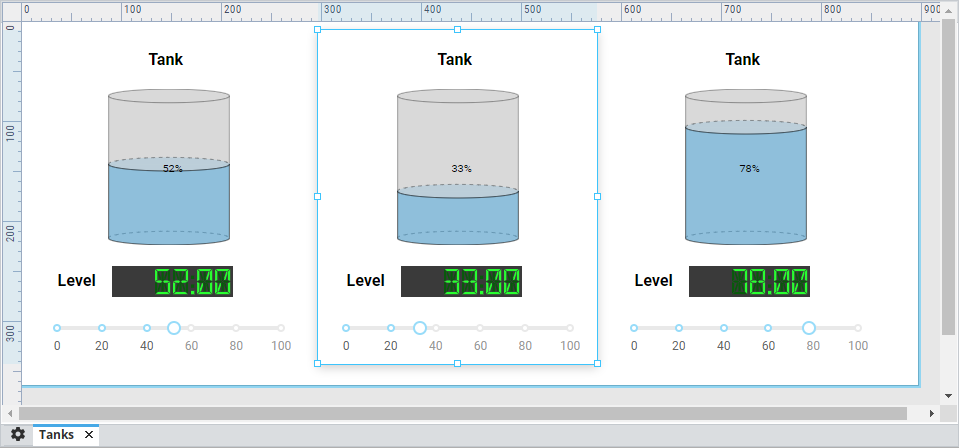
Let's create a couple of Tags so we can use the 'dropConfig' feature to create multiple embedded views. Copy the Tag you created in the last example (i.e., Test Tank Tag) to make two more Tags, and change their values. This example uses 52, 33, and 78 for the values.
Create a new large view so we have plenty of room to drop multiple of these tank views on the screen.
Drag and drop each of your three Tags into your new large view. You will be prompted for what type of component or view you want to create. Choose your original view (i.e., Plant C / Tank3).

The three Tank components and their values are now displayed on your view.
If you check the individual tank views, you will see a binding on the 'sliderValue' param. If you open the binding, you will see that each embedded view is pointing to one of the Tags.
