Component Message Handlers
In Perspective, Component Message Handlers are the preferred way to pass parameters between components or Views. Doing this involves the system.perspective.sendMessage function. There are typically two steps involved:
- Creating a Message Handler on the component that will listen for a particular call.
- Create a script that will call the Message Handler.
This page will demonstrate how to prepare both steps. The goal of this example is to create a script that will cause a button to change the text property of a Label.
Object Traversal
When writing a component based script, Object Traversal should be avoided where possible. Object Traversal is the process of declaring hard-coded component paths in a script similar to how the Vision module uses component paths in scripting. While component paths exists in Perspective, they are brittle: changes to the hierarchy in the view (such as placing a component into a new container), or changing a component name will invalidate any paths defined before the change, since the component's relative location has changed.
Consider the following:
self.getSibling('Text Field').props.text
The path described above only works if there is component named "Text Field" in the same container as the component that is running this script. If the Text Field component is renamed at any point, this reference to the component will fail. Additionally, if the Text Field is placed in a different container, then the getSibling() call will no longer work. Components in other containers (in the same view) are available, but are not siblings.
Additionally, Object Traversal can't be used to reference a property in a separate view: i.e., a script in View A cannot reference something in View B.
We strongly suggest you utilize Message Handlers when a script is trying to interact with a component in another View.
Message Types
A message type is a string used to identify a Message Handler.
If a script sends a message with a type of foo, then any handler listening for a Type of foo will execute. This means multiple components in the same window can all have Message Handlers with the same Type: e.g., if a view has a "reset" button to clear out multiple input components, then each input component can simply have a "reset" message type that clears the field, allowing a single message to trigger multiple handlers. Alternatively, if only a single handler should execute when sending the message, simply give that one handler a unique Type.
Message types are case-sensitive, so message types foo, Foo, and FOO are considered separate types.
Message Handler Scope
Message Handlers can be limited in scope, meaning the range of the sent message (or range of the listener) can be confined to a particular scope. The available scopes are:
| Scope | Definition |
|---|---|
| View | Messages can only be heard by listeners within the same View that are listening for view-scoped broadcasts. |
| Page | Messages can only be heard by any listeners within the same Page that are listening for page-scoped broadcasts. This includes listeners both within the same View and those in other Views contained within the same page (including Docked Views and Popup Views). |
| Session | Messages will be heard by any listeners in any open tabs in your workspace that are listening for session-scoped messages. |
For example, you can send a message that is scoped to just the View where the message originated, meaning only listeners in the same View will be able to respond. This is useful if you sent a message from a popup view, and didn't want any other views to respond.
There are two ways to limit the scope of a message:
- The system.perspective.sendMessage function contains a scope parameter that will restrict the range on the message being sent.
- The Message Handlers have a Listen Scopes setting that can filter out messages from certain scopes.
Message Handler Example
Step 1 - Prepare Perspective Workspace
-
Open the Designer.
-
Switch over to the Perspective Workspace by clicking on Perspective in the Project Browser.
-
Right-click on the Views folder and select New View.
-
Give the new View a name and click the Create View button. The name of the view will not matter for this example.
-
Place a Button and a Label component on the View.

Step 2 - Create A Message Handler
Message Handlers are effectively user-created scripting events. A user can define a Message Handler that listens for a particular message. The idea being that some other component will broadcast a message, and if the type of the message matches what the Message Handler is listening for, the Message Handler will execute a script.
Message Handlers are useful because they can respond to messages from multiple components: if something sends a message with the correct type, then the Message Handler will execute. Additionally, message can be sent across separate views, pages, or throughout the entire session.
In our example, we want the Label's text property to change when something else in the view happens (in our case, our button is pressed), so it would make sense to configure a Message Handler (listener) on the Label. This way, if we relocate the Label component in the view, the script will still work.
-
Right-click on the Label, and select Configure Scripts.
-
The Script Configuration window appears. Make sure the title bar on the window states that it's the Label component.

-
On the left side of the Script Configuration window, you will see a tree. Double-click on the Add handler... item.
-
A new handler named "type-name-here" will appear. Under Message Type type
my-handler. Note that we're using all lowercase characters: Message Handlers are case-sensitive. The Message Type is effectively the name of the Message Handler. When sending a message, we will specify this Message Handler's type, which will cause it to respond by executing the script. -
In our example, let's change the text on the Label to "Hello!". Under the script area, type the following script:
Python - Set the Textself.props.text = 'Hello!' -
This example is fairly limited to this one view. Thus, let's limit the scope so that it will only respond to messages from the same view the Label is on. Under the Listen Scopes, leave Page as the only selected scope.

-
Click the OK button. We just created a Message Handler. In the next step, we'll create a script that will call the Message Handler.
Step 3 - Send A Message
In this step, we place a script on the Button that will call our Message Handler.
-
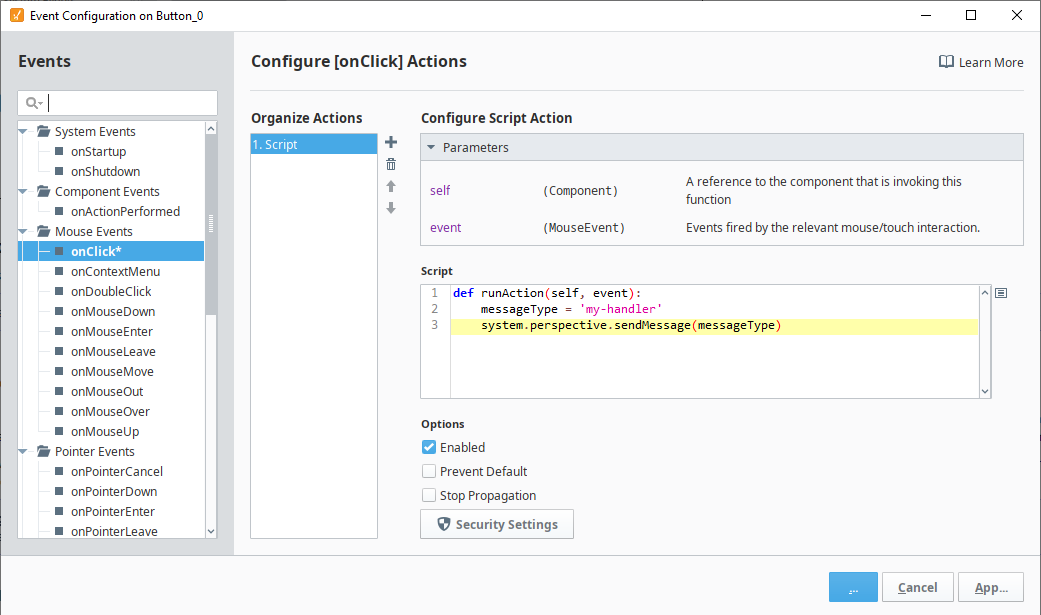
Right-click on the Button, and select Configure Events.... The Event Configuration window appears.
-
We want our script to trigger when the button is pressed. On the left side of the window, in the Mouse Events folder, select onClick.
-
The Organize Actions list will appear. Press the Add
 icon. A popup list will appear.
 -
Select the Script action.
-
Add the following code:
Python - Sending a MessagemessageType = 'my-handler'
system.perspective.sendMessage(messageType)Make sure the script lines are indented one time.
-
Click OK to apply the script.
The example is now running. From the Designer, enable Preview mode, and then click on the Button component. The text on the label should update.
Messages Execute Asynchronously
When sending messages from a script, the called Message Handler will execute in a separate thread. This means the script that sent the message will not wait for the Message Handler to execute its own script. Additionally, this means a script where system.perspective.sendMessage was invoked will continue executing, running, and possibly completing before the script on the Message Handler.
For example, consider the following script action on a button's onActionPerformed event:
system.perspective.sendMessage('my-handler')
system.perspective.print('running')
The print function will likely be invoked before the my-handler Message Handler finishes. This is because the component script is not waiting for a response from my-handler. Since a message was broadcast, the component script continued to the next line.
Due to the non-deterministic timing, it is still possible for the Message Handler to complete before the original script executes. Just as you cannot rely on the Message Handler to block the invoking thread, you cannot rely on the invoking thread to block the Message Handler.
Passing Parameters Example
Let's make the previous example more complicated and pass some values with the message. The example above can be modified to determine the timestamp. When passing parameters in a script, the most direct approach is to include any parameters along with the message. Message Handlers have a built-in argument called a payload, which is used to transfer values to the handler. The payload is simply a Python Dictionary, so please see the Dictionaries page for more information.
Alternatively, we could create a session property to hold the value, and have the label reference the session property. However this would require that we either create a new property to hold the value or overwrite the value of another property. Thus, our next example will demonstrate how to utilize the payload.
Since Tag values are shared by all Perspective sessions, you may not want to write the parameters in Tags. Doing so would result in each session instance potentially trying to overwrite the same value.
Step 1 - Update the Button Script Action
-
Right-click on the Button component and select Configure events....
-
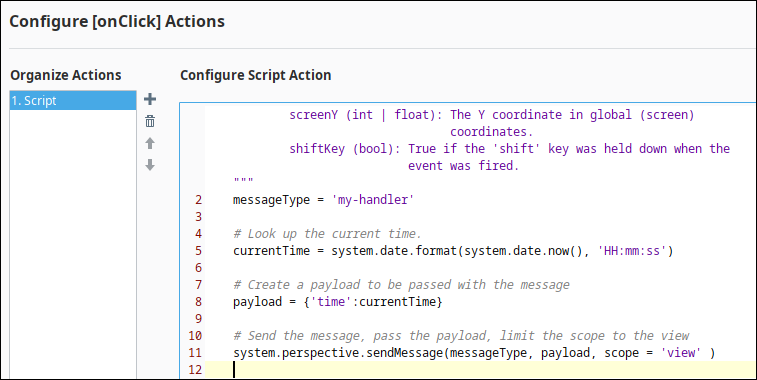
Replace the code with the following:
Python - Check the Time, Send a MessagemessageType = 'my-handler'
# Look up the current time.
currentTime = system.date.format(system.date.now(), 'HH:mm:ss')
# Create a payload to be passed with the message
payload = {'time':currentTime}
# Send the message, pass the payload, limit the scope to the view
system.perspective.sendMessage(messageType, payload, scope = 'view' ) -
Make sure the code is indented one time.
 note
noteOn line 8, we're creating a dictionary, creating a key called "time", and storing the current time with the "time" key. When our handler receives the payload, it can retrieve the value we passed by referencing the "time" key.
-
Once finished, click the OK button.
Step 2 - Update the Message Handler
Now that we're including a payload with the message, we need to modify our handler so that it will extract the time from the payload.
-
Right-click on the Label component, and select Configure scripts....
-
Replace the original code with the following:
# Access the time by referencing the 'time' key
self.props.text = payload['time'] -
Click OK.
-
To test it, enable Preview mode, and click the Button component. You will see the current time populate in the Label.