Script Builders in Vision
When creating an Event Handler on a component, you can use one of the handy Script Builders instead of writing your own script. In the Component Scripting window, the Script Builders are accessible as tabs along the top. Each tab represents a different kind of action that users can associate with an event. The last tab, Script Editor, lets you write your own event handler. You can also use the Script Editor tab to view a script that was generated by one of the builders, which is a good way to get started learning how to write your own event handlers. Each script builder example on this page shows the actual script in the Script Editor, just simply click the link under each example.

Only one Script Builder can be used at a time. If you previously picked another action using a different Script Builder, it will get overwritten by enabling another Script Builder. If you need to do more than one action at a time, use the Script Editor to combine scripts, or create your own script.
Navigation Script Builder
The Navigation Script Builder has various functions that deal with opening and closing windows.
Open / Swap
Opening is a very straight-forward operation, it simply opens the specified window at the same size it was in the Designer. Simply click on the Open / Swap button, and select a Window from the dropdown list that you want to open. There are options to center that window within the Client, and to close the window that the event was fired from. The opened window can also be opened as an additional instance, meaning there can be multiple copies of the same window. This is useful when opening dynamic popups, so that a couple of popups can be opened, each with different values.

Swapping is the practice of opening another window in the same size, location, and state as the current window, and closing the current window. This gives the appearance of one window simply swapping into another, seamlessly. The Navigation Builder uses the swapWindow version of swapping, but most "by hand" script authors will use the swapTo version. This last version relies on the fact that the windows being swapped are both maximized windows. See the navigation strategy section for more information.
You can also pass parameters to the opened or swapped-to window. Check the Pass Parameters box, and click the Add ![]() icon to add a row, where each row is another passed parameter. The names of these parameters must match names of custom properties on the root container of the target window. The values can either be literals or values of other properties from the source window. Use the Binding icon
icon to add a row, where each row is another passed parameter. The names of these parameters must match names of custom properties on the root container of the target window. The values can either be literals or values of other properties from the source window. Use the Binding icon ![]() to navigate to the properties that you want to pass. It will construct the path to the property on the window. To pass parameters in a navigation window, follow the steps below.
to navigate to the properties that you want to pass. It will construct the path to the property on the window. To pass parameters in a navigation window, follow the steps below.
-
Check the Pass Parameters box, and click the Add
 icon to add a row.
 -
Choose a custom property from the "Parameter Name" dropdown list. This will be filled with custom properties on the root container of the selected window. You can also type a name in directly.
-
Highlight the empty cell in the Value column of the parameter table, click the Binding icon
 , select the component property you want to enter the value and press OK.
 -
Press OK to commit the change.
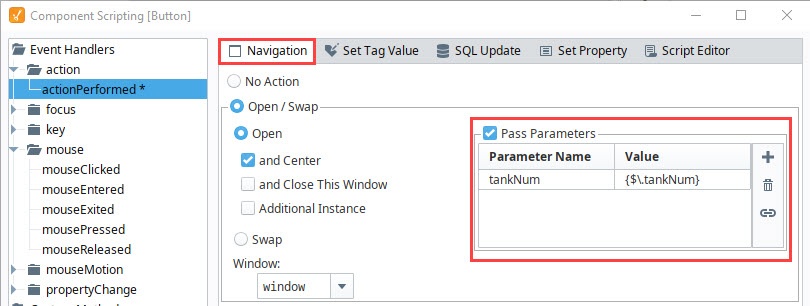
To learn more about passing parameters, refer to the parameterized windows section for more information.
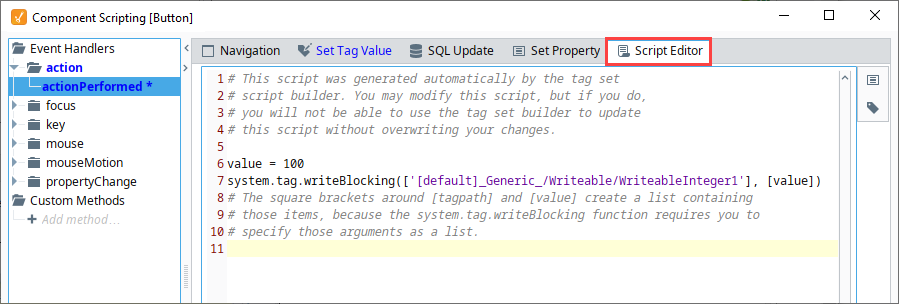
Navigation Builder Script
The following Navigation builder script was generated by the Script Editor. If you compare the settings in the Navigation tab with the documented code in the Script Editor, you'll notice the Tank popup window will be opened and centered in the window, and the value of the "tankNum" parameter passed.

param1 = event.source.parent.tankNum


window = system.nav.openWindow('Popups/Tank', {'tankNum' : param1})
system.nav.centerWindow(window)
Forward / Back
The Forward / Back actions give you a simple way of implementing browser-style forward/back buttons in your client. You must be swapping between windows for this to work, because these functions rely on calls to system.nav.swapTo in order to keep track of what the sequence of recent windows has been.
Closing Windows
The Closing windows action allow for an easy way to have an event handler close the window that it is a part of, or any other window.
Set Tag Value Script Builder
The Set Tag Value Script Builder responds to an event by setting the value of a Tag. You can set the Tag to either a literal value directly typed in, but we recommend using the chain link Tag ![]() icon to have the event handler use the value of another property from the same window.
icon to have the event handler use the value of another property from the same window.
Use the steps below to create a Set Tag Value.
- Under the Set Tag Value tab, click the Set Tag Value radio button.
- Click the Tag
 icon and choose a Tag from the Tag browser list to write to (i.e., WriteableInteger1).
 - In the To this Value field, enter a number (i.e., 100) or click the Property
 icon to to browse for a component property to use as the set-to value.
 - Press OK to commit the change.

Set Tag Value Builder Script
The Set Tag Value script shown below was generated by the Script Editor. Compare the settings in the Set Tag Value tab with the documented code in the Script Editor and you'll see the Tag is set to "WriteableInteger1" and the Tag value is set to "100."
value = 100
system.tag.writeBlocking(['[default]_Generic_/Writeable/WriteableInteger1'], [value])

# The square brackets around [tagpath] and [value] create a list containing
# those items, because the system.tag.writeBlocking function requires you to
# specify those arguments as a list.
SQL Update Script Builder
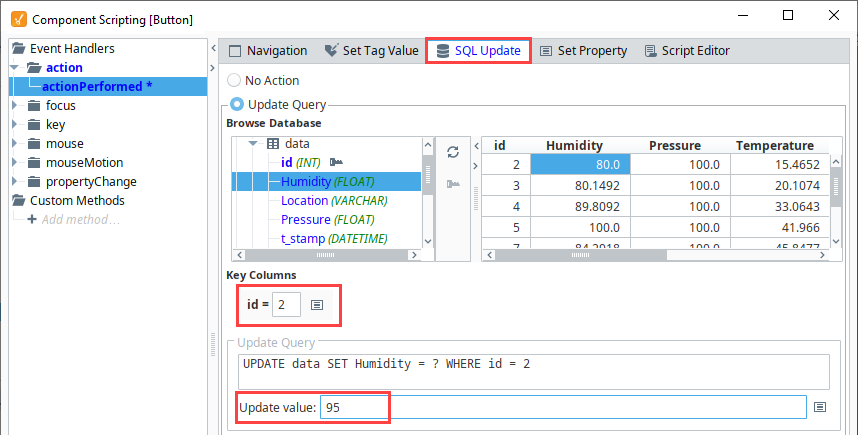
The SQL Update Script Builder helps you build an update query using a database browsing interface. Choose a database and table in your target database, and the update query will be built for you. The key query will help identify a specific row to update, and can be made dynamic using Update Query and Update Value text boxes.
- Under the SQL Update tab, click the Update Query radio button.
- Select a database and choose a table in your database. Select an event value in the table on the right.
- This example has the id as the Key Column, so we entered 'id =2.'
- We selected the Humidity for 'id 2'.
- To change the value in the database, we entered the new value in the Updated Value field to replace the previous value when the action is executed.
- Press OK to commit the change.
SQL Update Builder Script
The following SQL Update script was generated by the Script Editor. If you compare the settings in the SQL Update tab with the documented code in the Script Editor, you'll see your database, table, and column name, including the row id of the searched value. You'll also see the new update value that will replace the existing value when the action is executed.
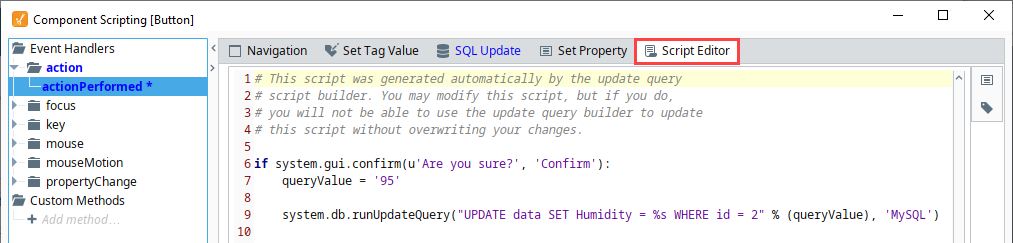
if system.gui.confirm(u'Are you sure?', 'Confirm'):
    queryValue = '95'

    system.db.runUpdateQuery("UPDATE data SET Humidity = %s WHERE id = 2" % (queryValue), 'MySQL')
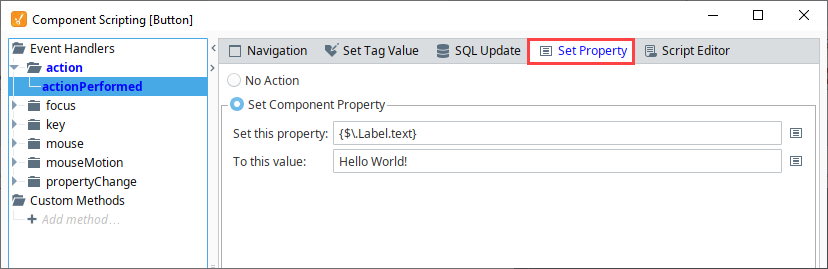
Set Property Script Builder
The Set Property Script Builder will respond to an event by altering a property in the window. You must choose the property to alter and choose the value that you wish to assign to it. The new value can be a literal value or the value of any other property on the window.
- Drag a Label component to your window to set the property to.
- Select the Button component and open the Scripting window, and select actionPerformed.
- In the Set Property tab click the Set Component Property radio button.
- On the Set this property click on the Property icon to browse for the Label component's Text property, and click OK.
- Type something into the To this value: field (i.e., Hello World!), or click the Property icon to browse for a component property to use as the set-to value.
- Press OK to commit the change.
Set Property Build Script
This Set Property script was generated by the Script Editor. Compare the settings in the Set Property tab with the documented code in the Script Editor and you'll see the value string "Hello World!" will be written to the Label component when the action executes.
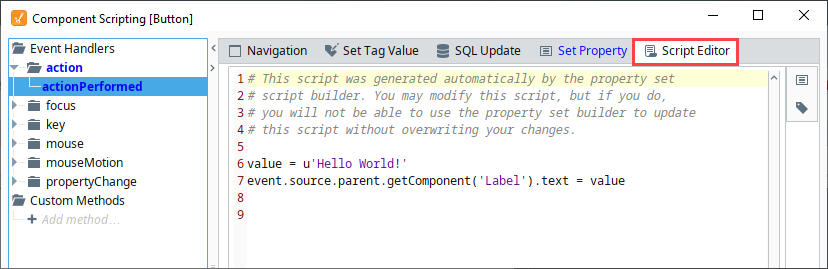
value = u'Hello World!'
event.source.parent.getComponent('Label').text = value
Script Editor
The Script Editor allows you to add more complexity to existing scripts, combine scripts, and even write your own custom scripts. For example, if you need to perform two or more actions at once, (i.e., set a Tag and navigate to another window), you can update the script by combining the two actions in the Script Editor. The Script Editor even gives you the flexibility to create your own code for any action you want to perform on an event handler.
As seen elsewhere on this page, the other builders ultimately generate a script that can be modified from the Script Editor Builder.
Advanced Settings
- Scoping Dropdown - Allows you to specify the scoping of the script. The scoping of event handlers in older versions of Ignition work differently that modern versions. This settings was added as a way to provide backwards compatibility when upgrading. All new scripts should ideally leave the scope set to Standard Scoping, as there is no reason for new scripts to use the Legacy Scoping option.
- Invoke Later - Provides an opportunity to allow the script to run after other events have finished processing. Most scripts will leave this setting disabled, however if can be useful in some scenarios:
- Controlling the focus order in a window, since requesting focus from a component in the middle of an event being processed can cause undesirable results.
- When writing a script on a window's visionWindowOpened event, you may wish to have your script run after processing.
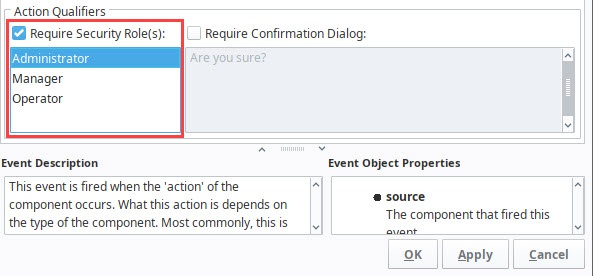
Action Qualifiers
All of the Script Builders allow you to put Security and/or Confirmation qualifiers onto an event handler. These Action Qualifiers are optional.
Security Qualifier
The Security Qualifier lets you restrict the event handler from running if the current user does not have one of the required roles highlighted in the Security qualifier dialog box. The roles listed will be all of the roles within the project's default user source. To set up the required roles for an event handler, select one or use CTRL+click to select multiple roles. Once the roles are selected, they will be highlighted. To deselect roles, use CTRL+click again. The action will only be executed if the Required Roles checkbox is enabled. Click Close.
Confirmation Qualifier
The Confirmation Qualifier prompts the user with a popup dialog box confirming you want to perform the action. The action will only be executed if the Require Confirmation checkbox is enabled. There is a default message, and if you prefer, you can delete it and enter your own message. Click Close.
