Read a Cell from a Table
After data has been populated in a Table or Power Table component, it may be useful to read or extract a particular cell from the Table, especially if users can select rows in the Table. On this page, we'll take a look at how to retrieve information from a particular cell on a Table.
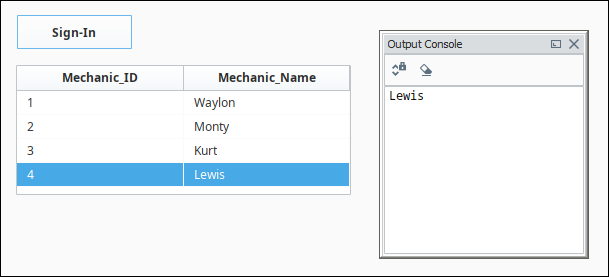
The example on this page utilizes a simple Power Table and Button component. Users select a row from the table to extract one of the cells from the highlighted row in the Power Table and press the Sign-In button.

Power Table Example
This example provides the code that you can use for selecting a single cell and multiple cells in a Table.
Before we get started, it is important to understand that a cell in a Table is actually a cell in a dataset. Data in a Table is stored in a property on the component (the Data property), and the script needs to interact with that property.
Retrieve a single cell requires that we reference the Power Table a couple of times in the same script. Because of this, we can create a variable that references the table, and use the variable later on. Be aware that a Button and Power Table can be in the same container or separate containers. If your Button and Power Table are in separate containers your path may differ.
Selecting a Single Cell
-
Drag a Button and Power Table components to your Designer workspace. Assuming the Power Table has not been renamed, we can reference the Power Table component with the line of code below as shown in the image below.
 Python - Reference the Power Table
# Grab a reference to the Power Table.
table = event.source.parent.getComponent('Power Table') -
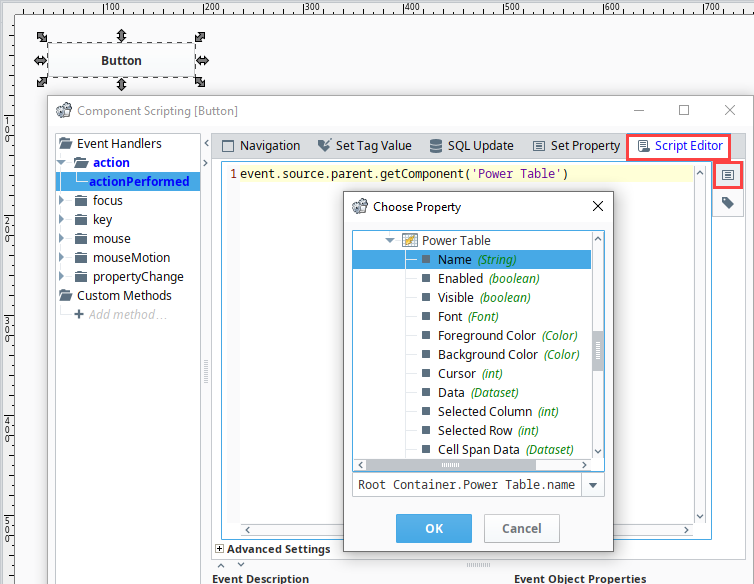
As mentioned above, if the Button and Power Table are in separate containers, the path will be different. Double click the Button component to open the Scripting window, select the action > actionPerformed event handler, and click the Property Reference
 icon to generate the path to a property, but not the component.
 -
Next, select a property from the Power Table in the Choose Property window and click OK.
-
Remove the ".propertyName" portion at the end of the script in the Script Editor, and click OK.
-
Next , we need to figure out which row contains the cell we want to read from. In our example, the user will select the row for us, so we simply need to know which row is selected when the Button is pressed. Fortunately, the Power Table contains a Selected Row property that can be used to determine the row that is selected. Furthermore, we can use the getValueAt() function that is built into datasets.
Python - Reference the Name of the Column# Here the "Mechanic_Name" argument references the name of the column.
table.data.getValue(table.selectedRow, "Mechanic_Name") -
Alternatively, we can use an integer as the last argument to specify the index of the column our cell is located in.
Python - Reference the Index of the Column# Here the '1' references the index of the column in the Power Table's raw dataset (Data property).
# Remember, indexes are zero-based, so this would retrieve the second column from the left.
mechanicName = table.data.getValueAt(table.selectedRow, 1) -
Lastly, we will need to account for scenarios where the user did not selected a row, otherwise, this will throw an exception. An if-statement can be used here to check for a -1 value on the Power Table's Selected Row property, and an else-clause can be used to notify the user that a row needs to be selected. There is a property on the Power Table named Selection Mode that allows users to select multiple rows. By default it is set to only allow a single row to be selected. Change it to test your button.
Here is all the code that you'll need to read a single cell from a Power Table in the same container.
Python - Putting it all Together# Grab a reference to the table.
table = event.source.parent.getComponent('Power Table')
# Make sure the user selected something before doing the rest of the work.
if table.selectedRow != -1:
mechanicName = table.data.getValueAt(table.selectedRow, "Mechanic_Name")
# Do something with the mechanicName variable.
print mechanicName
else:
print "Please Select a Row!"
-
To test your script, follow the steps in the Test Your Script section.
Selecting Multiple Cells - Same Column
By default, the Power Table allows for multiple rows to be selected. However, the Selected Row property only shows the row index for the first row selected. Fortunately, the Power Table also has a built-in getSelectedRows() function that can be used to return all of the indices. We simply need to iterate over each index.
We can still use the Power Table's Selected Row property to test if any rows are selected, but we could instead check the length of the object returned by getSelectedRows():
Here is all the code you'll need to read multiple cells from a Table in the same container. Copy the code in the code block below and replace the code in previous example to allow for multiple rows to be selected.
# Grab a reference to the table.
table = event.source.parent.getComponent('Power Table')

selectedIndices = table.getSelectedRows()

# If the length of selectedIndices is greater than 0, then at least one row is selected.
if len(selectedIndices) > 0:

    for index in selectedIndices:

        mechanicName = table.data.getValueAt(index, "Mechanic_Name")

        # We can do something with the value as we iterate, or append to a list and
        # do something with the entire list after the for-loop completes.
        print mechanicName

else:
    print "Please Select a Row!"
Test Your Script
Now you're ready to test your script whether you are selecting one row or multiple rows.
-
Open the Output Console and select Tools > Console in the menubar.
-
In Preview Mode, select a row in the Power Table, and click the Sign-In button. You will see the selected Mechanic_Name displayed in the console.
-
To test selecting multiple rows, shift click a couple of rows and press the Sign-In button, and you'll see the selected Mechanic_Names displayed in the console.