How to Filter by Associated Data on the Vision Alarm Status Table
Filtering on Associated Data
Another way to filter alarms in the Alarm Status Table is using associated data that was added to an alarm. You can easily and quickly search, filter, and display on specific alarms based on associated data configured in an alarm.
Using a Script to Filter on Associated Data
It's a common design practice to associate alarm groupings on associated data of an alarm. Scripting gives you the ability to filter on associated data, but also gives you the freedom to filter on anything that you want. In the following example, we used a script to filter on associated data, but first we need to add associated data and set up an alarm group.
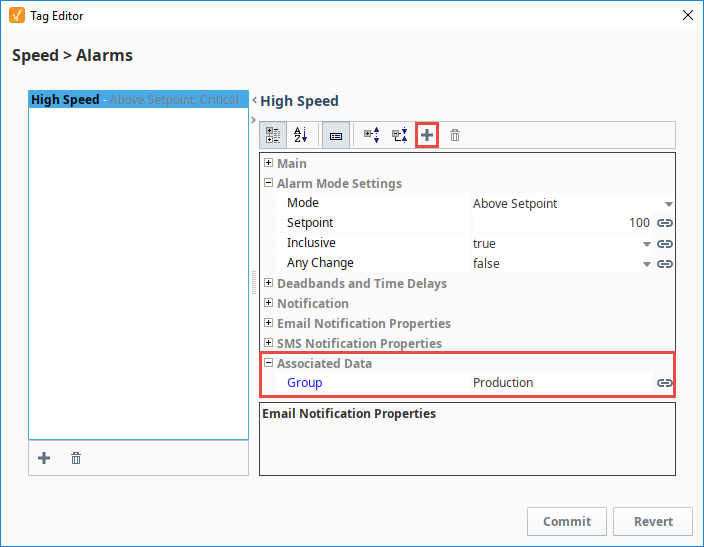
Here we have a Memory Tag called 'Speed' with a configured alarm called 'High Speed.' To add associated data, click the Add ![]() icon at the top of the Tag Editor, scroll down the list of alarm properties to Associated Data, rename 'New Data' to 'Group' and add a static value called ‘Production.’ Click Commit and save your Tag.
icon at the top of the Tag Editor, scroll down the list of alarm properties to Associated Data, rename 'New Data' to 'Group' and add a static value called ‘Production.’ Click Commit and save your Tag.
Next, create a script to filter for all alarms in the Alarm Status Table that have the associated data called ‘Production.’ Scripting allows you to use the 'filterAlarm' extension function specifically for filtering on associated data.
-
Right click on your Alarm Status Table component, and scroll down and select Scripting.
-
In the Component Scripting window, under Extension Functions, select 'filterAlarm.'
-
Click the Enabled checkbox.
-
Enter the code below into the 'filterAlarm' script. You can filter on anything you want here, but in this example, we are going to filter on 'Production.'
Extension Function - filterAlarm for 'Production'group = alarmEvent.get("Group")
if group == "Production":
return True
return FalseYour script will look like the image below. This script will only display alarms matching the associated data for 'Production.' For every alarm matching ‘Production,’ it will return ‘True’ and show alarm results in the Alarm Status Table. If the associated data does not match ‘Production,’ it will return ‘False,’ and the Alarm Status Table will be empty. Note, when you're finished filtering on associated data, don't forget to disable your script.

-
Click OK.
-
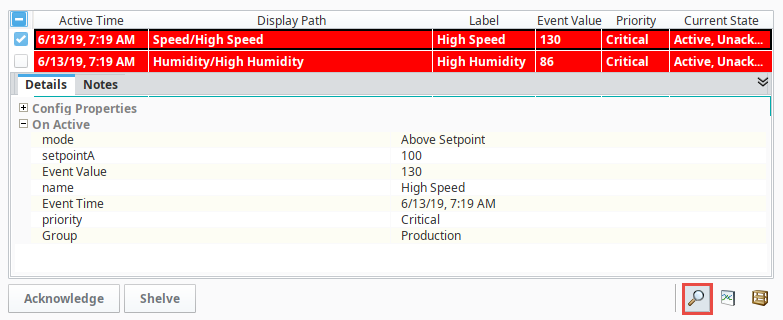
Now the Alarm Status Table below shows all the alarms in the 'Production' group. Select an alarm and click the Search
 icon to see all the Details about the alarm.
- If you see alarms that do not match your associated data, check your filter settings in the Property Editor of the Alarm Status Table. You may need to uncheck the 'Show Clear and Unacked' and 'Show Clear and Acked' settings depending on what you want your operators to see.
- If you have an error in this filtering script, it will return 'true' for every alarm instance (and show all alarms) instead of displaying many errors to your users. You can find more information about the error from the Output Console under the Tools Menu in the Designer, and from the Vision Client under Help > Diagnostics and selecting the Console tab.