Simple Database Editor
Building a Database Table Editor
Building a Simple Database Table Editor in Ignition is actually quite easy. Using a few simple components and some scripting, we can easily make a window that will allow users to add, edit, and delete the data from a particular database table. Before we get started, there is a table that has already been created in a database that is used for this example. You can either create this table and follow along, or alter the example to fit your table.
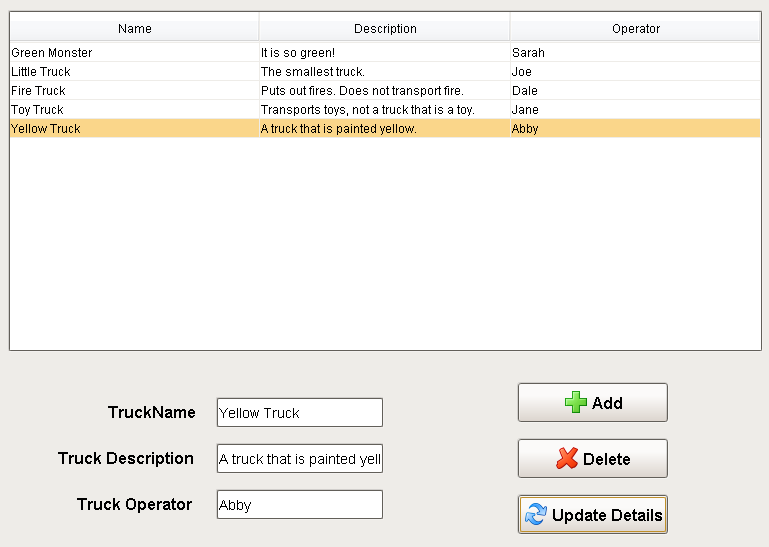
The table is called trucks, and it has four columns.
| id | Name | Description | Operator |
|---|
- The id column is our primary key, it is non null, and it auto increments.
- All other columns are varchar(45)
That is it. There is no need to add any data, as we can add data when testing our tool.

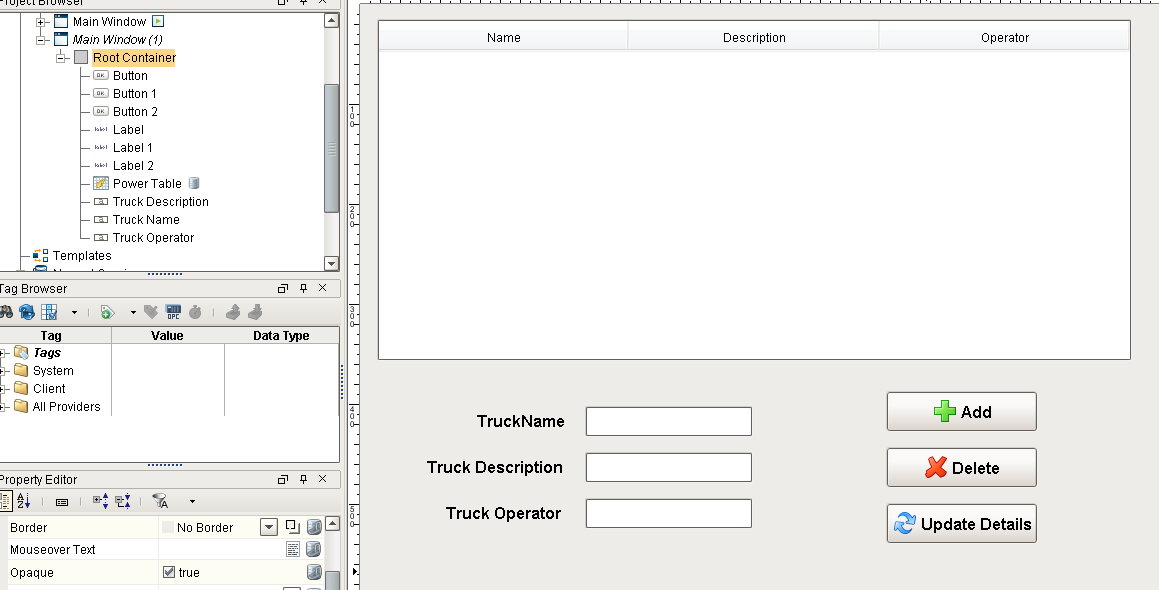
Adding the Components
This example consists of a Table component that will display the data, Button components to add and delete rows from the database table, Text Fields where we can enter in new values, and an Update Details Button that will push those values to the database table.
Let's start off by going to the Designer and adding the necessary components to the window.
-
Add a Power Table component to the window.
-
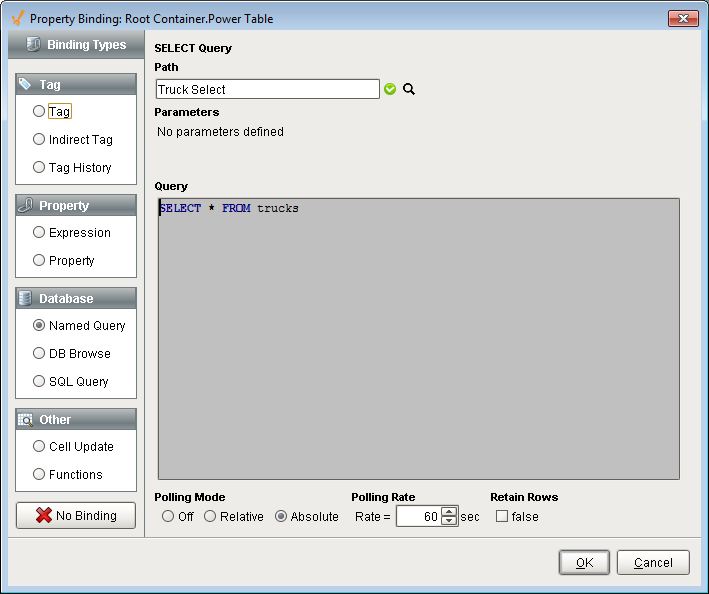
We want to query the table in the database that we made earlier, so let's add a SQL Query Binding on the Data property of the Table.
-
Add the following code under the SELECT Query area.
SQL - Selects all TrucksSELECT * FROM trucks -
Set the Polling Mode to Absolute and the Polling Rate to 60 seconds, so that it periodically updates if left open.
-
Since we want to use the secure Named Query system, click the convert to Named Query button under the polling mode, and call the query "Truck Select"
-
With the Table still selected, open the Table Customizer by right clicking on the Power Table and going to Customizers > Table Customizer.
-
Set the Hide property of the id column to true. We don't need to show that column to our users. Click OK to close the Table Customizer.
-
In the Property Editor, make sure the Selection Mode property of the Power Table is set to Multiple Interval.
-
-
Add three Button components to the right of the Table.
- Change the Text property on one Button to say "Add."
- Change the Text property of the second Button to say "Delete".
- Change the Text property of the final Button to say "Update Details"
- Optionally, you can also add an image to the Image Path of each button such as a green plus and a red X, and resize them as necessary.
-
Add three Label components and three Text Field components under the Table.
- Pair up a Label with each Text Field.
- Rename the Text Fields: Truck Name, Truck Description, Truck Operator.
- Change the Text property of each Label to match the name of their corresponding Text Fields.
Now we have our window configured with all of the components we need. Next we can start adding scripts that will alter the components.
Add a Truck
First, we can add a script to our Add button that will allow us to add a row to the Table. We can use the Text Fields that we added so the user can enter in values to insert into the table.
-
Create a new Named Query which we will use to insert new data. Set up security to fit your needs and name it appropriately. For more information on creating Named Queries, see Using Named Queries - Example.
-
Set the Query Type to Update Query.
-
Create three Value type Parameters.
- The first will be a string data type and will be used for the name of the truck so it can be called "truckName".
- The second will be a string data type and will be used for the description of the truck so it can be called "truckDescription".
- The third will also be a string data type and will be used for the operators name so it can be called "operName".
-
Create the insert query.
SQL - Adding a TruckINSERT INTO trucks(Name, Description, Operator) VALUES(:truckName , :truckDescription , :operName)
-
-
Back on our window with components, right click on the Add Button and select Scripting. Select the actionPerformed Event Handler and navigate to the Script Editor tab.
-
Here we can add some code that will pull the values from the three Text Field components and then use those values in the Named Query we made in step 1.
Python - Adds a New Blank Row and Refreshes the Table# Grab the values from the Text Fields.
name = event.source.parent.getComponent('Truck Name').text
description = event.source.parent.getComponent('Truck Description').text
operator = event.source.parent.getComponent('Truck Operator').text
# Use those values in the Add Truck Named Query.
system.db.runNamedQuery("Add Truck", {"truckName":name, "truckDescription":description, "operName":operator})
# Refresh the table to immediately bring in the new row.
system.db.refresh(event.source.parent.getComponent("Power Table"), "data")
-
-
Now we can test out our script and query by putting the Designer into Preview Mode, adding some data to the Text Fields, and clicking the Add Button. You should see a row populate the table. Try adding a few rows to fill our table with data. Make sure you have the designer Communication Mode set to Read/Write to test. Go back to Design Mode before moving on.

Delete a Truck
Now that we can add rows, let's add a script to our Delete button that will delete rows. Since our users can select multiple rows, our script needs to take that into account, and delete all of the rows that the user selected. It will also have a Message Box popup if there are no rows selected, informing the user that they need to select at least one row. We also want to add a confirmation before the rows actually get deleted.
-
Create a new Named Query which we will use to insert new data. Set up security to fit your needs and name it appropriately. For more information on creating Named Queries, see Using Named Queries - Example.
-
Set the Query Type to Update Query.
-
Create one Value type Parameters.
- It will be a Int4 data type and will be used for the id of row so it can be called "id".
-
Create the delete query.
SQL - Deleting a TruckDELETE FROM trucks WHERE id = :id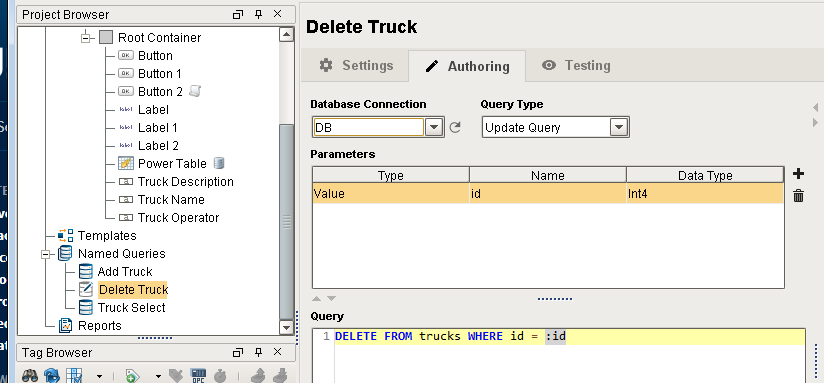
-
-
Back on our window with components, right click on the Delete Button and select Scripting. Navigate to the Script Editor tab on the actionPerformed Event Handler.
-
Here we can add some code that will delete the user's selected rows. First we grab the Power Table's selected rows, and check to make sure rows are actually selected. If there are selected rows, then we have a popup that confirms the user wants to delete rows, and it shows the number of rows that will be deleted. Once the user confirms, the script will then loop through the selected rows and delete each one.
Python - Deletes the Row or Rows# Get the selected row or rows.
selRows = event.source.parent.getComponent('Power Table').getSelectedRows()
# Check to see that a row is actually selected.
if len(selRows) > 0:
# If a row is selected, ask for confirmation before deleting the rows.
if system.gui.confirm("Are you sure you want to delete " + str(len(selRows)) + " row(s)?", "Are You Sure?", 0):
# If the user gave confirmation, we need to loop through all of them.
for row in selRows:
# For each selected row, we need to get the value of the id column in that row.
id = event.source.parent.getComponent('Power Table').data.getValueAt(row, "id")
# Use the id of the row to delete it from the database table.
system.db.runNamedQuery("Delete Truck", {"id":id})
# Refresh the table after deleting all selected rows
# to immediately remove the selected rows from the Power Table.
system.db.refresh(event.source.parent.getComponent('Power Table'), "data")
# If the user said no to the delete.
else:
system.gui.messageBox("User canceled the delete.", "Delete Canceled")
# If no row is selected, have a popup message that asks the user to select a row.
else:
system.gui.messageBox("Please select at least one row.", "Select A Row")
-
-
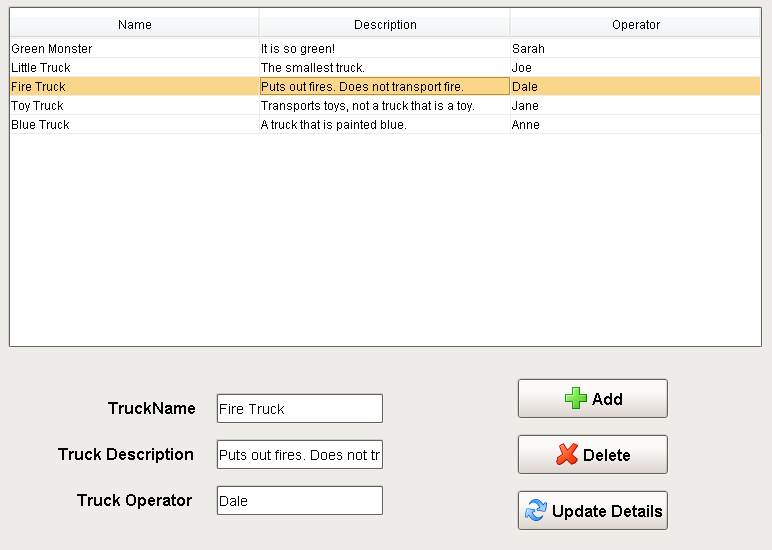
Now we can test our Delete button by putting the Designer into Preview Mode and clicking the Delete button. When one or more rows are selected and the Delete button is pressed, a popup will confirm we want to delete the rows before deleting them. (You can select multiple rows with Shift-Click or Control-Click). When no rows are selected and the Delete button is pressed, a Message Box will pop up, informing the user to select a row first. You can deselect rows in the Table by clicking on the Table and pressing the Escape key. Be sure to go back to Design Mode before moving on.
Confirming Row Selection to Delete Row Deletion Results 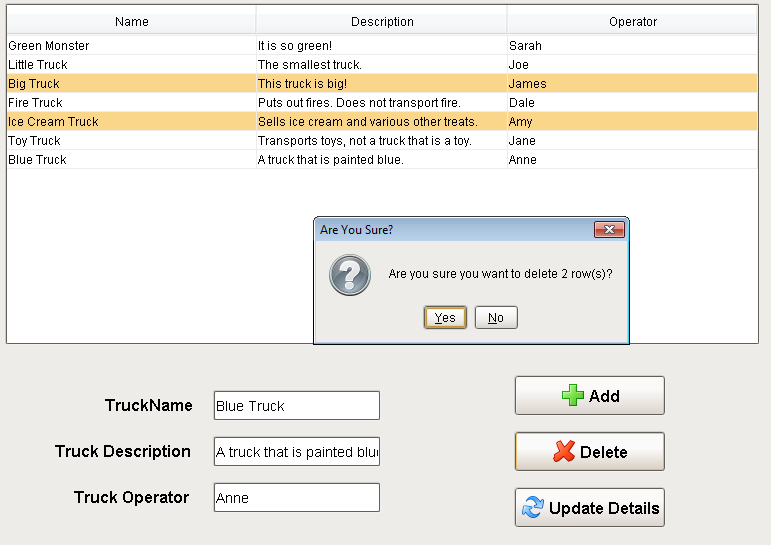

Populate Text Fields
Now that we can add and delete rows from our Table, we need a way to edit the data contained in them. However, before we can create a script on our Update Details button, we first need to populate the Text Fields with the current values of the selected row. We can do this by adding a simple expression to each of the text fields.
-
On the Truck Name Text Field, add an expression binding to the Text property.
-
The expression will grab the dataset and will grab the value at the selected row of the Name column. The expression is wrapped in a try so that if no rows are selected, it will return an empty string.
Expression - Grabbing the Selected Row's Name Valuetry({Root Container.Power Table.data}[{Root Container.Power Table.selectedRow}, "Name"], "")
-
-
On the Truck Description Text Field, add an expression binding to the Text property.
-
The expression will grab the dataset and will grab the value at the selected row of the Description column. The expression is wrapped in a try so that if no rows are selected, it will return an empty string.
Expression - Grabbing the Selected Row's Description Valuetry({Root Container.Power Table.data}[{Root Container.Power Table.selectedRow}, "Description"], "")
-
-
On the Truck Operator Text Field, add an expression binding to the Text property.
-
The expression will grab the dataset and will grab the value at the selected row of the Operator column. The expression is wrapped in a try so that if no rows are selected, it will return an empty string.
Expression - Grabbing the Selected Row's Operator Valuetry({Root Container.Power Table.data}[{Root Container.Power Table.selectedRow}, "Operator"], "")
-
-
Click on a row to see the fields below populate. Press the ESC key to empty the selection.
Update Data
The last part of setting up this window is to add a script to the Update Details button that will pull the data from the Text Fields and insert it into the selected row of the database Table. Additionally, the script will check to ensure that a row selected, and that only one row is selected. We wouldn't want to confuse users who may have accidentally selected multiple rows at a time, since our button will only update a single row.
-
Create a new Named Query which we will use to update a row of data. Set up security to fit your needs and name it appropriately. For more information on creating Named Queries, see Using Named Queries - Example.
-
Set the Query Type to Update Query.
-
Create four Value type Parameters.
- The first will be a string data type and will be used for the truck name of row so it can be called "truckName".
- The second will be a string data type and will be used for the truck description of row so it can be called "truckDescription".
- The third will be a string data type and will be used for the operator name of row so it can be called "operName".
- The fourth will be a Int4 data type and will be used for the id of row so it can be called "id".
-
Create the update query.
SQL - Deleting a TruckUPDATE trucks SET Name = :truckName , Description = :truckDescription , Operator = :operName WHERE id = :id
-
-
Back on our window with components, right click on the Update Button and select Scripting. Navigate to the Script Editor tab on the actionPerformed Event Handler.
-
Here we can add some code that will update the users selected row with data pulled from the Text Fields. First we check to ensure that only one row is selected. Next the script asks them to confirm that the user wants to update the selected row. If the user confirms, the script then pulls in the values of all three Text Fields and uses those values along with the selected rows id to update the database table with new data. It will then refresh the table after updating so that the new data can be brought into the table.
Python - Deletes the Row or Rows# Check to make sure only one row is selected.
if len(event.source.parent.getComponent('Power Table').getSelectedRows()) == 1:
# If a row is selected, ask for confirmation before updating the row.
if system.gui.confirm("Are you sure you want to update the selected row?", "Are You Sure?", 0):
# Grab the values from the text fields.
name = event.source.parent.getComponent('Truck Name').text
description = event.source.parent.getComponent('Truck Description').text
operator = event.source.parent.getComponent('Truck Operator').text
# Grab the selected row.
selRow = event.source.parent.getComponent('Power Table').selectedRow
# Using the selected row, we need to get the value of the id column in that row.
id = event.source.parent.getComponent('Power Table').data.getValueAt(selRow, "id")
# Run a query that will update the values of the row matching the id.
system.db.runNamedQuery("Update Truck", {"truckName":name, "truckDescription":description, "operName":operator, "id":id})
# Refresh the table to immediately show the updated data.
system.db.refresh(event.source.parent.getComponent('Power Table'), "data")
# If the user said no to the update.
else:
system.gui.messageBox("User canceled the update.", "Update Canceled")
# If there more than one row selected, or no rows selected.
else:
# Have a popup asking the user to select one row.
system.gui.messageBox("Please select one row to edit.", "Select One Row")
-
-
Now that we added this last bit of code, we can test it by selecting a row, adding data to each Text Field, and clicking the Update Details button. You should see the data populate the row of the Table, since the table in the database has been updated. Additionally, you should notice how the Text Fields will automatically update when selecting a new row. Try adding a few rows of valid data to your Table.